by Lisha Vidler
(This article was first published at Your Wardrobe Unlock’d.)
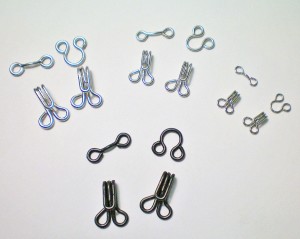
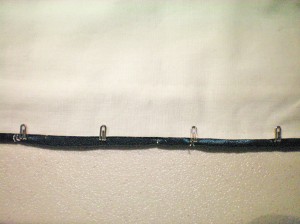
Hooks and eyes are small metal devices that are often used to fasten garments. They are generally made of twisted wire and have two round loops on either side, with which to be sewn down. Hooks and eyes come in a wide range of sizes, from miniscule to immense, depending on their purpose.
They have a number of functions, most frequently in couture sewing. For example, a single hook and eye is often placed at the top of a zipper to hold the neckline or waistband edges together. They are used to fasten collars and sleeve cuffs, custom belts, waist stays, and lingerie guards, or anywhere that a larger fastener would be inconvenient. Doll clothes sometimes use hooks and eyes, and they are a popular choice for historic costumers, since they’ve been in existence for centuries.
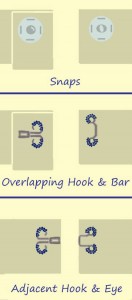
Hooks and eyes have the advantage over snaps, in that they can be used not only with overlapping edges, but also with abutting fabric edges. Snaps can only be used with edges that overlap. A snap is more likely to pop open under pressure, however hooks to tend to unfasten easier when jostled in different directions.
Choosing Hooks & Eyes
Once you’ve determined that a hook and eye is the best choice for your project, select the smallest size that will work. They are sold in white, black, or nickel, so pick the least conspicuous color for your fabric. Keep in mind that frequent or strenuous use might chip the enamel on white or black hooks, revealing the nickel underneath.
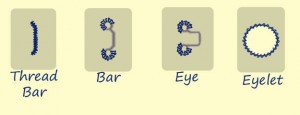
Hooks attach to either a rounded metal eye or a flat bar. You can create your own thread bar or eyelet, as well. A metal eye or bar is much sturdier, but a thread bar has the advantage of blending in with your fabric. With an eyelet, the hook will lay flat against the garment. However, it isn’t always appropriate to put a hole in your garment.
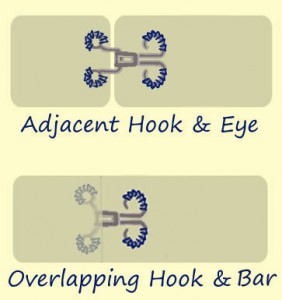
Should you use bars or eyes to fasten your hooks? It depends on whether your fabric edges will abut or overlap. Often, eyes will show when used on overlapping closures. Therefore, they’re best used with abutting edges, where they’ll be hidden. Bars work best for edges that overlap, because they won’t show.
Where do you place your hooks? Generally, hooks are sewn about 1/8″ from the edge of your garment, on the underside of the fabric. If you’re not overlapping the edges, eyes will likewise go on the underside, about 1/8″ from the edge—far enough that neither hook nor eye will show when the closure is pulled taut. If you are overlapping the edges, you’ll place your bars on the outer side of the fabric. Their position is not crucial and they can be moved, if necessary, for a good fit.
Attaching Hooks & Eyes
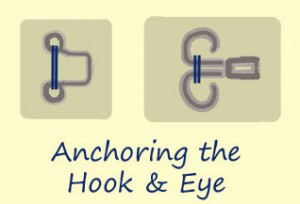
Mark your garment with a chalk pencil or fabric pen to ensure accurate placement. (It’s a good idea to test your fabric first, to be sure the marks will come off.) Select a hand needle that’s sturdy enough to pass through all the layers of fabric, but small enough to easily fit through the hook’s holes. Thread your needle and knot the ends together, then wax the thread to strengthen it. When you begin, either “pop” the knot, so it’s hidden between two layers of fabric, or start on the wrong side of the fabric, so the knot isn’t seen. Take two or three stitches across the metal loops, just to anchor the hook or eye in place.
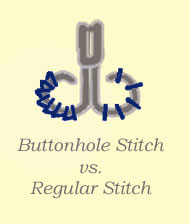
Using small buttonhole stitches, sew the loops to the fabric. Using buttonhole stitches takes slightly longer than simply sewing over the metal loop, but it provides a neat, professional finish.
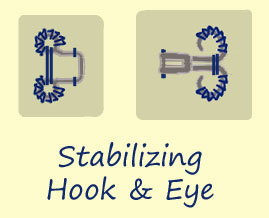
After you’ve sewn the loops of your hook or eye, you’ll need to stabilize it. With hooks, this means stitching down the top part, just beneath the curved part of the hook. With eyes, you must stitch down the sides of the eye, just below the top curve. Bars don’t require stabilization.
Creating Thread Bars
If you prefer things to match, a pretty option is to fashion a bar out of thread. It can be nearly invisible, but be aware that it will not hold up the way a metal bar will. Use it only for hooks that won’t be under strain.
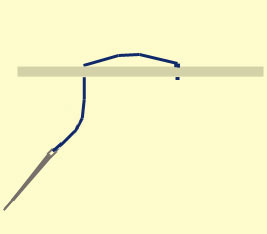
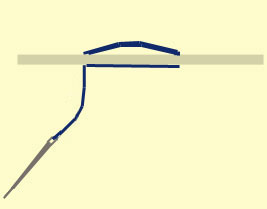
Thread your needle, knot it, and wax the thread. Hide the knot beneath the fabric and take two tiny stabilizing stitches. Determine how wide you need the bar to be, keeping in mind the thickness of the hook. A stitch the exact width of the hook won’t allow the hook to slip beneath it, so make it a little wider. Take a single stitch, being careful to keep the tension loose.
Return your needle to where you began, bringing the thread across underneath and back up to the right side of the fabric. Go across the width of the bar again, adding a second strand of thread to thicken the bar. Repeat, so you have a bar comprised of three layers of thread, both under and on top of the fabric.
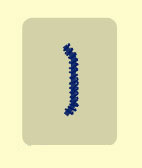
Now you’re going to sew buttonhole stitches across the length of the bar. Slide the needle under the bar, but don’t pull the thread all the way through. Pick up the loop of thread and slip it over the needle, then pull taut. Repeat until your entire bar is covered with buttonhole stitches.
Another option is to simply wrap the thread around the bar, creating a spiral bar. This isn’t as sturdy, but it will be thinner, which is good if you have trouble getting your hook to fasten over the bar.
Creating Eyelets
If you’d like your hook to lie completely flush with your garment, you might fasten it to a handmade eyelet. Consider carefully, however, and always make a test sample first, because an eyelet can’t be undone.
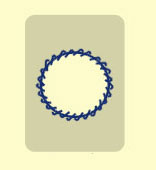
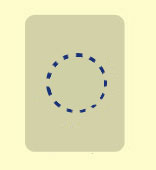
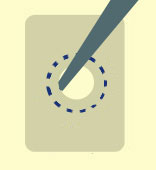
#1. To make an eyelet, first sew a running stitch in a circle. Stitch through all layers of fabric and make it the exact size you want your finished eyelet to be.
#2. Use an awl or tapestry needle to spread the threads of your fabric apart, creating a small hole. Never cut a hole in the fabric, for this can rapidly tear and cause a much bigger hole than intended. Once your hole is established, use a tapered awl, a small crochet hook, or a round chopstick to enlarge it. Twist it through the hole, but go gently, carefully spreading the threads apart without breaking them.
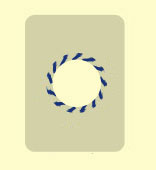
#3. Once your hole is the right size, take several whip-stitches around the edge to keep it from closing.
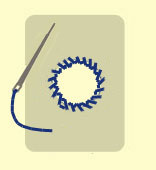
#4. Sew around the edge of the hole with buttonhole stitches. Make them close together, for they will prevent the hook from wearing through the fabric.
#5. Once you’ve gone all the way around, knot your thread. Don’t cut it immediately, but pull the needle between the layers of fabric for some distance, so that the loose end will be hidden.
Using Hooks & Eyes
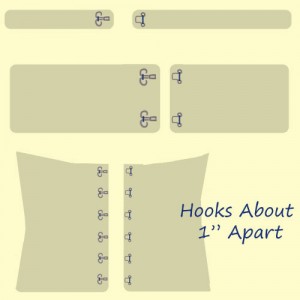
How many hooks and eyes do you need? That depends on how wide an area you need to fasten. A narrow ribbon belt, for example, or the top of a zipper, needs only one. A waistband could use one large hook in the middle or two smaller ones spread apart, depending on which looks better. For the front of a historic bodice, space your hooks about an inch apart.
Remember that hooks aren’t appropriate for all purposes. They hold fast by being pulled in opposite directions. For this reason, they work quite well for waistbands and bodice closures, but they tend to come undone if used for securing things that get jostled around. For example, it isn’t wise to use hooks to attach a dust ruffle to the underside of a trained gown, or to secure the tapes of a bustled skirt, because these tend to move around in different directions and the hooks may come undone.
Securing a Bodice
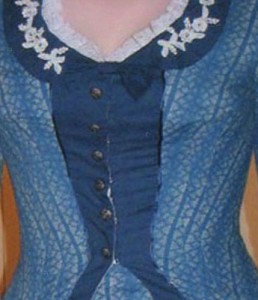
If you’re using hooks to close something like a snug-fitting jacket, a bustier, a Victorian bodice, or a corset, you need to anchor the hooks to prevent gaping. At a minimum, the hooks must be sewn through the lining and interlining. If you only attach them to the lining, they’ll pull away from the outer layers, causing wrinkling and gaping.
There are two solutions. You can sew the hooks and eyes through all layers of fabric (lining, interlining, and fashion fabric) and hide the stitches with buttons or trim. If you don’t want the stitches to show, you can anchor the hooks to the interlining before the bodice is assembled.
For the second option, some planning is required. Make a mockup of your bodice first, to be absolutely certain everything fits. Any fluctuations in size will have to be addressed later by altering the fit at the seams, not by shifting the hooks over.
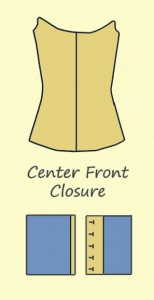
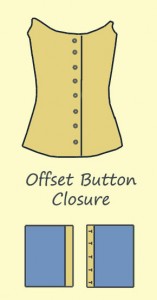
Take the front pieces of the bodice before they’re sewn to the sides and baste the fashion fabric and interlining together. Fold the front edges under. The width of this fold will vary based on whether you want the edge of the closure at the exact center front or if you want it offset to allow room for non-functioning buttons down the front.
For a centered edge, turn under more on the right and less on the left. When it’s time, you’ll place your hooks near the edge on the underside of the right and you’ll place your bars a good distance from the edge on the outer left side.
For an overlapping false button closure, turn under an equal amount on each side. When it’s time, you’ll place your hooks on the underside of the right side, about 1/4″ from the edge. Your bars will go on the left side; shift them toward the edge so they’ll remain hidden beneath the overlap. Remember that your closure must overlap enough that your buttons will fall down the center front line of the bodice.
Steps For Placing Hooks
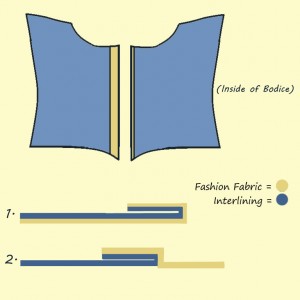
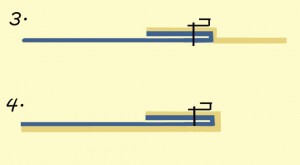
1. Once you’ve determined the width of your front edges, fold them over by that amount. You’ll have a thickness of four layers: two fashion fabric and two interlining. 2. Fold the top fashion layer back out of the way, leaving you with just three layers.
3. Stitch the hooks through both layers of interlining and the inner layer of fashion fabric, keeping them free of the (folded back) outer layer of fashion fabric.
4. Once finished, fold the top layer of fabric back in place, but don’t stitch it.
5. When the hooks are all sewn in place, attach the lining, folding the edge so that it hides all but the outer edges of the hooks and eyes. Slipstitch the lining along the folded edge of your bodice. This is a historic technique that leaves your garment neatly finished.
Conclusion
Hooks and eyes are a great way to fasten your garments. Be sure to choose the right size for the job, space them properly, and sew them on securely.
~~*~~
Have you used hooks and eyes, thread bars, or eyelets in your recent sewing projects? What techniques do you find useful?





Pingback: Musings À La Mode: DIY Oriental Wrap Skirt ~ 2 Ways | Daisy and the Fox
Pingback: Calling all hammy hammock pros - Page 2 - Hamster Central
Pingback: The “Who Likes Short Shorts?” Shorts – Anna-Jo Sews
Pingback: Attempt 9: A Silk Dupioni Gown with Darts and Tulle Pettycoat (=Complete 3) – Maddie's Dolls and Outfits
Pingback: Sewing tips reference sites – Maddie's Dolls and Outfits