
This article was previously published at Your Wardrobe Unlock’d.
Click any illustration to view the full-sized image.
We all keep a variety of presser feet in our sewing baskets. Some probably came with your sewing machine, but you can buy more separately, for different purposes. Do you know what they all do? Having the right presser foot for the task you’re trying to accomplish can make the difference between a beautiful, stress-free garment and one that you wad up with frustration.
Let’s take a look at a few of the most helpful presser feet.
Zigzag Foot
Also known as the all-purpose or standard foot, this is the basic presser foot that you’ll use most of the time. It has a wide eye that allows the needle to zigzag back and forth without hitting the foot, so it will handle any stitch your machine can do. Some are open, with separate runners that stabilize your fabric as you sew. Others are closed, with a transparent “sleigh runner.”
Use the zigzag foot for all of your regular sewing.

Two Types of Zigzag Feet
Tip
- If you’re working with a wide stitch, before beginning, slowly lower the needle using the hand wheel, just to test the stitch. You don’t want to stomp on the foot pedal and start stitching, only to find that the eye of your presser foot isn’t wide enough. If the needle strikes the presser foot at high speed, it could break, possibly sending bits of the shattered needle flying, or it may even puncture the presser foot!
Satin Stitch Foot
Although this foot looks similar to the zigzag foot, it has a wide groove on the underside, which makes it ideal for sewing raised decorative stitches, like the satin stitch. The groove permits the raised stitching to pass beneath the foot without snagging.
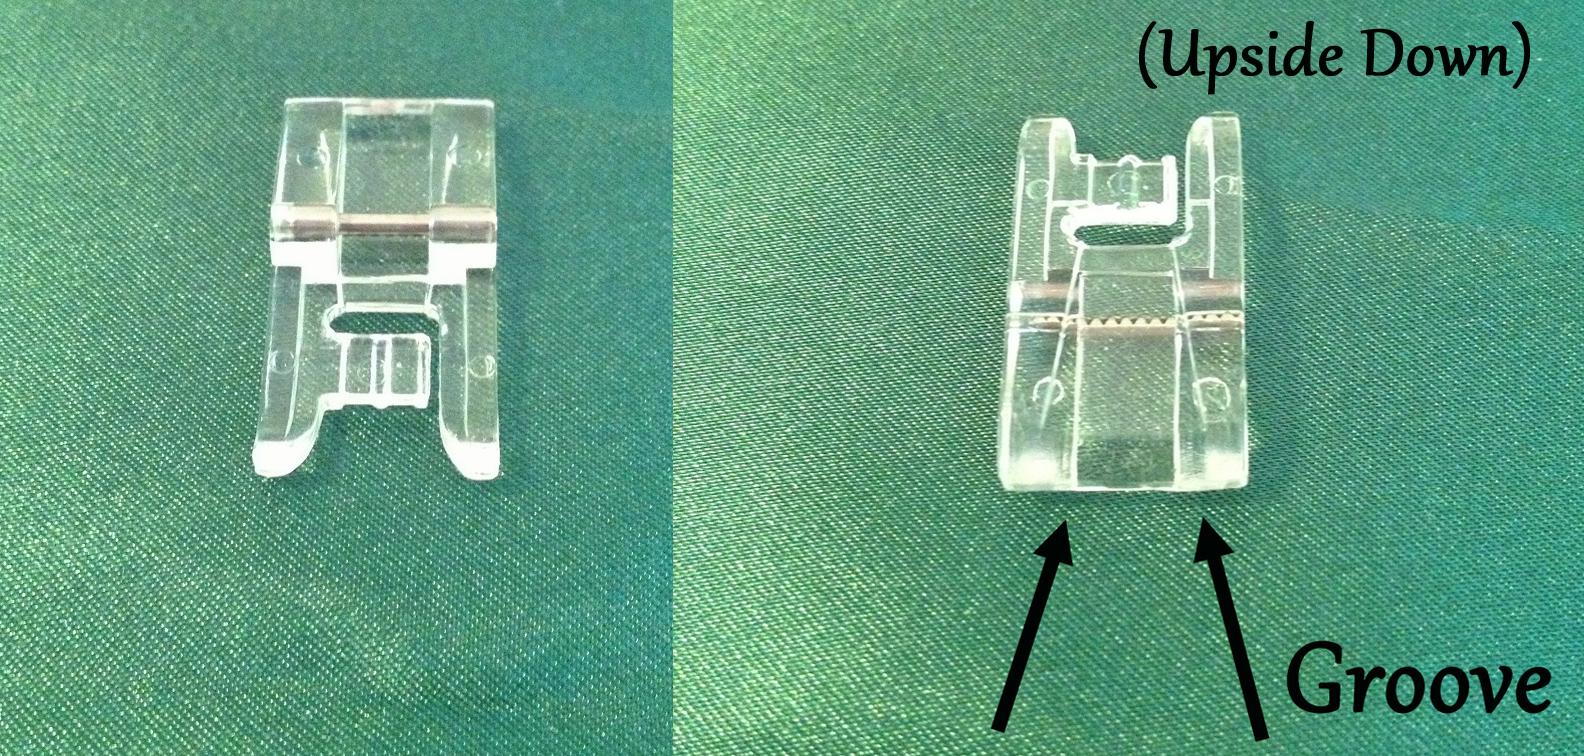
Satin Foot
Use the satin foot when appliqueing or using decorative stitches that are thick or raised.
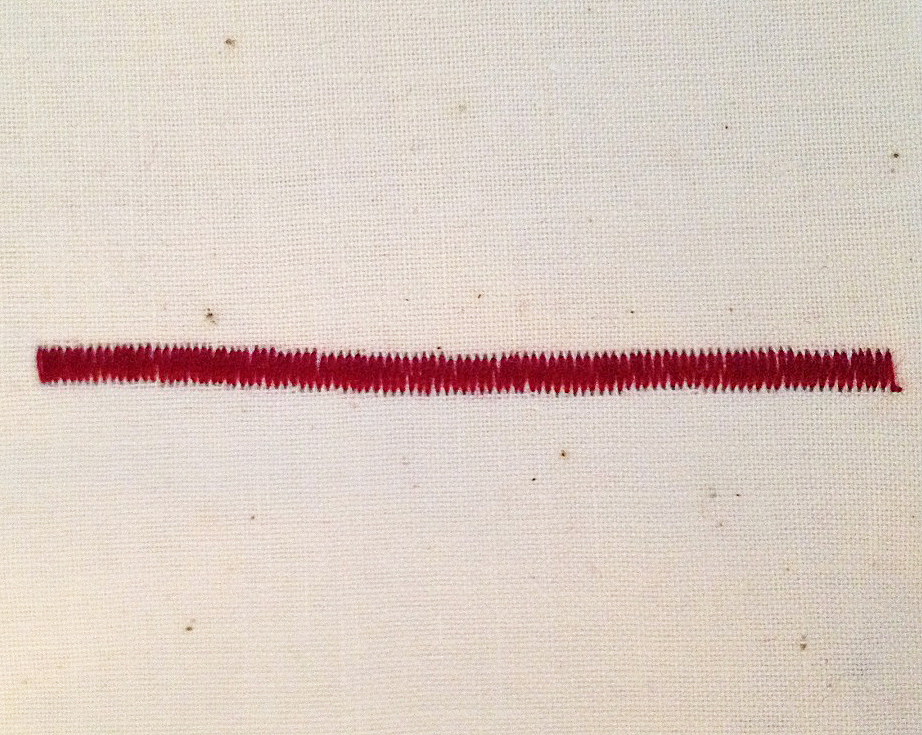
Satin Stitch
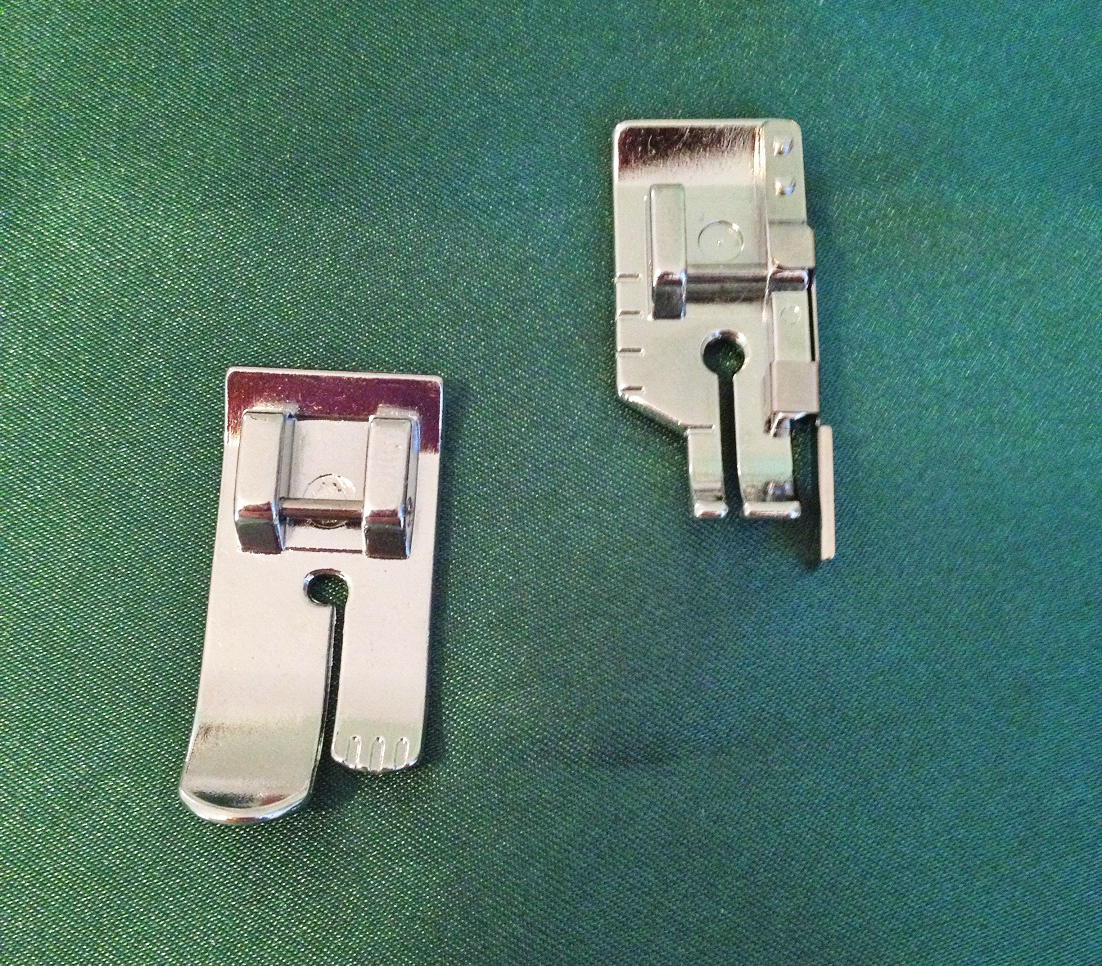
Zipper Foot
The zipper foot is a narrow foot with a single runner that’s notched on either side. These notches allow you to sew very close to the edge of the zipper. Most can be positioned on either the left or right side of the needle, but some are limited to just one position.
In addition to zippers, you can use the zipper foot for sewing piping, welting, and trims, or in any other situation where you need to stitch right up against the edge of something.

Zipper Foot
Tip
- Before stitching with a zipper foot, lower the needle using the hand wheel, just to test the needle’s position. If it’s too close, it may hit the presser foot. At the same time, you don’t want it too far away, since you won’t get the up-close stitching that the foot is intended for.
1/4-Inch Quilter’s Foot
The quilter’s foot is specifically designed for sewing narrow seams, such as quilt piecing or doll clothes. It has a small eye for the needle to pass through, so you cannot use it for zigzagging or specialty stitches—only straight stitching. Having a small eye helps stabilize the fabric, which is vital when you’re using a ¼-inch seam allowance.
Two Types of 1/4-Inch Quilter’s Feet
Some quilter’s feet have an attached guide bar, which keeps the fabric aligned as you sew. This can be quite useful in obtaining a precise seam allowance, but the bar tends to get in the way when you’re sewing curved seams.
Use the quilter’s foot whenever you want a very narrow seam allowance.

5/8″ vs 1/4″ Seam Allowance
Tips
- When using a quilter’s foot with a guide bar, be sure the edge of your fabric is cut straight. If the edge is uneven, your stitching will likewise be uneven.
- The guide bar will not work if the edge of your fabric has been pinked.
- Some quilter’s feet have markings to make pivoting around corners easier, but you’ll want to do a test sample and measure the seam allowance, just to be sure the marking is accurate. If it isn’t, use a marker to draw your own line on the presser foot.
Buttonhole Foot
This strange-looking device is used to create perfect buttonholes. You’ll need to check your sewing machine’s manual to learn how to sew buttonholes on your machine, but it usually isn’t difficult. There’s an adjustable slot at the back of the presser foot, into which you place the button you’ll be using for your garment. This allows the foot to sew a buttonhole that’s exactly the right size.
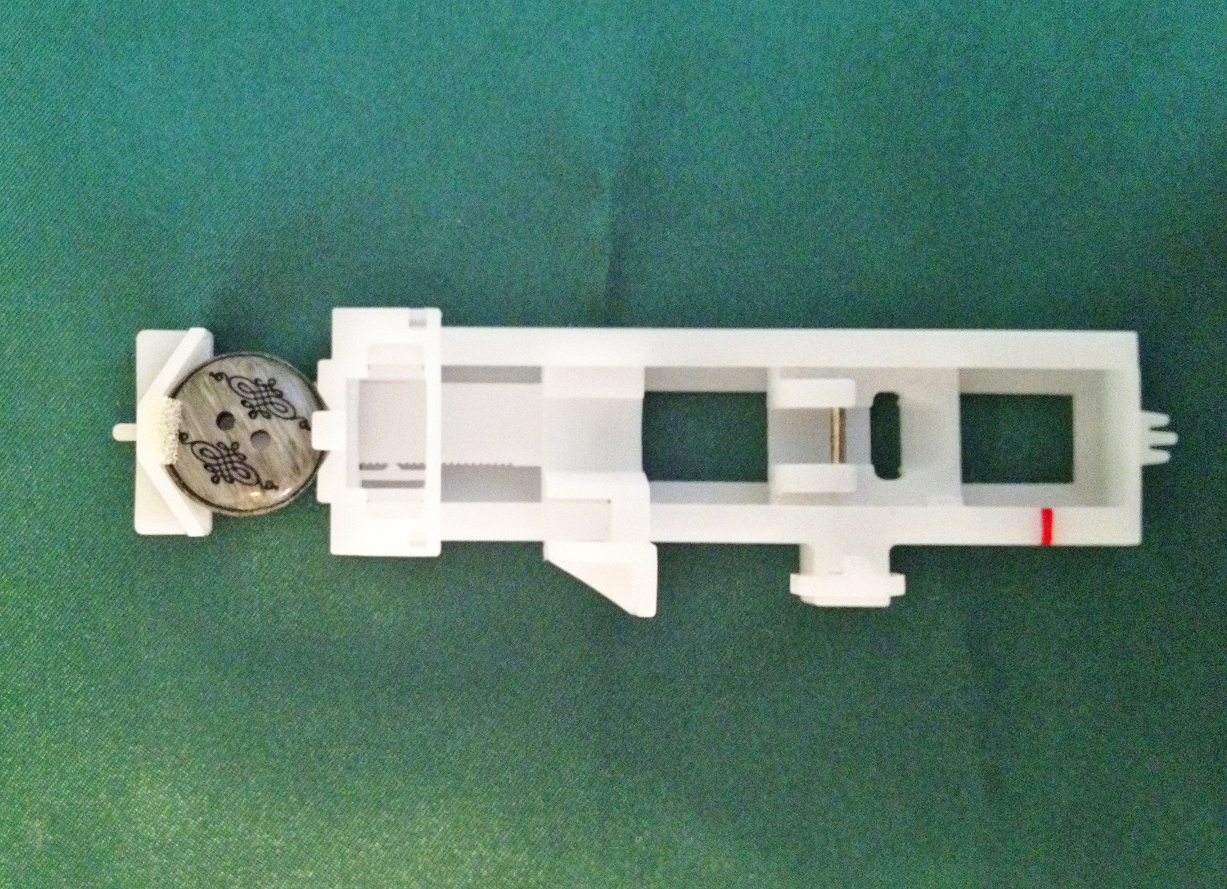
Buttonhole Foot w/Button
Tips
- Make sure to do a couple of test buttonholes, so you know which settings to use.
- Use thread that matches your fabric, so the gaps in the zigzagging of the buttonhole won’t be as noticeable.
- If you don’t care for the open weave of the zigzag stitch used, try sewing a second buttonhole directly over the first. To do this, don’t move the fabric when your machine is done sewing the first buttonhole. It will stop at the precise place it began, so leave the needle where it is and start a new buttonhole directly over the first.
- Don’t cut a buttonhole open until after you’ve sewn it. Use a buttonhole chisel or a seam ripper. With the latter, start at either end and cut toward the middle. That way, you won’t accidentally slice through the bar tacks at the end of the buttonhole.
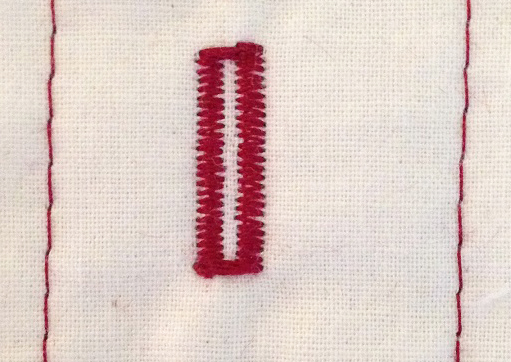
Buttonhole Made With Buttonhole Foot
Overlock Foot
While it might not look like much, the overlock foot is pure genius. Have you ever tried using an overlock stitch without the benefit of an overlock foot? No matter how close to the edge of the fabric you sew, there’s always a strip of fabric that needs to be trimmed away. And even after you’ve done this, it looks raggedy.
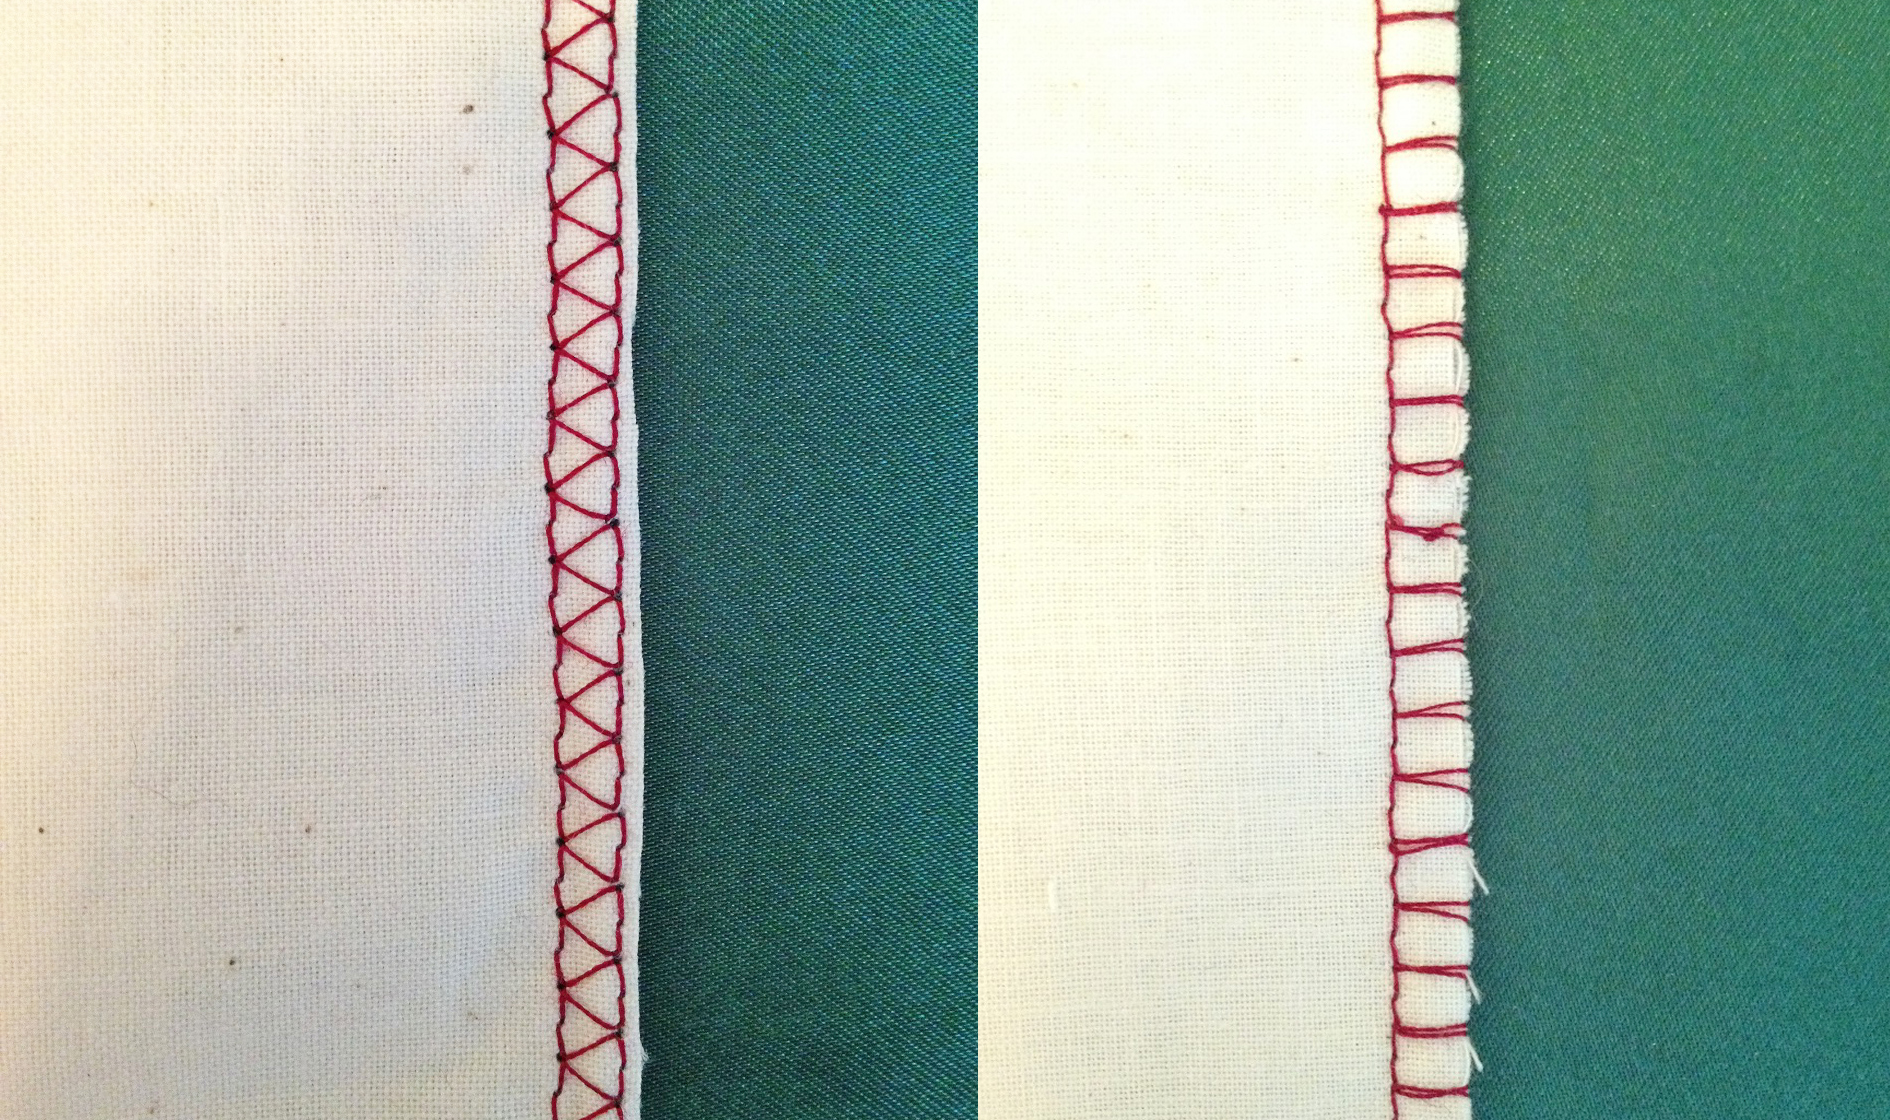
Overlocking Without the Overlock Foot (left) vs With the Overlock Foot (right)
The foot has two features that give you a perfect finish every time. First, there’s a guide bar that keeps the fabric aligned. This ensures that the stitches wrap over the edge of the fabric, binding it as intended. Second, there’s a bar down the middle of the presser foot, which the thread wraps over as you stitch. This regulates the thread’s tension, keeping it steady, so the fabric doesn’t curl or tunnel as you sew.
Use the overlocking foot whenever you want to bind an edge with an overlock stitch.

Overlock Foot
Tips
- Don’t try to overlock an edge that’s been pinked. The jagged edge won’t align with the guide bar.
- When you’re done stitching, don’t pull the fabric to the side to cut the thread, as you would normally do. The thread is wrapped over the center tension bar, which means you have to pull the fabric away from you, toward the back of the sewing machine, to release it. If you don’t do this, the last few stitches may distort or break.
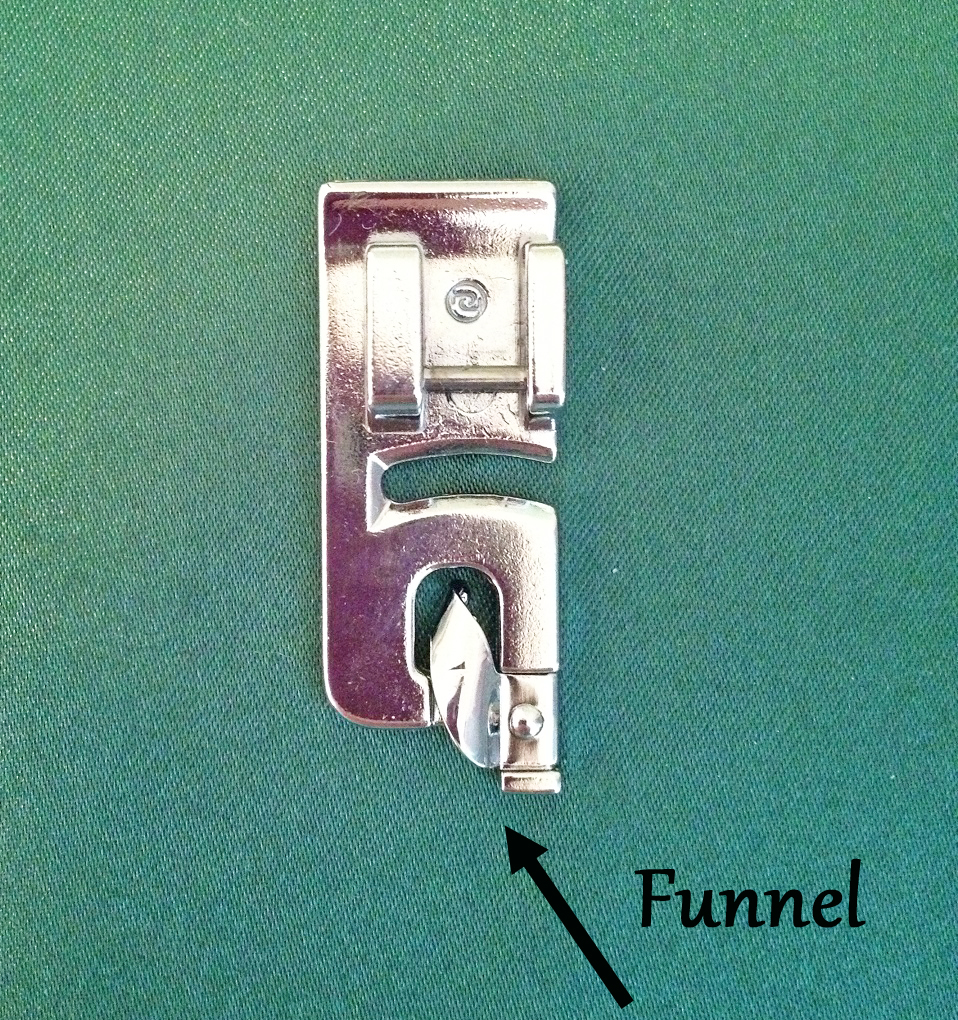
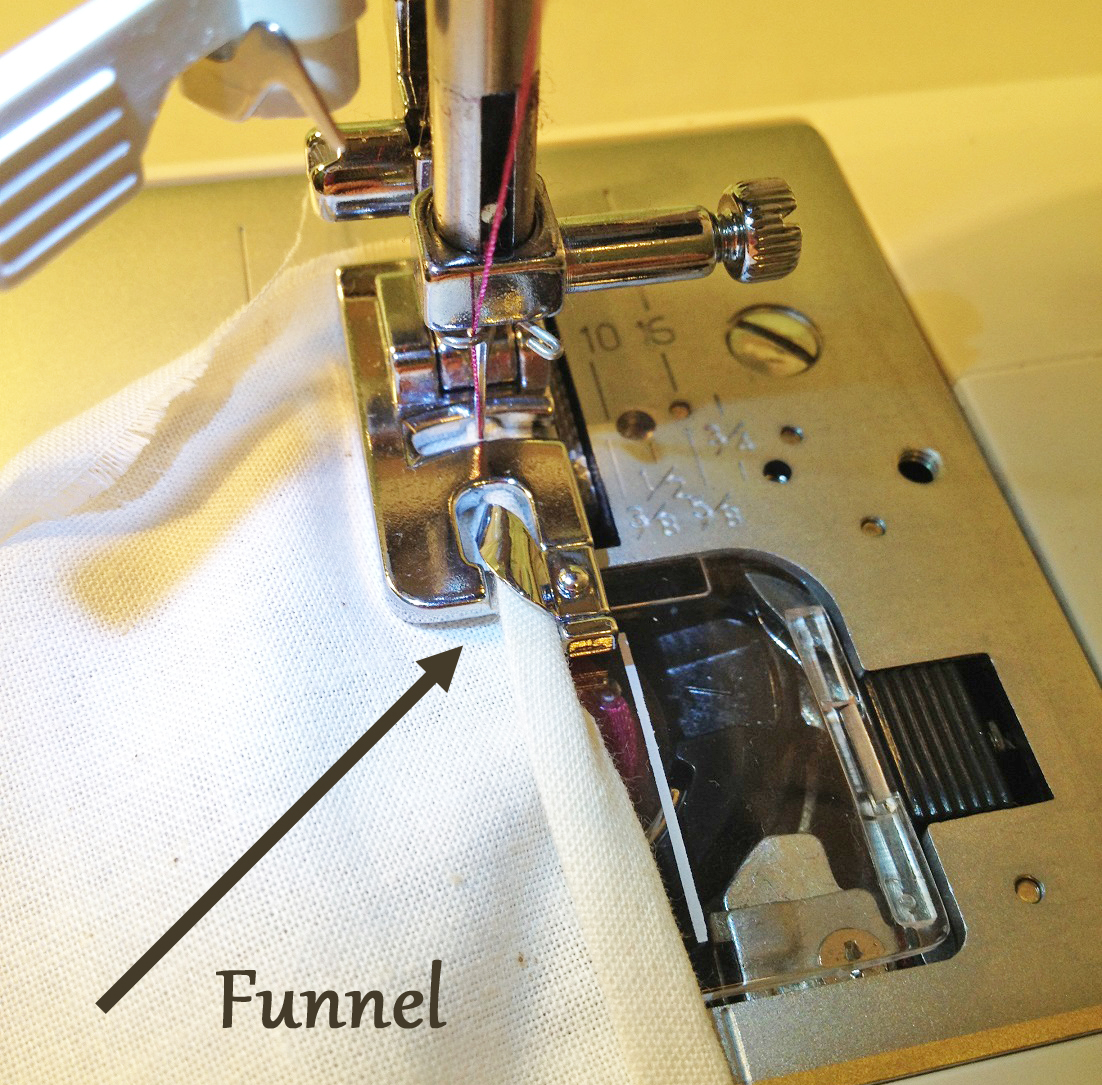
Rolled Hem Foot
This is a tricky foot to learn to use, but it’s well worth the effort. It has a sort of funnel at the front, which you feed the fabric into. The funnel rolls the fabric under as you sew, producing a tightly rolled narrow hem. It works well with lightweight fabrics, such as chiffon, organza, or voile. If you are using a heavier fabric, do a test sample first, as you may need to use a larger version of the foot.
Rolled Hem Foot
To use the rolled hem foot, begin by pressing the first inch of your hem under twice by 1/8″. Sew two or three stitches, then stop with the needle down and raise the presser foot. Work the folded edge of the fabric into the funnel until it catches. Lower your presser foot and resume stitching. Go slowly, lifting the fabric’s edge slightly, guiding it into the funnel as you sew.
Sewing a Rolled Hem
Tips
- The rolled hem foot is not designed for sewing curved edges. Only use it with straight hems.
- This foot works best when sewing a flat hem. If you’re sewing a skirt, for example, sew the hem before sewing the side seams. Trying to sew “in the round” will result in a small section where the seam is flat, instead of rolled, and you may encounter difficulty when you come back around to your starting point. It can be done, but it requires a great deal of patience and practice.
- If you have trouble getting the edge of your fabric into the funnel, use a pointed chopstick, seam ripper, or a pair of tweezers to help you.
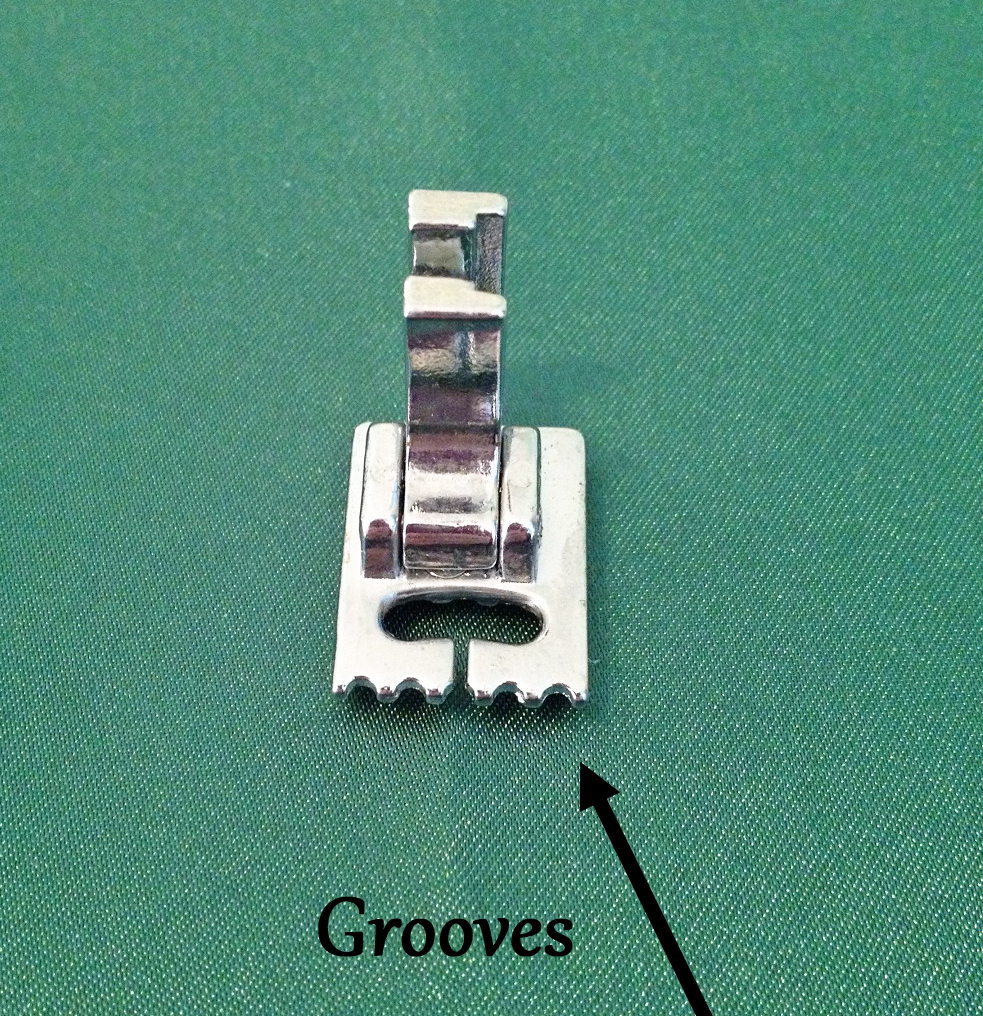
Pintuck Foot
The pintuck foot is always used in conjunction with a double needle. If you take a look at the foot, you’ll notice a series of grooves on the underside. These grooves help you sew multiple rows of evenly spaced pintucks.
Pintuck Foot
To sew a pintuck, first increase the upper tension on your sewing machine. Sew the length of the fabric with a straight stitch, while holding the fabric taut from front and behind. When you pull on the fabric, it creates a pucker, which becomes the pintuck. The tighter you pull, the more pronounced the pintuck will be.
To sew the next pintuck, position the fabric so the first pintuck lies in one of the grooves on your presser foot. Which groove you use will determine how far apart the pintucks are. If the pintuck remains in the groove as you sew, the second pintuck will form parallel to the first.
Tips
- You may need to experiment to find the tension and stitch length settings that work best for your fabric.
- For subtle pintucks, use thread that closely matches your fabric color. If you’d rather draw attention to them, use a contrasting thread.
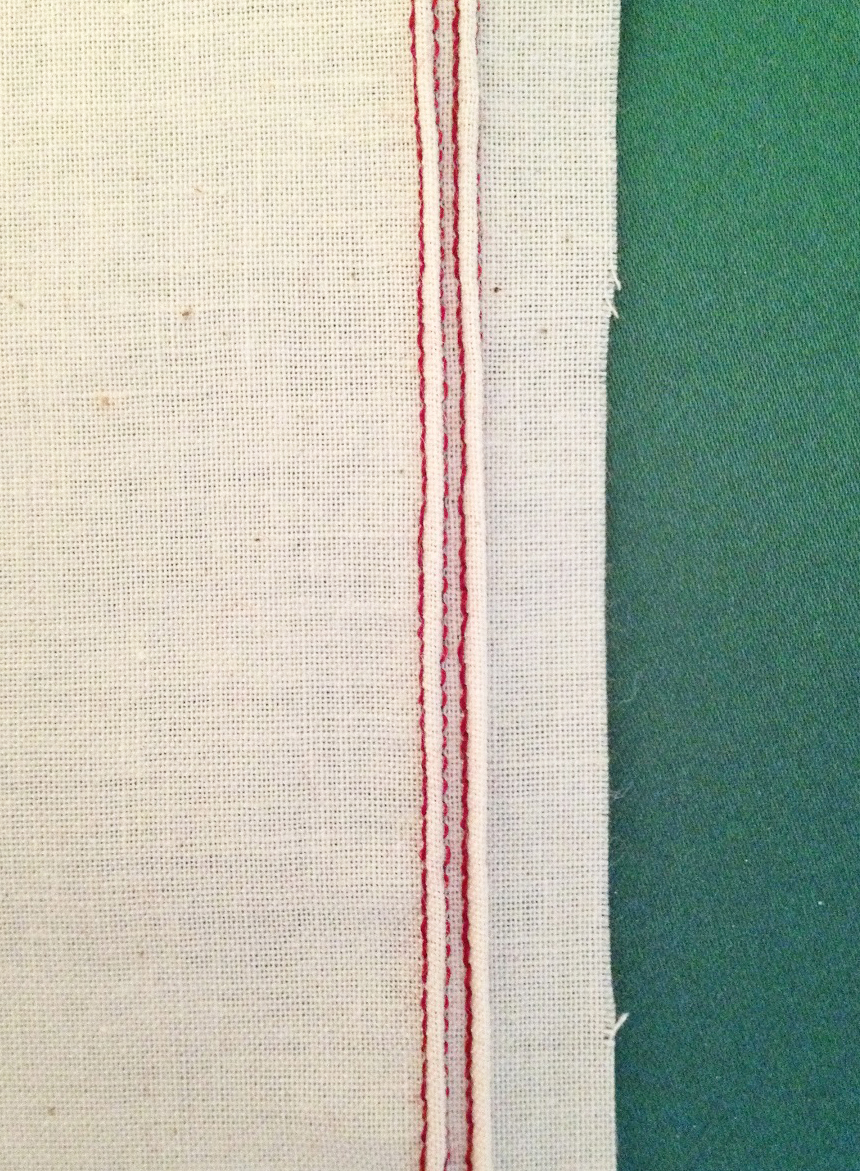
Parallel Pintucks
Walking Foot (aka Even Feed Foot)
When you sew normally, the feed dogs push the fabric from underneath. With lightweight fabrics, both layers will be pushed through evenly. When you sew thick fabrics, however, the feed dogs might not be able to move both layers evenly and the bottom layer will feed through at a faster rate. As a result, when you reach the end of your seam, the top layer will be longer than the bottom layer. The walking foot (aka: even feed foot) prevents this problem by pushing the fabric through from the top, working together with the lower feed dogs to produce an even seam.
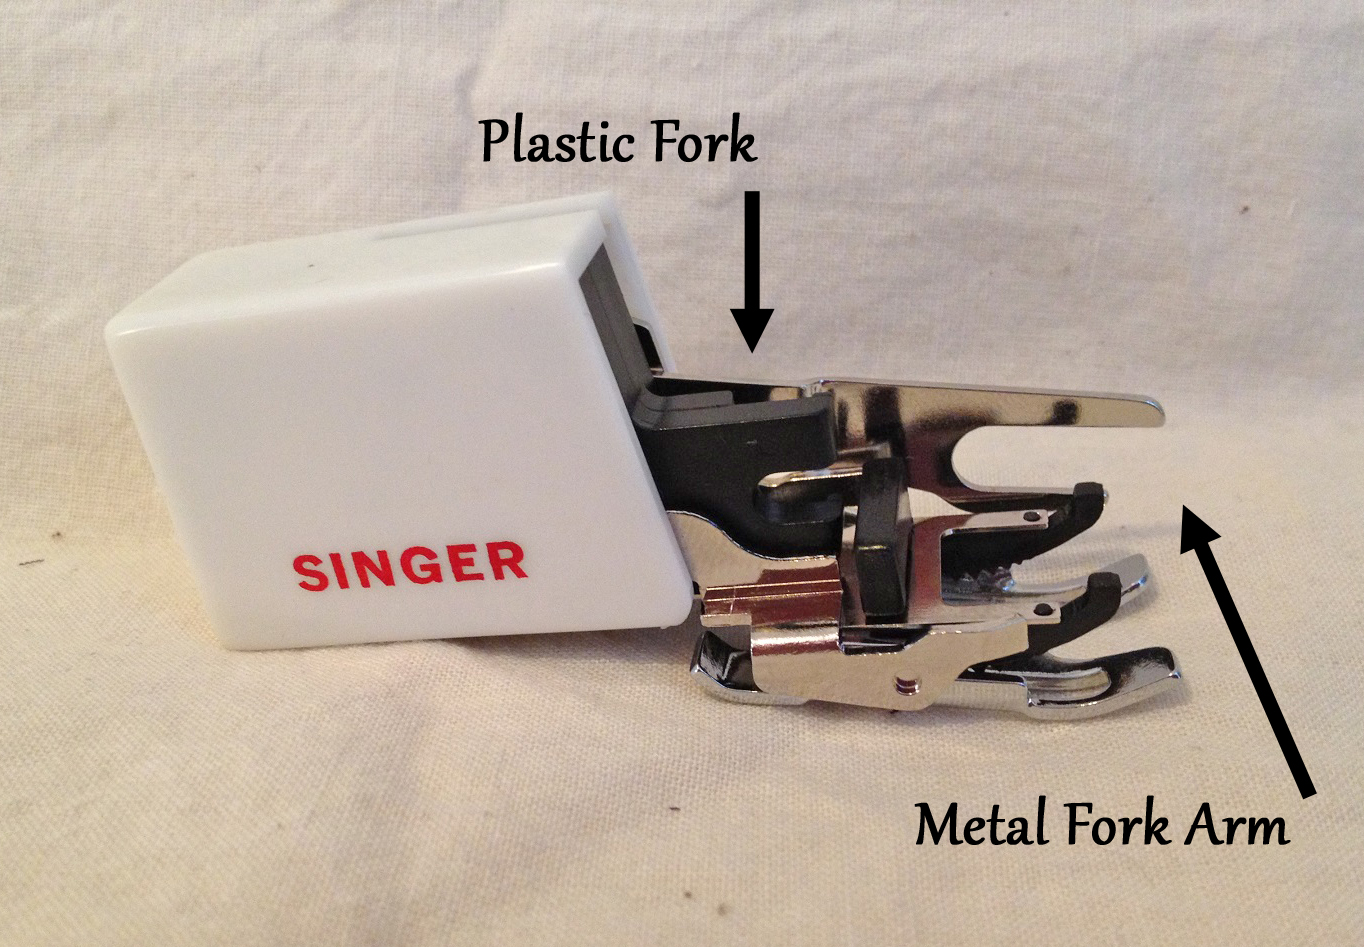
Walking Foot
This foot is a bit more complicated to use, as it must screw on. First, remove your presser foot assembly. As you slide the walking foot in place, lift the long fork arm (on the right) to ensure that it hooks over the screw that holds the needle. The small fork (on the left) slips over the screw that secures the presser foot assembly. Tighten the screw to hold the walking foot in place, then sew as you normally would. (Note: Different brands of walking feet may look different from each other, but they should work basically the same.)
Tip
- When you remove the presser foot assembly, make sure you put it someplace safe, so you don’t lose it.
Walking Foot on the Sewing Machine
Tape Binding Foot
This is a useful foot if you sew a lot of bias binding and don’t mind the stitches showing. As you sew, it rolls the bias binding around the edge of your fabric, sandwiching it firmly, allowing you to stitch right along the edge of the binding. Like most presser feet, it can take some practice, but it’s worth the effort involved.
Binding Foot
To get started, trim the edge of your binding straight and slip it into the rolled section of the foot. Turn the thumbscrew until the side bar is flush against the bias binding. Gently pry the edges of the rolled section apart, so you can slip your fabric between the layers of bias tape. Work it in there, until it’s flush with the folded edge of the bias tape. Pull all the layers toward the back of the foot, stopping when they are below the eye of the presser foot, where you’ll begin stitching. Attach the foot to your sewing machine, being careful not to dislodge the fabric. Lower the presser foot and begin stitching.

Bias Binding
Tips
- The binding foot will automatically roll the bias tape around the fabric’s edge, but you can give it a little help, ensuring that it’s straight and even. If you’re not careful, the binding can slip, so keep a watchful eye and don’t be afraid to stop and adjust the layers of fabric.
- Binding an edge works best if the fabrics are of similar weights. For my first sample (not shown), I used twill bias tape to edge a piece of muslin. It was difficult to keep the bias tape in place, and the end result was less than satisfactory. For the second sample (shown above), I used muslin for the bias tape and it worked much better.
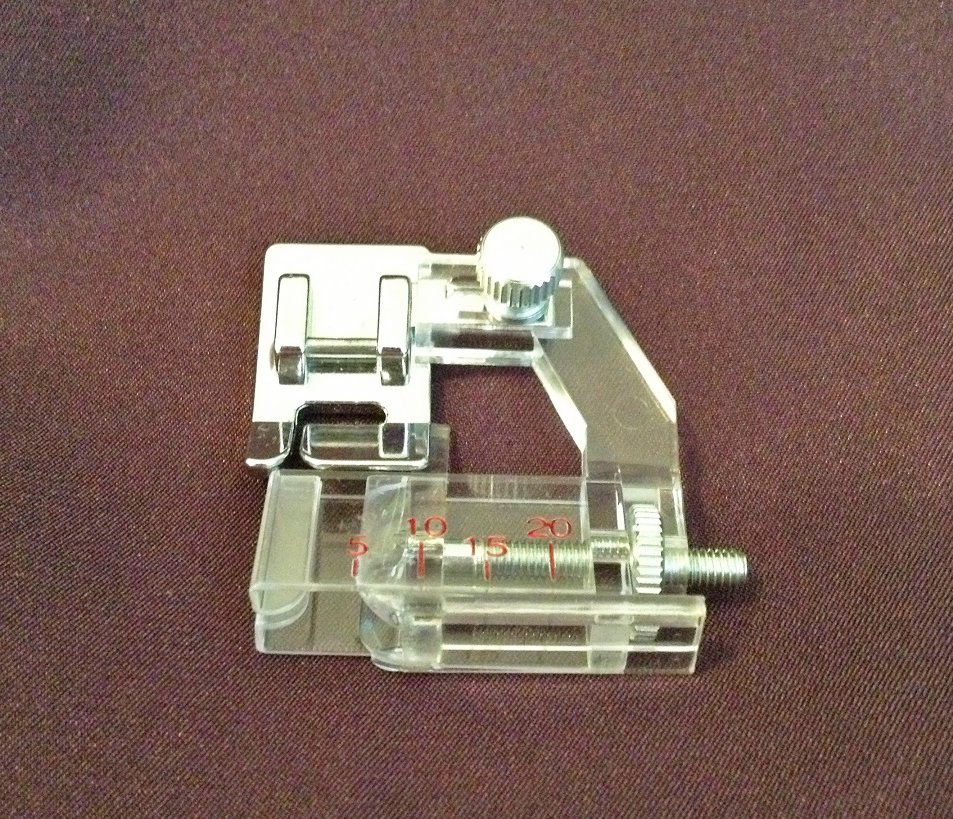
Ruffler Attachment Foot
This presser foot resembles a medieval torture device, but it does a fantastic job of producing gathered or pleated ruffles. It can be extremely temperamental, but don’t let that intimidate you. Just to be safe, always do a test sample to determine the correct settings.
Like the walking foot, the ruffler foot does not simply clip on. You must unscrew your presser foot assembly and attach the foot by slipping the metal fork over the needle screw and slipping the metal “box” around the presser foot shaft.

Ruffler Attachment Foot
The ruffler attachment foot works by pushing the fabric under the needle, forming a small tuck. You can adjust the settings of the foot to control how deep the tucks are. Shallow tucks will look like gathers, while deeper tucks look like knife pleats. You can also adjust how many stitches are sewn in between each tuck, which allows you to space the gathers or pleats.
For more detailed information, see: Using a Ruffler Foot Attachment.
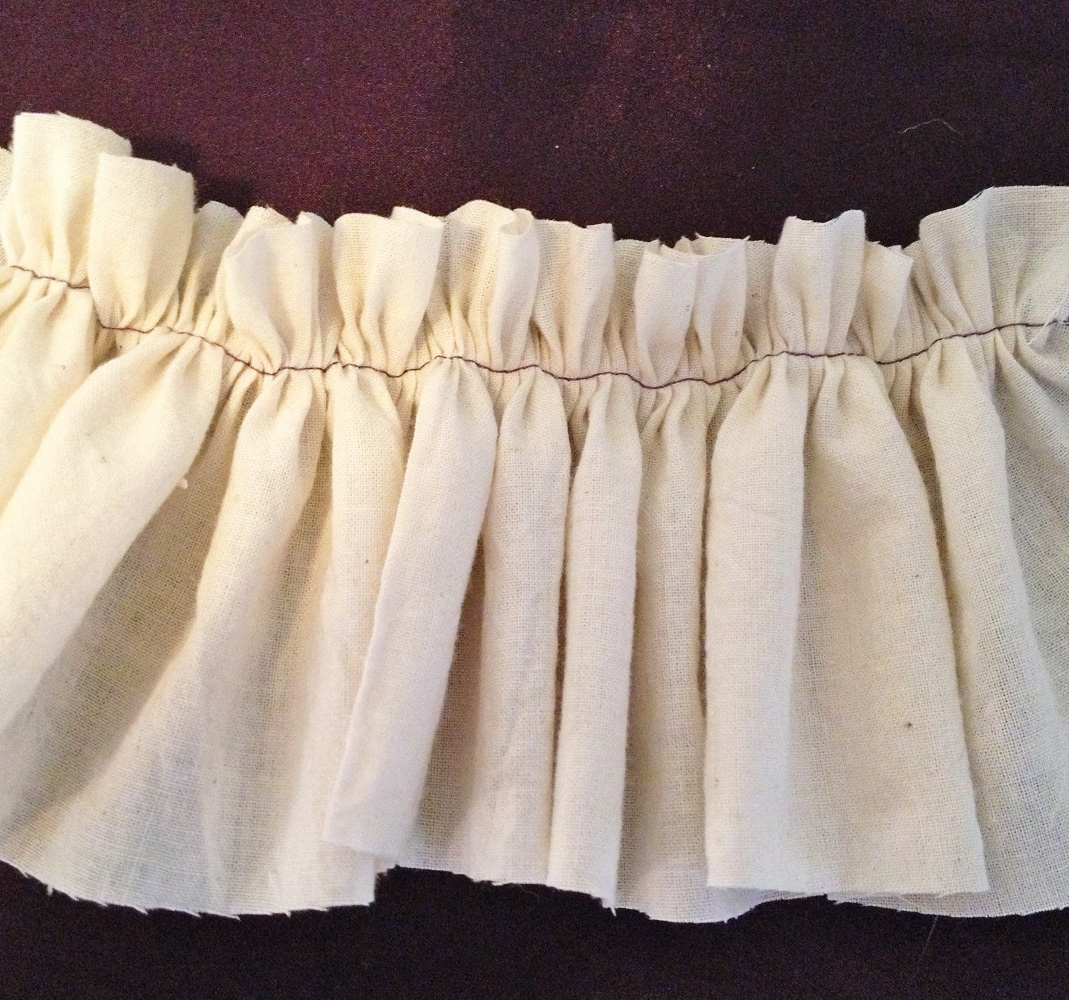
Sample Ruffle
Tips
- Once the ruffler foot is attached to your sewing machine, it can be nearly impossible to tell whether the foot is up or down. If it’s not down and you attempt to sew, the results will be disastrous, so always double-check.
- You’ll need to adjust your tension settings and stitch length, as well as the settings on the ruffler foot. Try various combinations until you get the results you want.
- It can be tricky to figure out how long a piece of fabric you’ll need to produce a ruffle that fits your garment. Do a test sample and measure it before and after ruffling, so you’ll know the gathering ratio your chosen settings will produce.
Additional Presser Feet
There are many other presser feet available. Some serve similar purposes, so do some research to figure out which is the best option for your project.
- Felling Foot: Designed to help you make perfect felled seams.
- Braiding Foot: Designed to help you sew down thick trims, such as braid and cord.
- Cording Foot: Designed to help you stitch down round cords.
- Roller Foot: Designed to allow knits and leather or vinyl to glide smoothly under the needle.
- Non-Stick Teflon Foot: Designed to prevent materials like leather and vinyl from sticking to the presser foot.
- Stitch-in-the-Ditch (Edge Joining) Foot: Designed to help you butt two edges together, as well as sewing in the ditch.
- Gathering Foot: Designed to help you gather or shirr your fabric.
~~*~~
Having the correct presser foot will help you accomplish the job you’re trying to do, saving you time and effort. If you haven’t experimented with different presser feet, why not start? They’re usually inexpensive (I rarely pay more than $15 for a new presser foot), and they can be found at your local fabric shop or online.
Who knows? You may find a new presser foot that you can’t live without!
One Response to Basics: Presser Feet