
by Lisha Vidler
This article first appeared at Your Wardrobe Unlock’d.
(Click on any image to view it full-sized.)
If you sew, chances are good you’ve read someone’s online sewing diary (or dress diary, as they’re sometimes called). This kind of diary documents each stage of a sewing project, providing fascinating insights into the creative process. You might even consider keeping a diary yourself.
Some use their diaries to track their various projects throughout the year. Others use them as a tool to keep motivated. If you post your diaries live—updating them every time you make progress on your project—your readers will be able to share in your triumphs, and even advise you when you need help.
Some prefer to wait until their project is finished and then post the completed diary online. If you have a habit of not finishing what you start, you might find it embarrassing to have a series of incomplete diaries. On the other hand, the feedback you receive by posting regular updates could motivate you to keep sewing.
Regardless of which method you choose, keeping a sewing diary can be fun. It can also provide a means of charting your progress as your skills improve. Let’s take a look at what’s involved.
Creating Your Diary
Since one of the goals of a sewing diary is to share your accomplishments with others, you’ll need to compose your diary on a computer. First, open a new folder and name it according to the project you’re making. (For example: “Blue Victorian Dress Diary,” or “Lavender Summer Dress Diary.”) Within, create a second folder and label it, “Pictures” or “Illustrations.” This is where you’ll place all of your photos.

Sewing Diary Folder
Next, choose a word processing program to write with. A lot of people use Microsoft’s Word, but if you’re looking for something free, I highly recommend LibreOffice. It has many of the same features as Word and will allow you to easily organize your diary. For instance, you can create “bookmarks” that will let you jump to a specific location in your file. It’s a good idea to add bookmarks if your diary is long, so you can easily move from one section to another while editing.
Keeping a Diary
Once you start sewing, it’s important to write down what you’re doing, step by step. At the end of every sewing session, take a few minutes to describe everything you’ve done that day. Keep it simple and concise, so readers can picture what you’re sewing. If you use any sewing terms that beginners might be unfamiliar with, make sure the meaning is clear, either by context or by providing a brief definition. Once you’ve finished, go back and edit what you’ve written, making sure it’s easy to understand and interesting for others to read.
It’s important to have a focus. You don’t want to describe every detail of every aspect of your project. Such a diary would get tedious, for you and for your readers! Instead, write about the specific things that interest and inspire you.
If you love pattern-drafting, demonstrate the process. If fitting is more your thing, describe how you figured out what those ripples around the neckline meant and how you altered the pattern to fix the problem. If you prefer hand sewing, focus on the hand-stitched hem and the hand-sewn buttonholes. Don’t forget to mention which stitches you used and why. If embellishing is your favorite aspect of sewing, describe how you embroidered that stomacher with silk ribbon, or how you hand-dyed your lace trim.
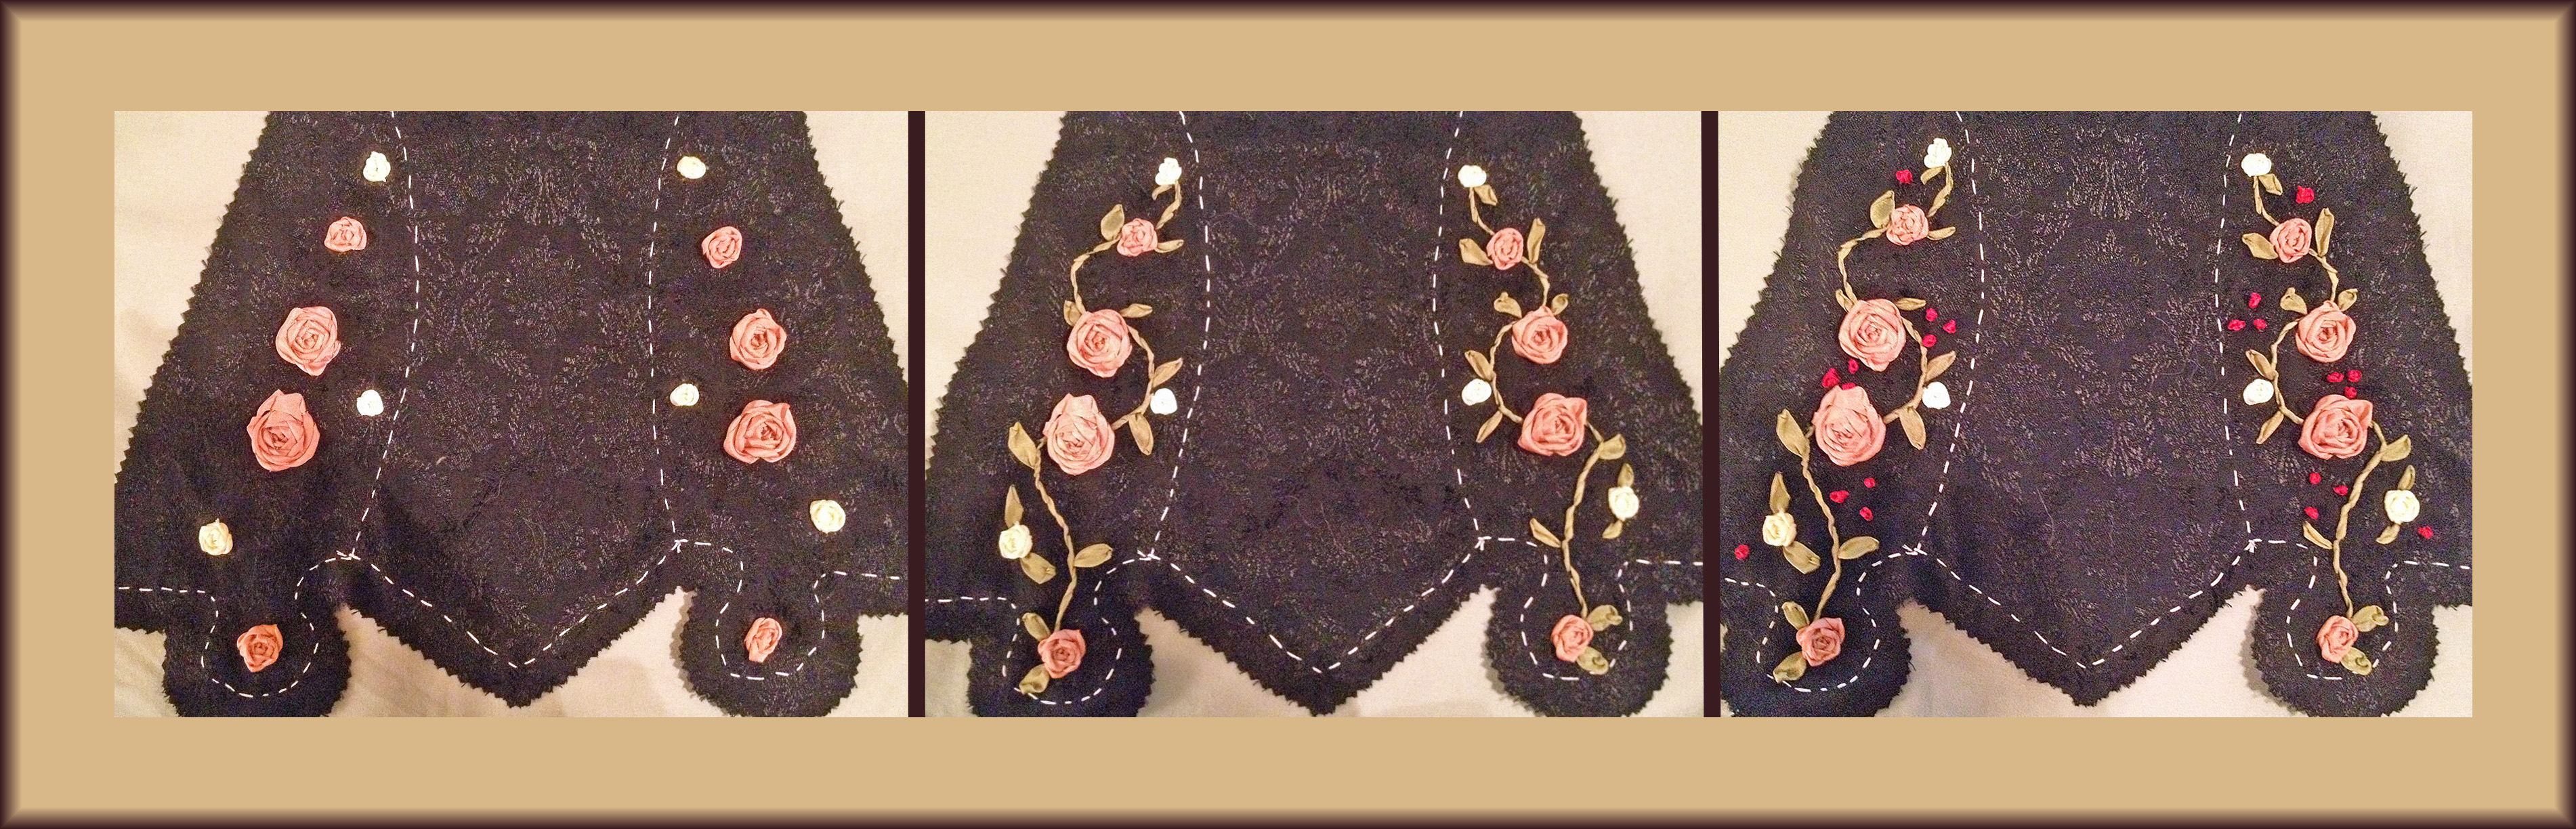
Embroidering an 18th Century Stomacher
Having a focus doesn’t mean ignoring the rest of your project. After all, you don’t want your diary to be terse: “Today I sewed the bodice.” But at the same time, you don’t need to go overboard with boring details.
What can you write about? You might briefly describe the steps you’ve taken to assemble your garment, especially if the pattern directions are difficult to understand. This will help others who are interested in making the same pattern. If you deviated from the instructions, explain how and why.
Be sure and take photos of your project at every stage. You might not use all of them, but you can always delete the ones you don’t need. (More on pictures in a moment.)
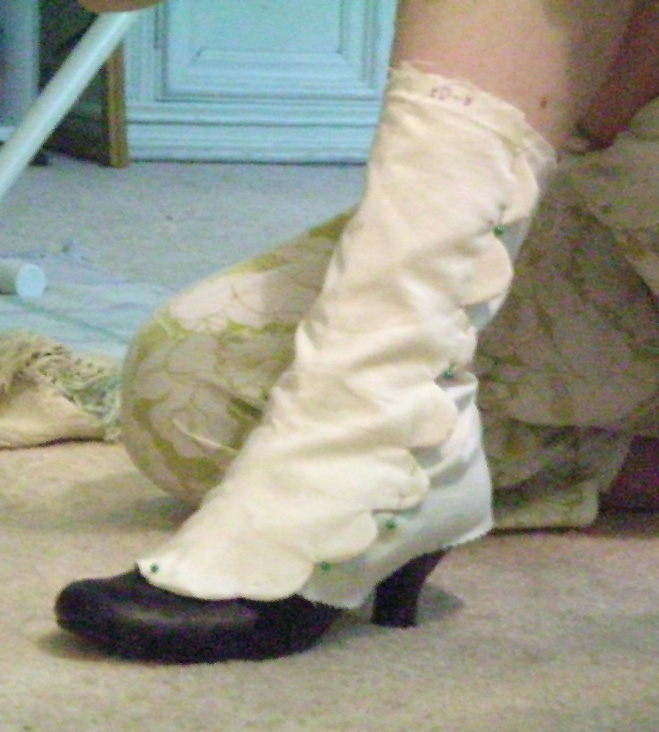
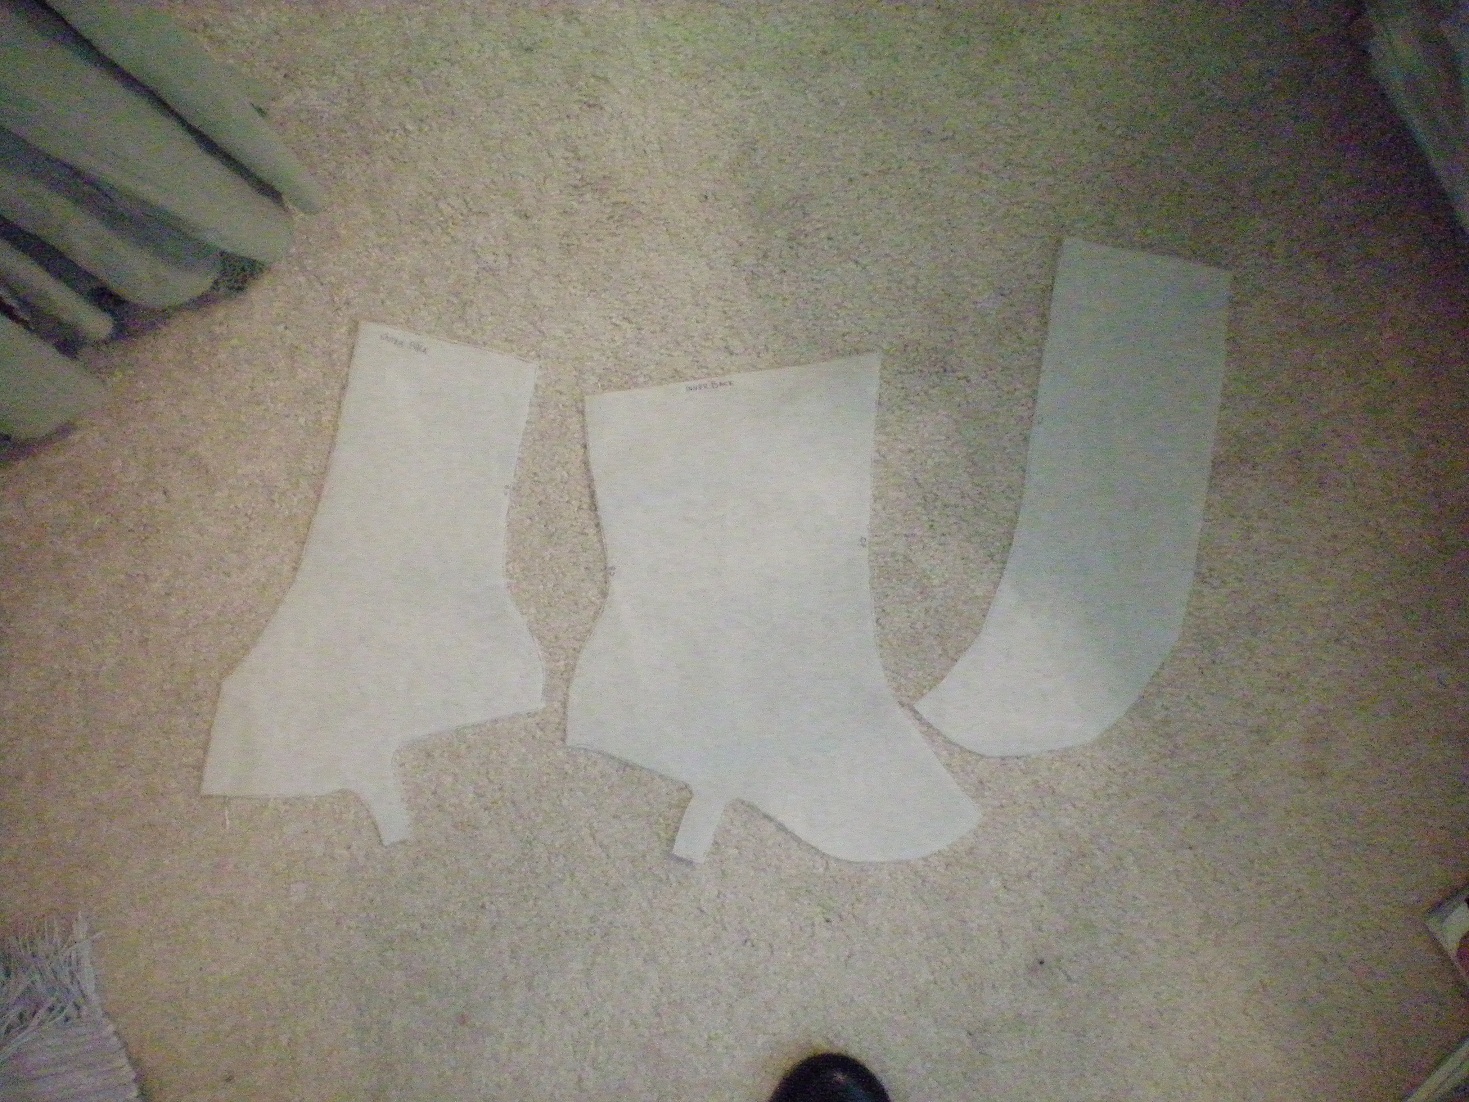
Mockup of Victorian Spats
Organizing Your Diary
There are two ways of organizing your sewing diary: chronologically or by subject. Writing chronologically is much like writing a regular diary. Start with an introduction stating your intentions and listing the patterns and materials you plan to use. Each day, add a few paragraphs describing the work you’ve accomplished, along with photos of the day’s progress. This works best if your project is small and uncomplicated. It’s also good for live diaries, where you post regular updates.
For examples of chronological diaries, please see my personal sewing diaries: 18th Century Stays and 1870s Wishing Gown, Part I & Part II.
Organizing by subject is better for long, complex diaries, or for diaries that are posted only after the project is complete. For examples of sewing diaries organized by subject, please see my personal diaries: 18th Century Robe á l’Anglaise and 1876 Copper Ballgown.
For a diary organized by subject, I currently use the following structure, varying the subheadings according to my exact requirements.
- Title & Introduction
Give your project a name and don’t forget to add your byline, so people know whose diary it is. Briefly describe the project. If you want, include the start date and approximately how long it took to finish.
- Inspiration & Design
Outline your reasons for beginning this particular project, along with what inspired you. Is it a replica of a film or theater costume? Is it based on a historic fashion plate? Is it completely original? If you want readers to get an idea of what you’re trying to accomplish, include a fashion sketch of the design. (For help drawing your own fashion sketches, see the article: Croquis—Fashion Illustration, Part I & Part II.)
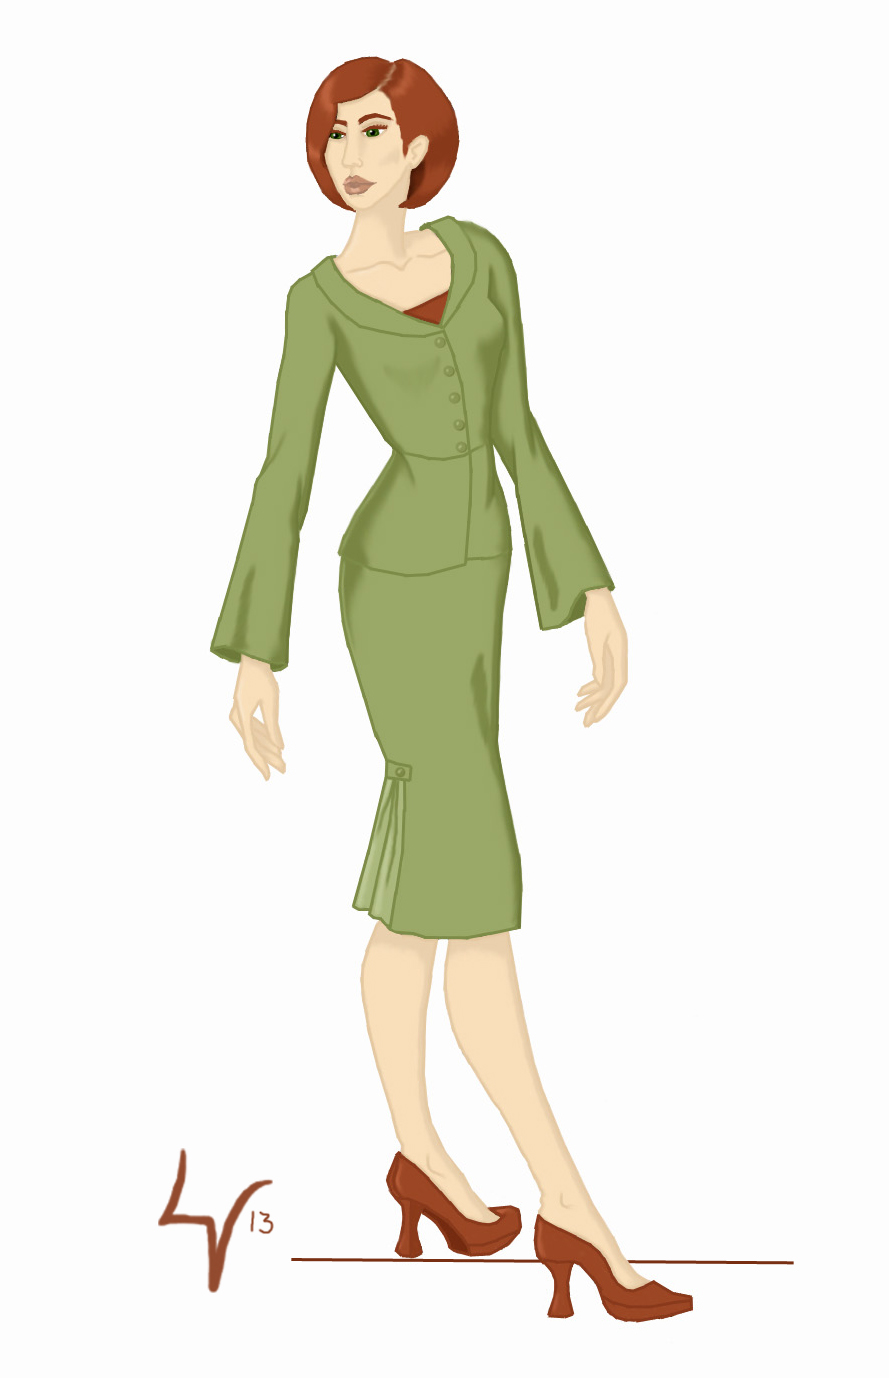
“Classy Suit” ~ © 2013, Lisha Vidler
If your project includes several complex pieces, such as a Victorian bodice, skirt, and overskirt, you might find it easier to describe each of them separately. If it’s a historical costume, mention what era it’s from. Describe its color scheme and silhouette, plus any unique details you plan to include.
- Patterns
Provide a list of the patterns you’re using, including the brand and the pattern’s name or number. If you drafted your own original patterns, or modified a commercial pattern to suit your needs, say so.
- Materials
Make a bullet list of everything you’re using for this project: fabric, trims, notions, etc. Include yardages where possible, as well as the cost of each item. You can describe your materials in detail, if you like. Be sure to include photos of your fabrics and trims.
Note: You may exclude some of these details from your finished diary. I like to keep track of how much money I’ve invested in each project, but I don’t make that portion of the list public.
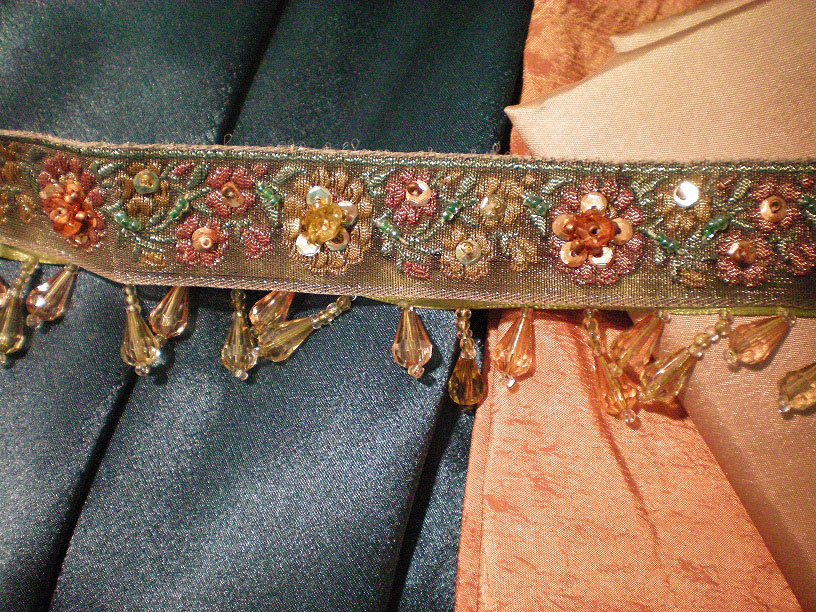
Materials For My 1876 Ballgown
- Mockup Construction
We all make mockups before we cut our good fabric, right? This is where things get interesting. Describe any changes you made to your pattern, whether for fit or design. If you had trouble with any aspect of the mockup assembly, talk about it. Tell us what you’re thinking, whether you’re concerned or annoyed, or if things are going as planned. Be sure and take a photo of the mockup, especially if you made any changes to the pattern.
If your project is made up of several items, you might find it easier to break this up into individual sections (i.e.: bodice, skirt, overskirt, etc.)
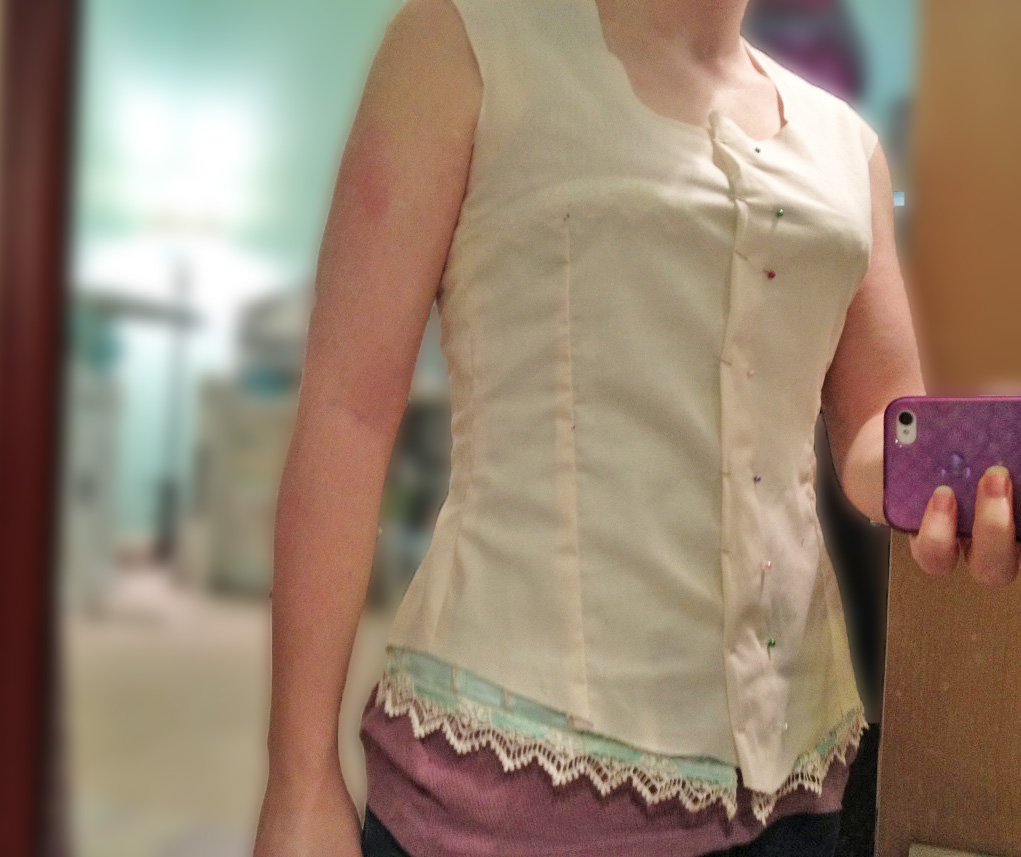
Mockup of a Victorian Bodice
- Garment Construction
Once you’re happy with your mockup, it’s time to cut your real fabric. As always, document every stage. Tell us what you’re doing, as well as what you’re thinking and feeling. The best diaries aren’t dry recitals of facts, but expressions of hopes and fears, demonstrations of courage, and bursts of jubilation when something turns out right. Don’t be afraid to share your mistakes, either! Remember to take pictures at every stage. And, as with the mockup, if your project is large, break it up into several sections, so you don’t overwhelm your readers.
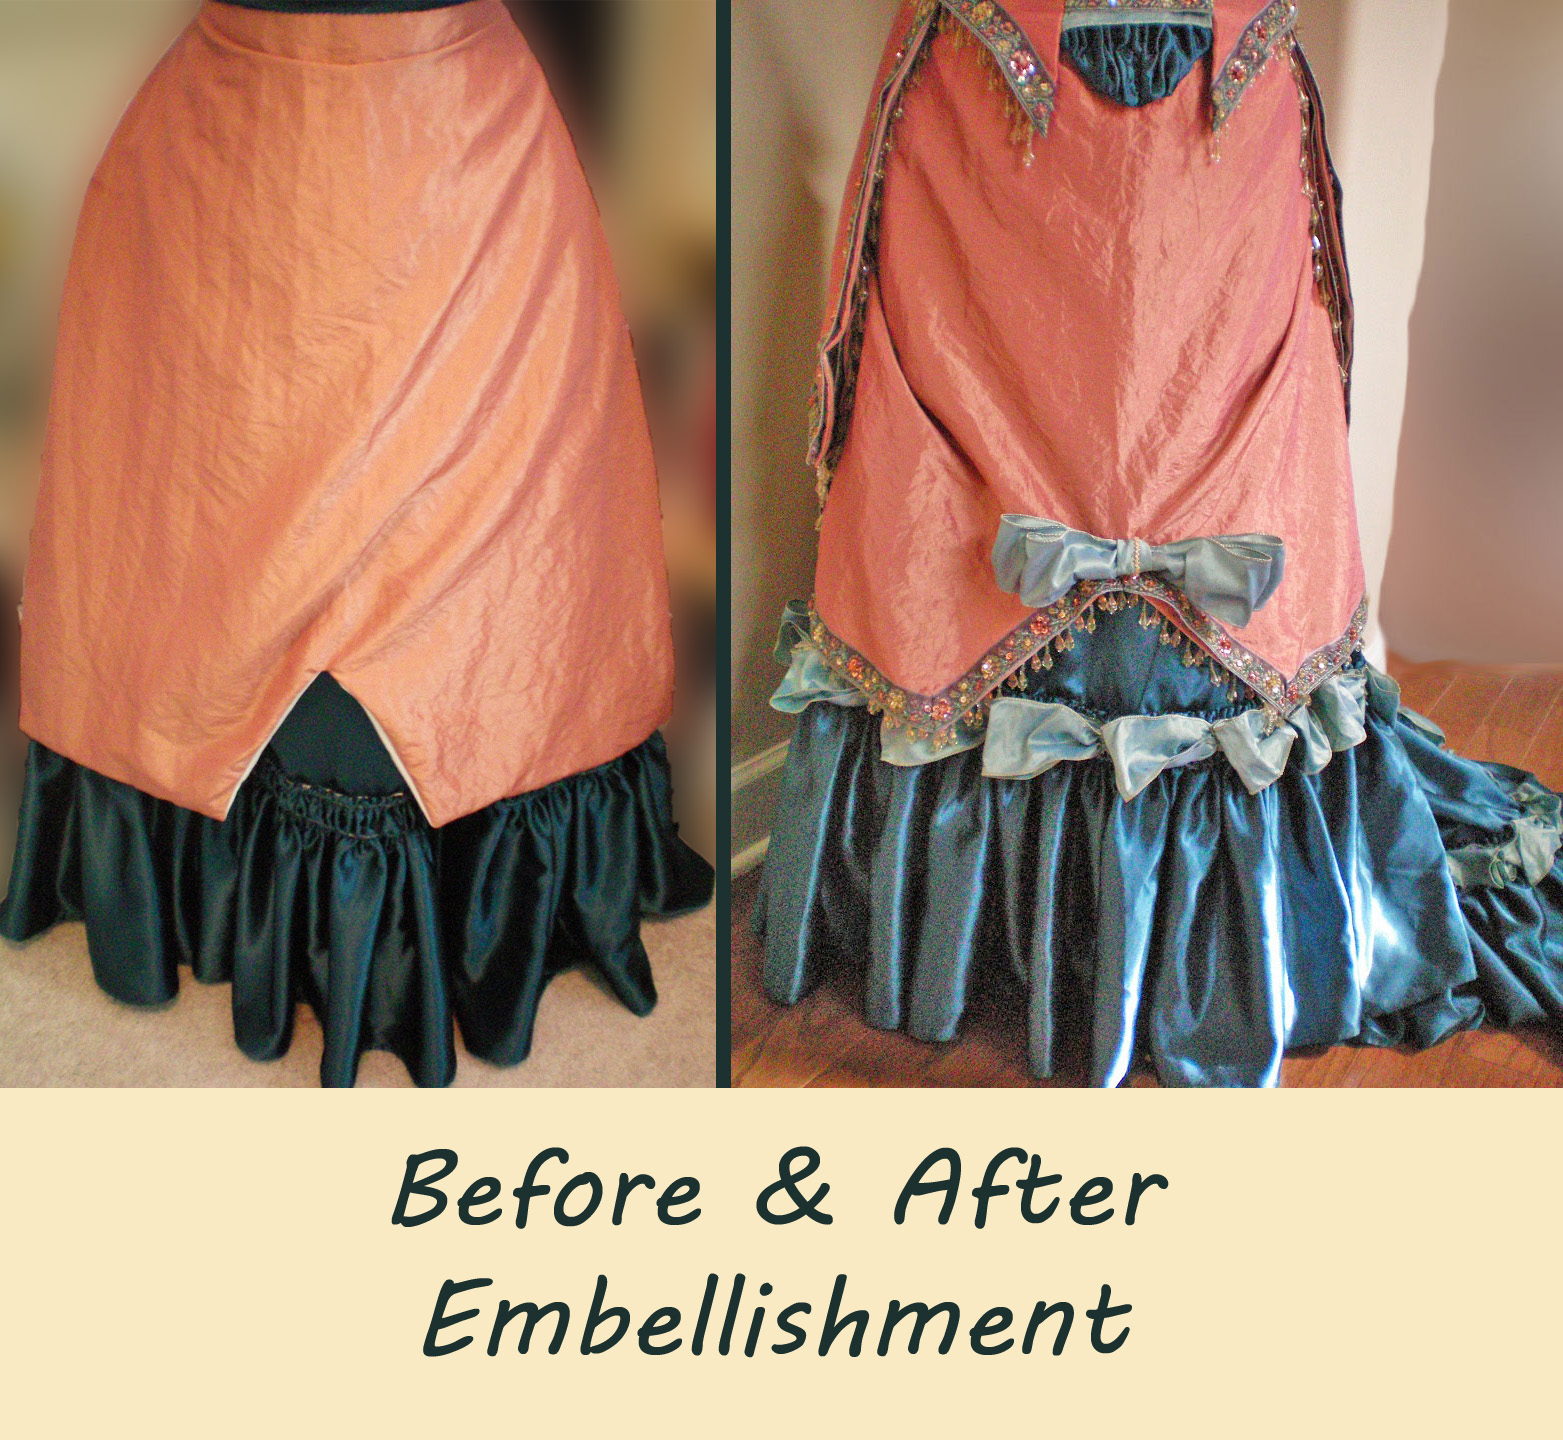
- Embellishment
When you’re done with the basic construction, you’ll start embellishing. Show us the “before & after” pictures, so we can see what a difference that row of gathered lace made, or how your beaded fringe sparkles.
- Conclusion
This is where you wrap everything up. Tell us what you learned in the course of this project. What aspect did you enjoy the most? What did you find the most unpleasant? What would you do differently in the future? Any final thoughts or conclusions should go here.
Taking Photos
You don’t need to go to a lot of trouble when taking photos for your diary. Use an inexpensive digital camera. A smartphone’s camera will work, or you can buy a cheap point-and-shoot. Here’s a few tips for getting the best photos.
- Make sure you have plenty of light.
- Avoid using the flash, as it can over-saturate the picture.
- Try not to cast your body’s shadow onto whatever you’re photographing.
- To help stabilize the image, hold your elbows close to your torso.
- Learn how to focus, so your pictures won’t be blurry.
- Try to keep the background uncluttered and plain.
- Use a background that’s of a contrasting color, so the subject of your photo will be clearly seen. (A pale garment should be photographed against a dark background and vice versa.)
- Take multiple pictures, varying the distance and camera angles, so you can choose the best of the lot when you’re done.
In the example below, several things could have been improved upon. The pattern pieces would have looked better against a darker background. The image is slightly out of focus. It isn’t well-lit. There are other objects cluttering up the scene. There’s a large shadow cast across part of the image. And you can see the tip of my shoe at the bottom of the picture. Some of this can be fixed with image-editing software, but it’s better to begin with a good photo, rather than trying to adjust it after the fact.
Poor Photo
If you plan to do a lot of photography, invest in Photoshop Elements or something similar. When you’re done taking pictures, import them into the program and make a few tweaks. You can lighten shadows, brighten the image, adjust the color, blur the background, and crop the image to the size you want. It isn’t difficult. Most of these can be done automatically, with a few clicks of the mouse. If you want, you can also add text or even arrows pointing to certain features you want to highlight.
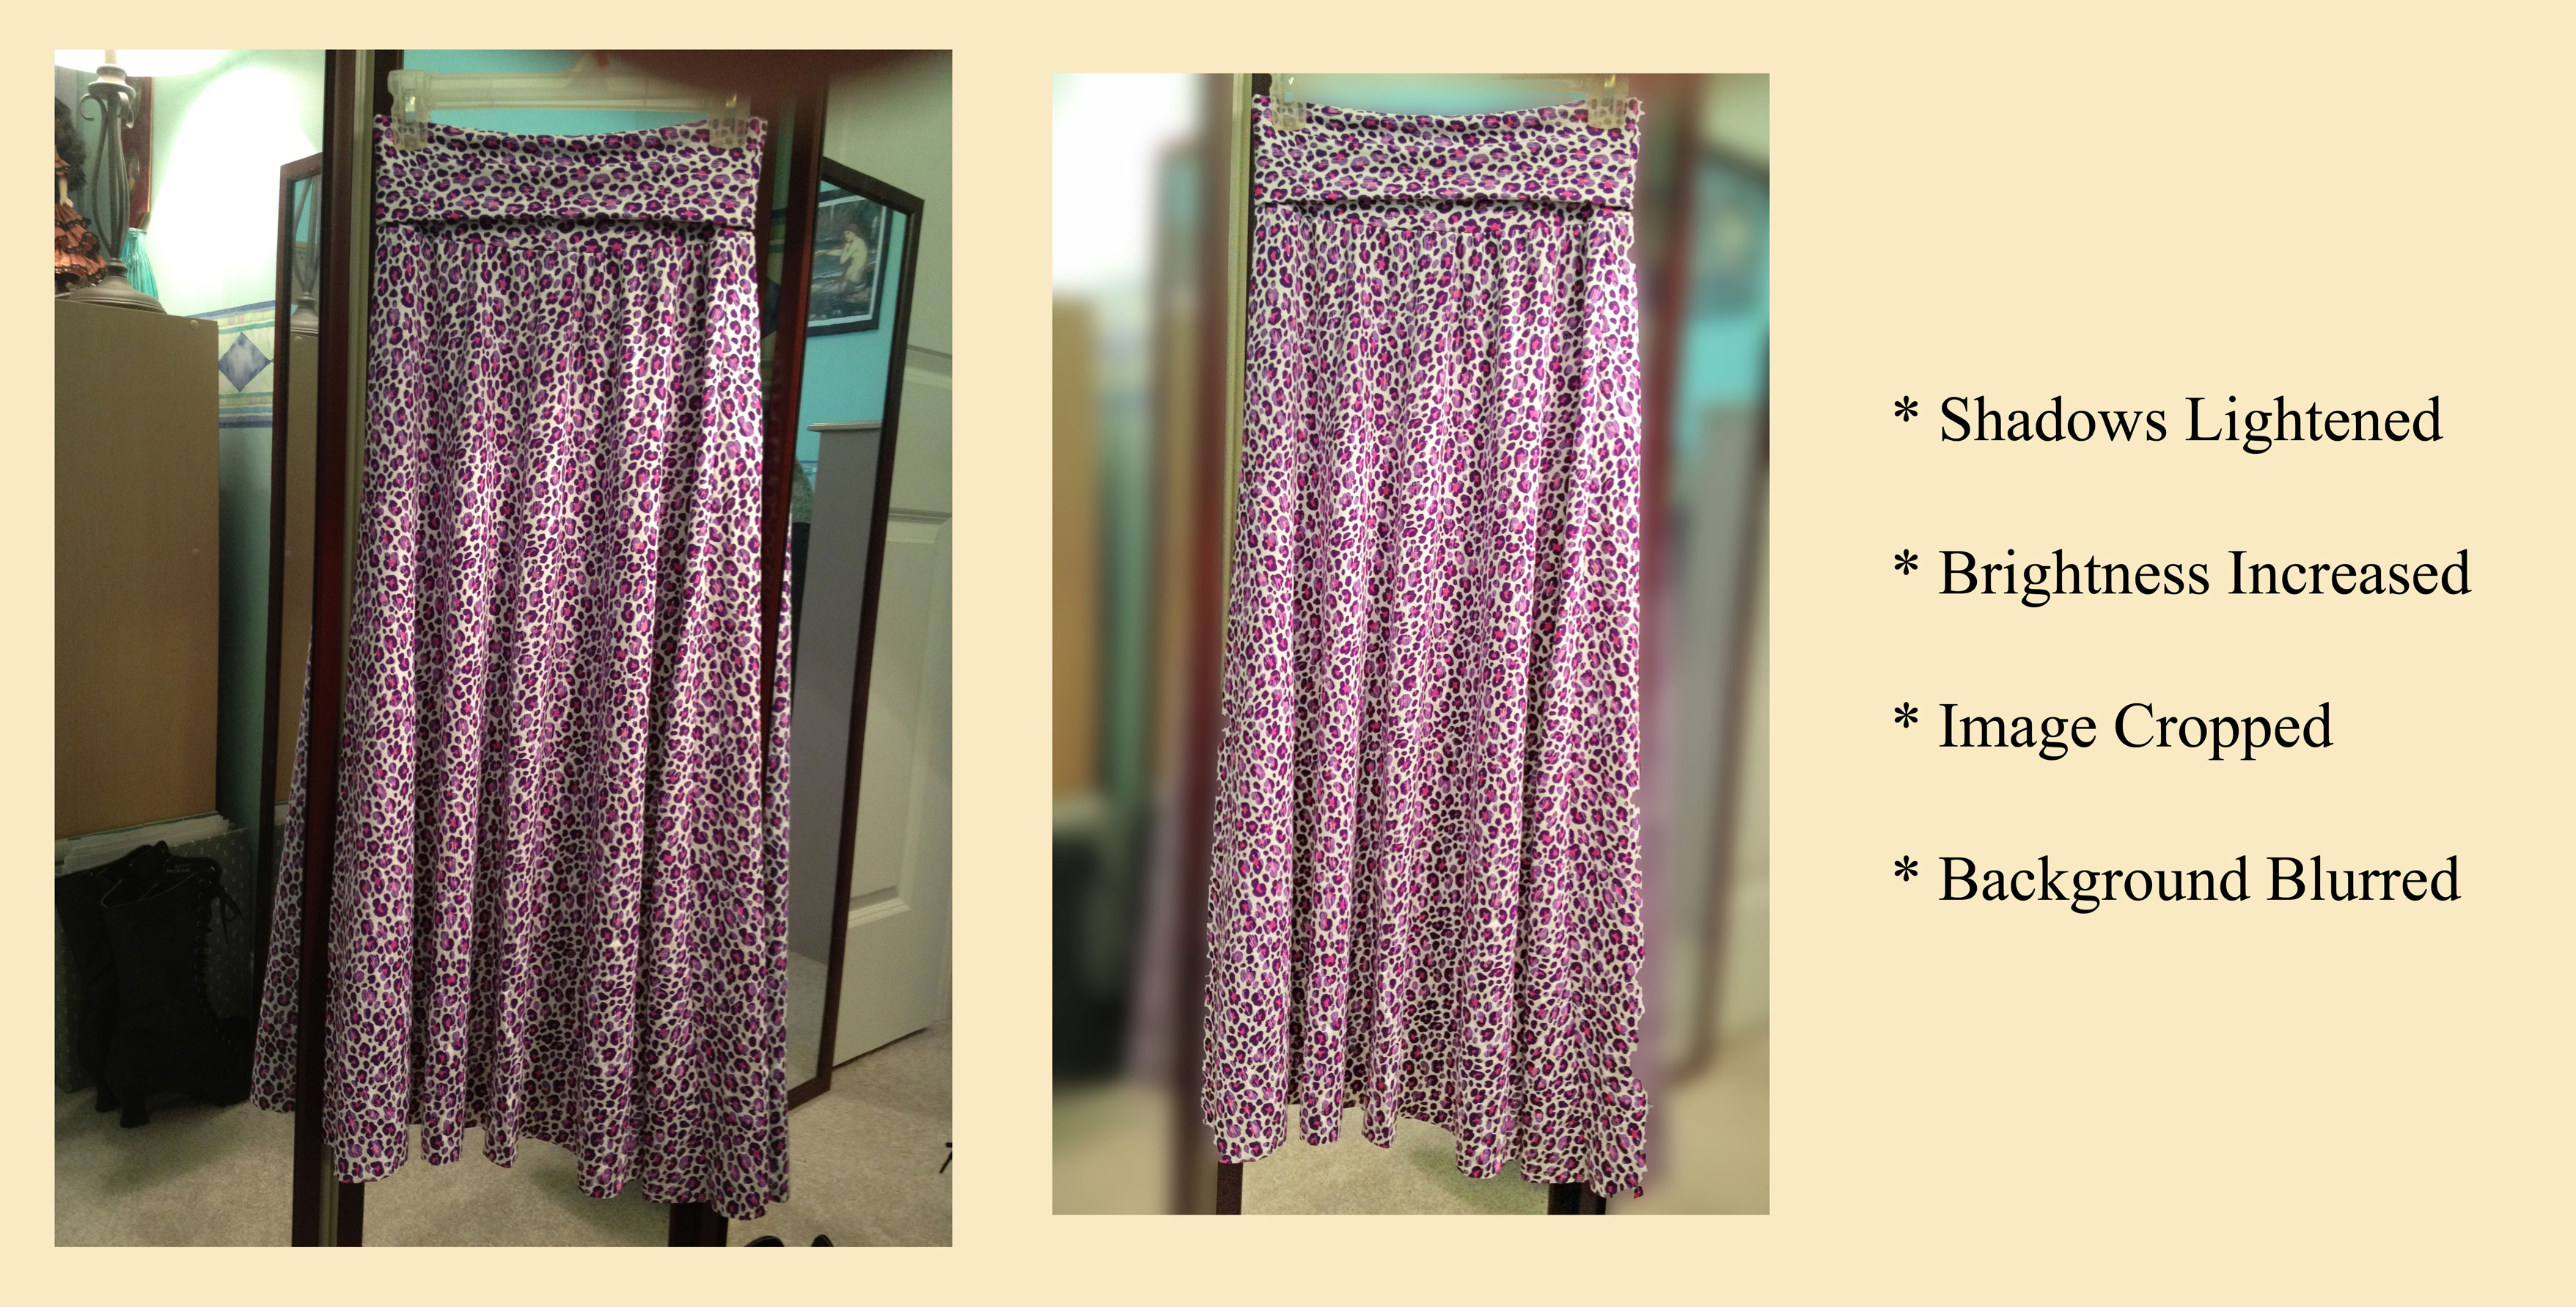
Photo Comparison
Putting it All Together
When you’re ready to post your diary, let readers know whether you’re publishing the whole diary at once, or if you’re going to post regular updates, so they’ll know what to expect. If you promise frequent updates, be sure and follow through, otherwise readers will stop visiting your website.
Here’s a few tips on web design.
- Choose a plain, neutral color for your background.
- Choose a dark color for your text.
- Make sure your text is readable against your background. Black text on a white background is fine. Black text on cream is better—less strain on the eyes. Blue text on a red background is extremely bad!
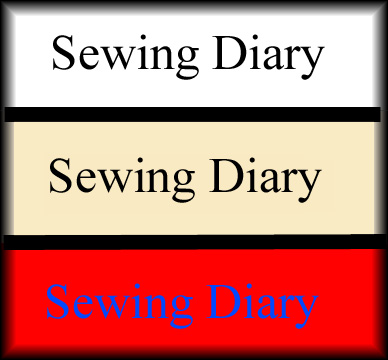
Example of Text Colors
- Avoid fancy fonts. Pick one that’s simple and easy to read.
- Don’t clutter the page with a lot of unnecessary images or links.
- Always preview your diary before you publish it—check for spelling and grammar errors and make sure your images load properly.
- Organize your blog entries with tags, so visitors can easily find all the posts on a particular subject. If you’re using a website format, link all your diaries to the same page.
- Provide readers with a way of commenting, but don’t be discouraged if no one does. Most people prefer to lurk.
- Always save a backup copy of your diaries. Keep the word document saved on your computer even after you’ve published the diary online, just in case your website gets hacked or the servers go down. It’s a good idea to save a backup somewhere else, too, such as on a thumb drive or cloud server.
The most important thing to remember is: Have fun! Enjoy looking back and reading your older diaries. It’s great to see how much you’ve accomplished and how much progress you’ve made over the years.
Pingback: Writing Your Own Sewing Diary | Yesterday's Thimble