
by Lisha Vidler
This article was first published at Your Wardrobe Unlock’d.
(Click any illustration to view the full-sized image.)
Have you ever wanted to copy a favorite costume from film, television, or the theater? Reproducing a costume can make for a daunting project, but it doesn’t have to overwhelm you. In the first half of this article, we examined the five steps involved in successfully making a costume replica:
- Research and Documentation
- Design
- Finding Materials
- Construction
- Embellishment
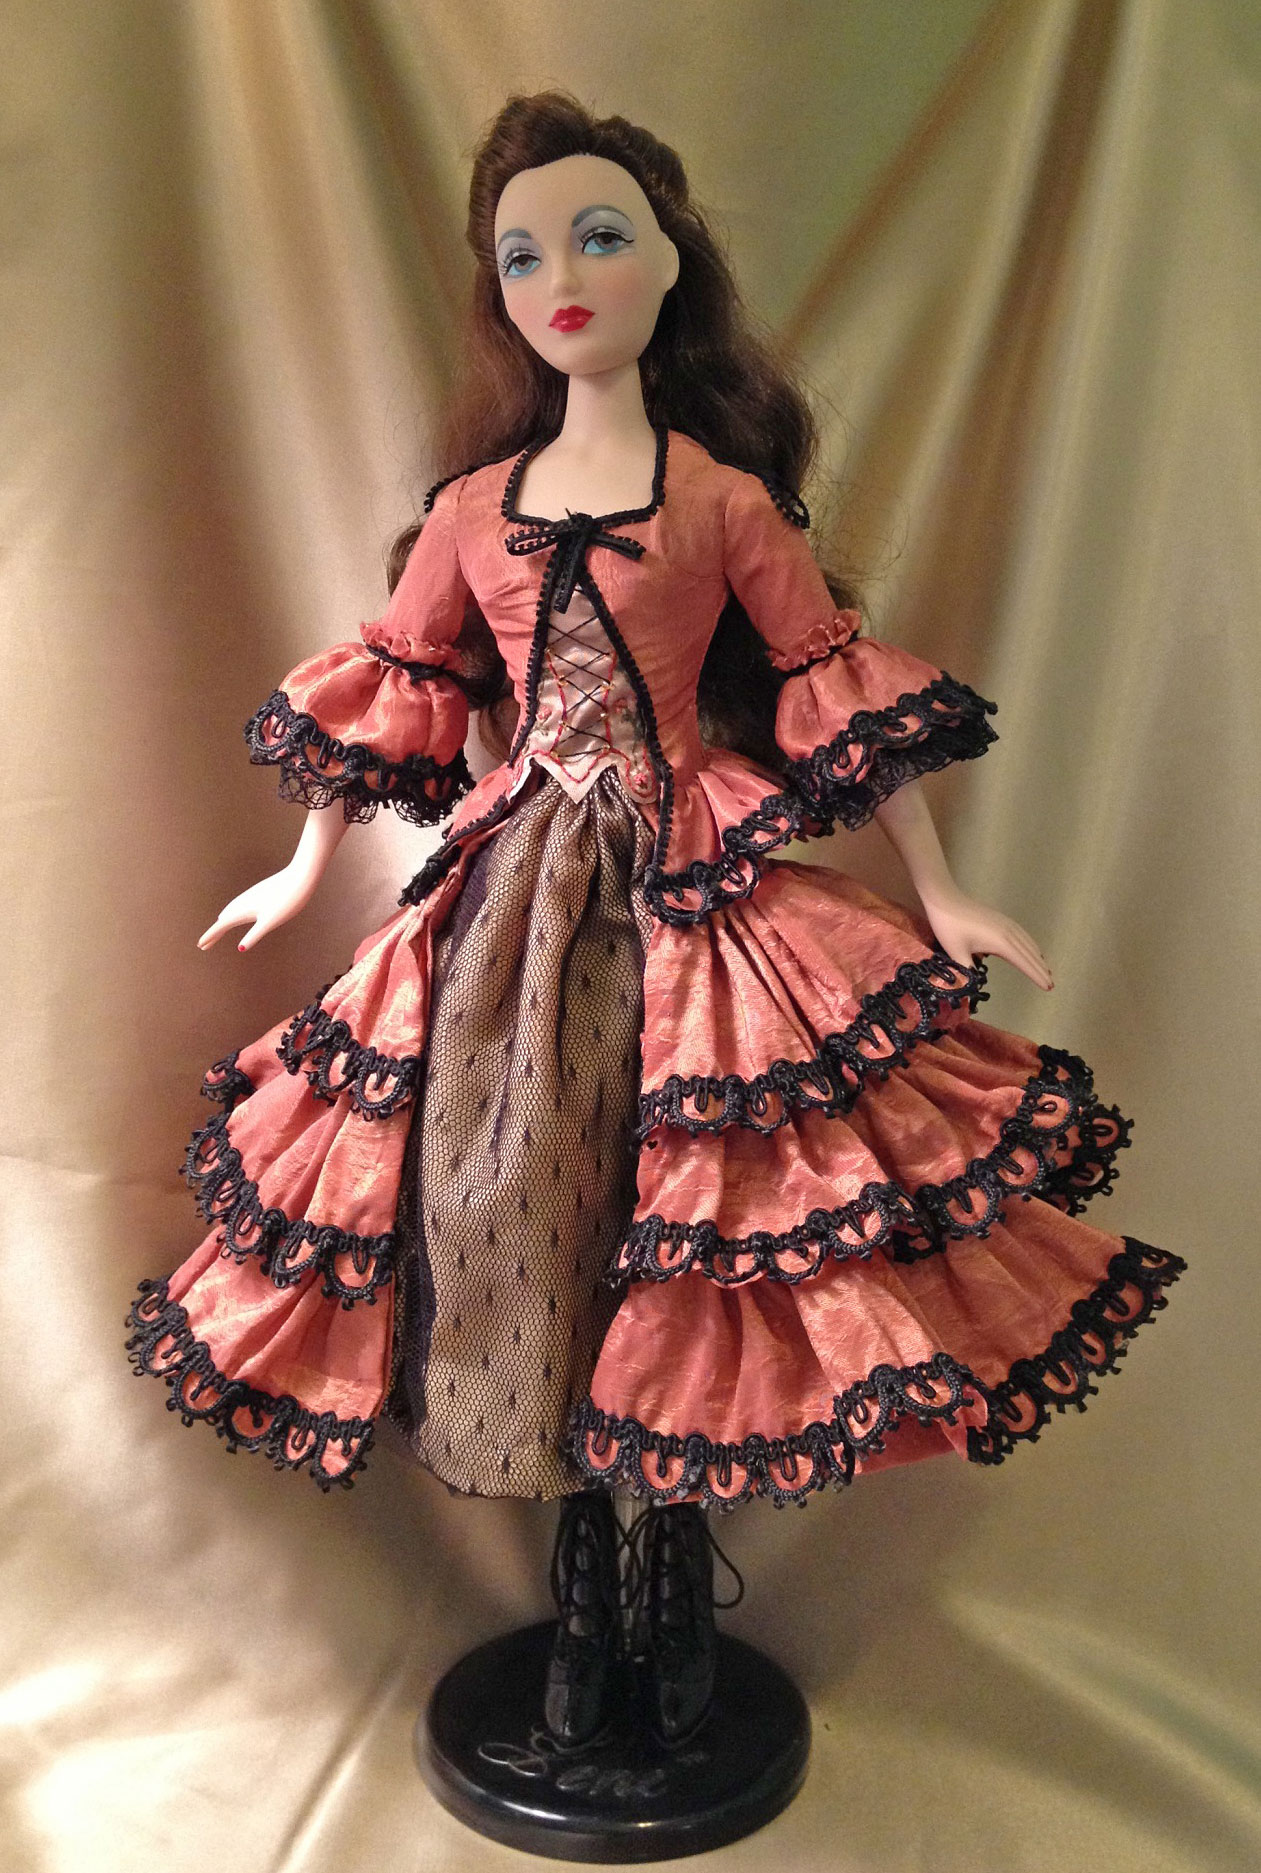
Now let’s take a closer look at the process. For this demonstration, I’ll be making a doll-sized version of the costume Christine wears during “Point of No Return,” from Andrew Lloyd Webber’s The Phantom of the Opera.
The Phantom of the Opera in Miniature: “Point of No Return”
- Step #1: Research
Despite the fact that The Phantom of the Opera takes place in 1881, its costumes range from the 1860s to the 1890s. This particular costume is worn during the performance of a fictional opera and is meant to be a Victorian interpretation of a Spanish dress from the 18th century. Elements from both centuries can be seen in the design.
While researching this costume, I looked at dozens of photos compiled by Anéa, a historical costumer who’s performed an exhaustive study of the costumes from The Phantom of the Opera. At The Aminta Costume, she examines the “Point of No Return” dress in great detail.
For the 25th anniversary of The Phantom of the Opera, they did a special performance at the Royal Albert Hall in London and broadcast it live to theaters around the world. Soon after, this recorded performance was released on DVD, so I was able to watch the relevant scene repeatedly. Seeing the dress in action allowed me to observe details that cannot be seen in photos.
- Step #2: Designing
Because each production (London, New York, Las Vegas, Canada, Germany, Australia, etc.) makes its own costumes, the variations are endless. After examining all the possibilities, I created a fashion sketch combining the elements I liked best.

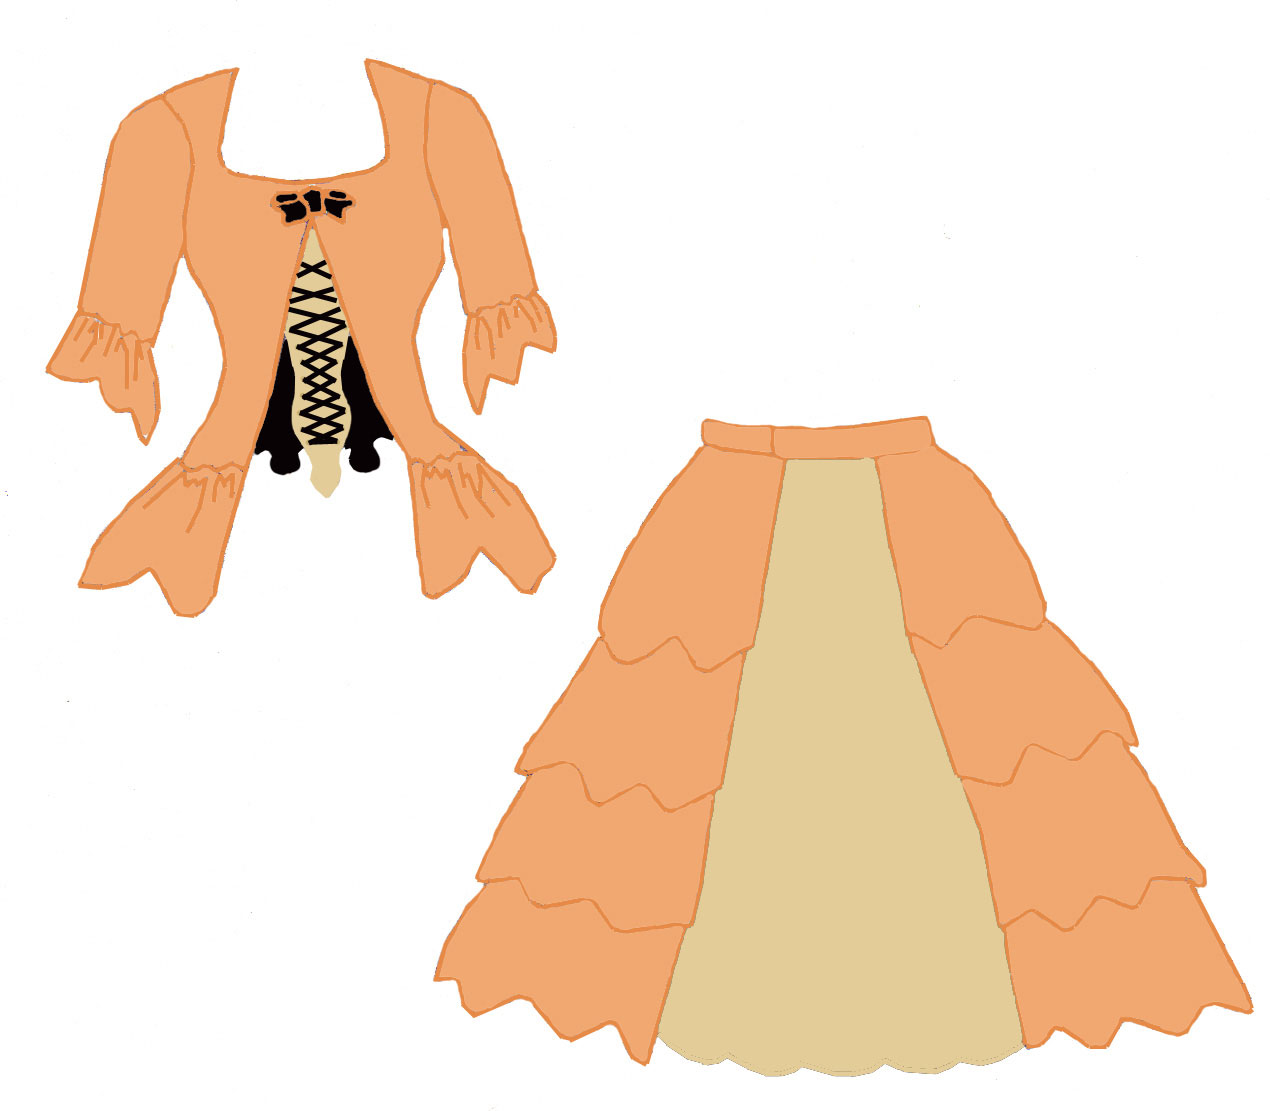
“Aminta: Point of No Return” (© 2013)
The dress is comprised of a ruffled skirt and coordinating bodice, made of peach silk. (On stage, the silk appears more of a copper, or dark peachy-coral, but in person, it’s peach.) It’s a fairly complicated design, so to make it easier, I broke it down piece-by-piece.
Skirt: The calf-length skirt is bell-shaped, but flatter in front and wider on the sides to suggest the panniers worn in the 18th century. There are several tiers of scalloped ruffles. The edges are embroidered with black, and each scallop contains an embroidered scrollwork motif.
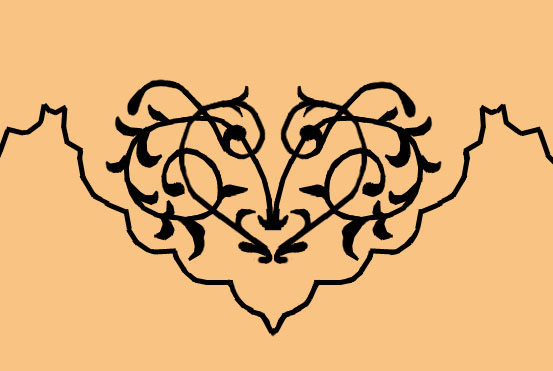
Embroidery Design
The front of the skirt is split, revealing a black and gold panel—basically a faux underskirt. Sometimes this panel is a black and gold brocade, other times it’s black with a gold lace overlay, or gold with a black lace overlay.
Some versions feature a richly embroidered apron, but I chose not to include this, as it would’ve made the costume too busy for the scale of the doll.
Bodice: The bodice has a low-cut, rounded square neckline. The center of the bodice is cut away in an inverse triangular shape, a popular 18th century design known as a zone-front. To fill the gap, a stomacher is used. Usually, the diagonal edges of the zone-front are straight, but occasionally, they’re scalloped. A few are edged with lace or embroidery. Much of the time, the bodice has a ruffled peplum that imitates the skirt’s tiers.
Stomacher: The stomacher often has colorful floral embroidery or appliques along the sides, while the center features zigzag lacing. The color scheme varies tremendously. The background might be black or gold, or both. The lacing might be black, red, or gold. The floral embroidery might be any combination of peach, red, gold, black, white, or even pink and blue!
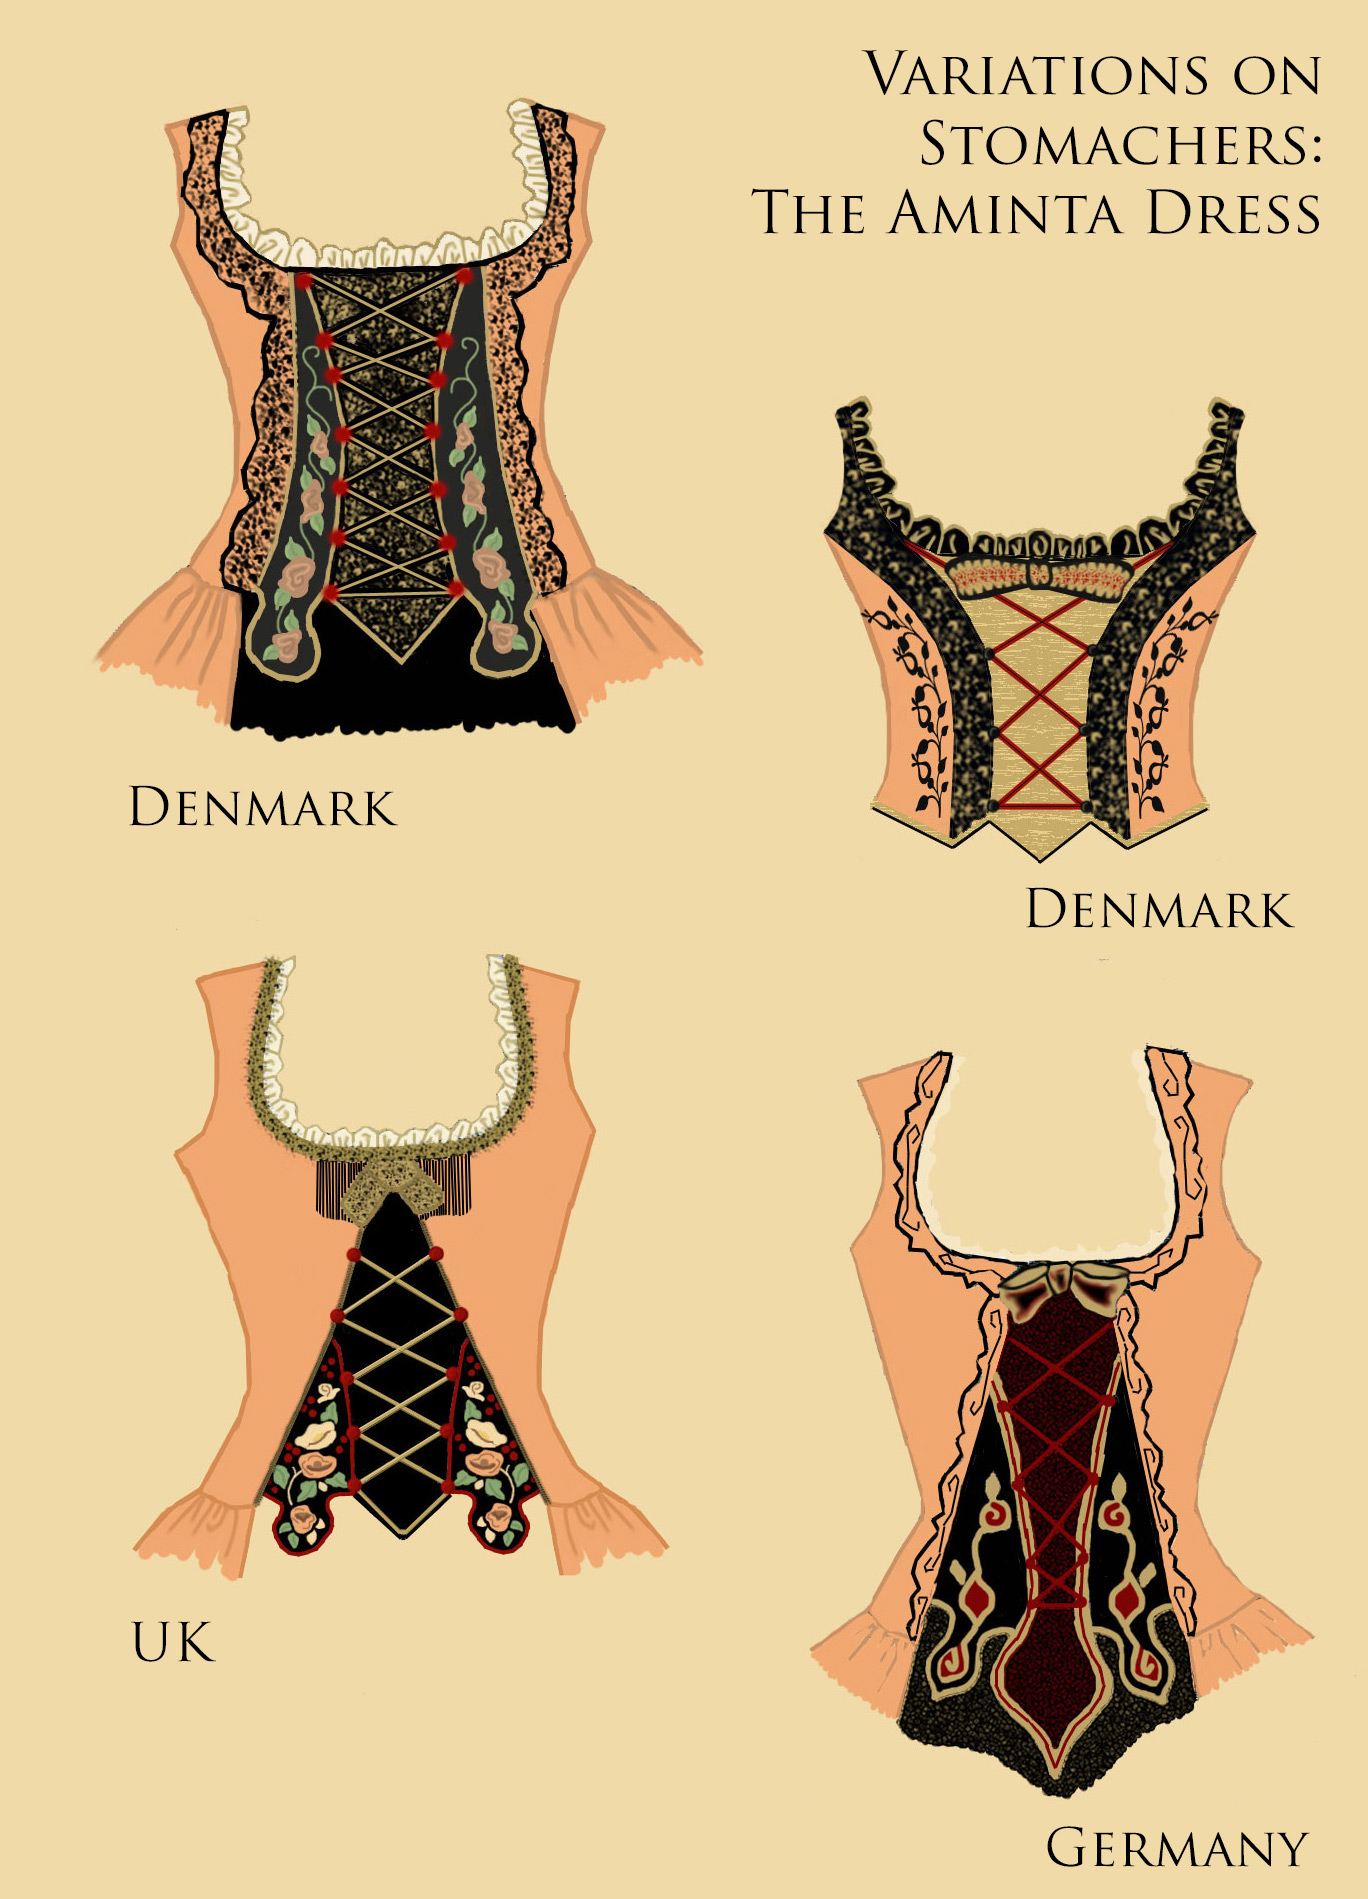
Stomacher Variations
Embellishment: The neckline is edged with gathered lace, which might be cream, black, or gold. The edge is often trimmed with a row of braid, floral appliques, or embroidery in black, gold, or red.
Epaulettes: The shoulders feature fringed epaulettes, which likewise vary in design. The shoulder part of the epaulettes might be a solid lace cap, an open-work design, or a corded lattice design. The fringe that hangs off the shoulder might be fine or thick; a few have tassels, ball-fringe, or beaded fringe, instead.
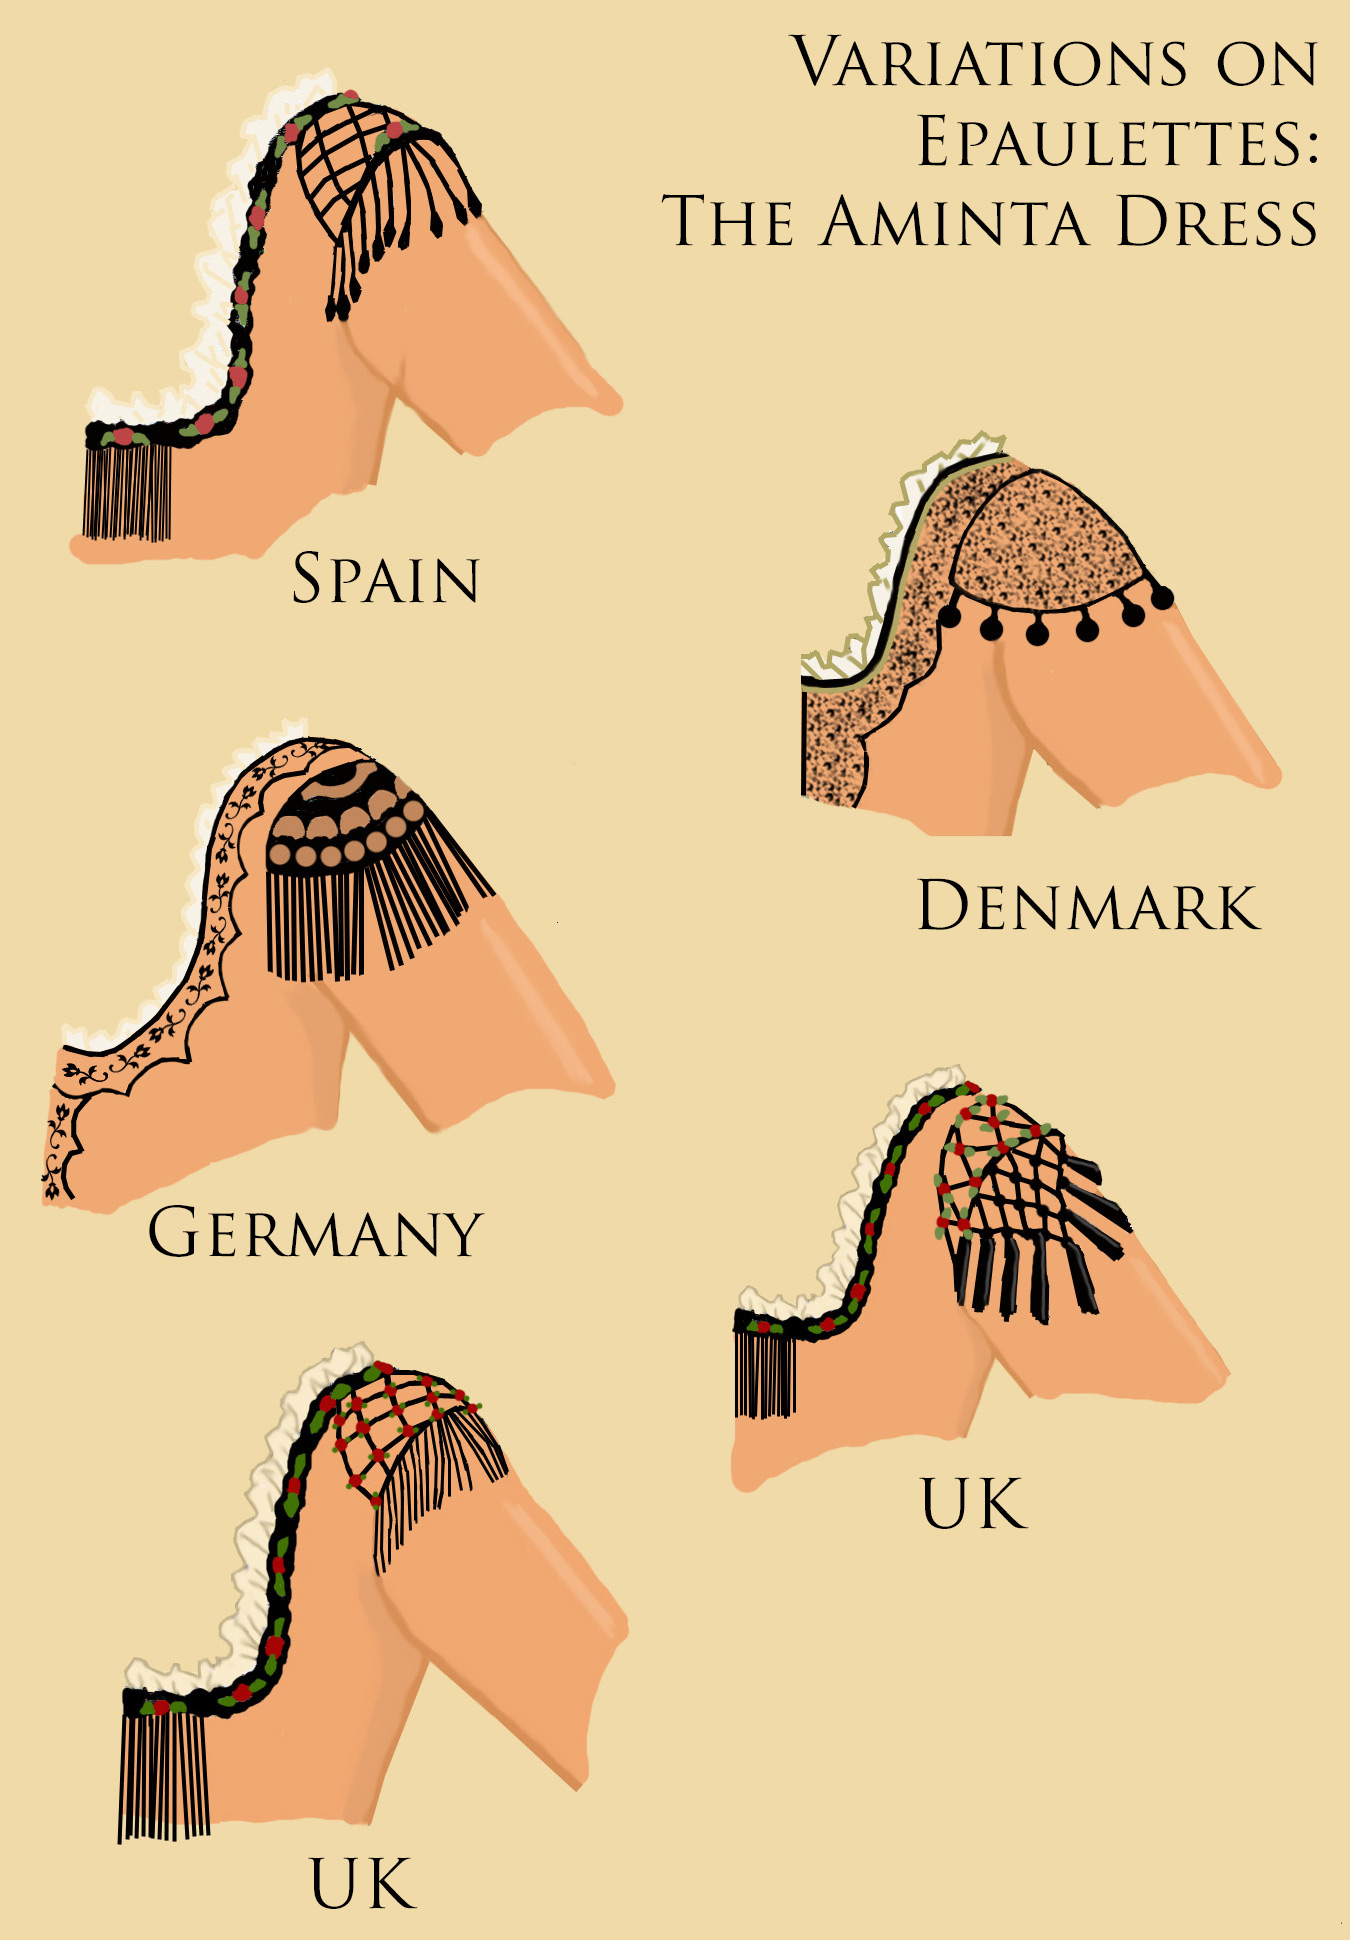
Epaulettes Variations
Sleeves: The elbow-length sleeves end in a scalloped ruffle, which is embroidered the same as the skirt ruffles. Generally, it’s shorter in front and longer in back, but occasionally it’s the same length all around. Beneath this ruffle, the sleeves are layered with gathered lace, sometimes black, sometimes cream, sometimes gold.
Sleeve Ruffle
As you can see, this is a very complex costume! For my doll-sized version, I had to simplify the details in order to make it work with the doll’s scale.
- Step #3: Materials
Which doll to use? I own many different fashion dolls, ranging from 11 ½” to 22″, with different body shapes, and different hair/eye colors. The choice of doll was crucial to getting the right look, so I picked Gene Marshall, a 15 ½” vinyl doll who is similar to Barbie, but much larger and therefore easier to work with. Specifically, I went with “Simply Gene,” who has long, wavy, dark brown hair. I would have preferred a curlier hair—my doll’s hair is rather frizzy—but as expensive as these dolls are, I didn’t want to risk ruining her by attempting a boil perm.
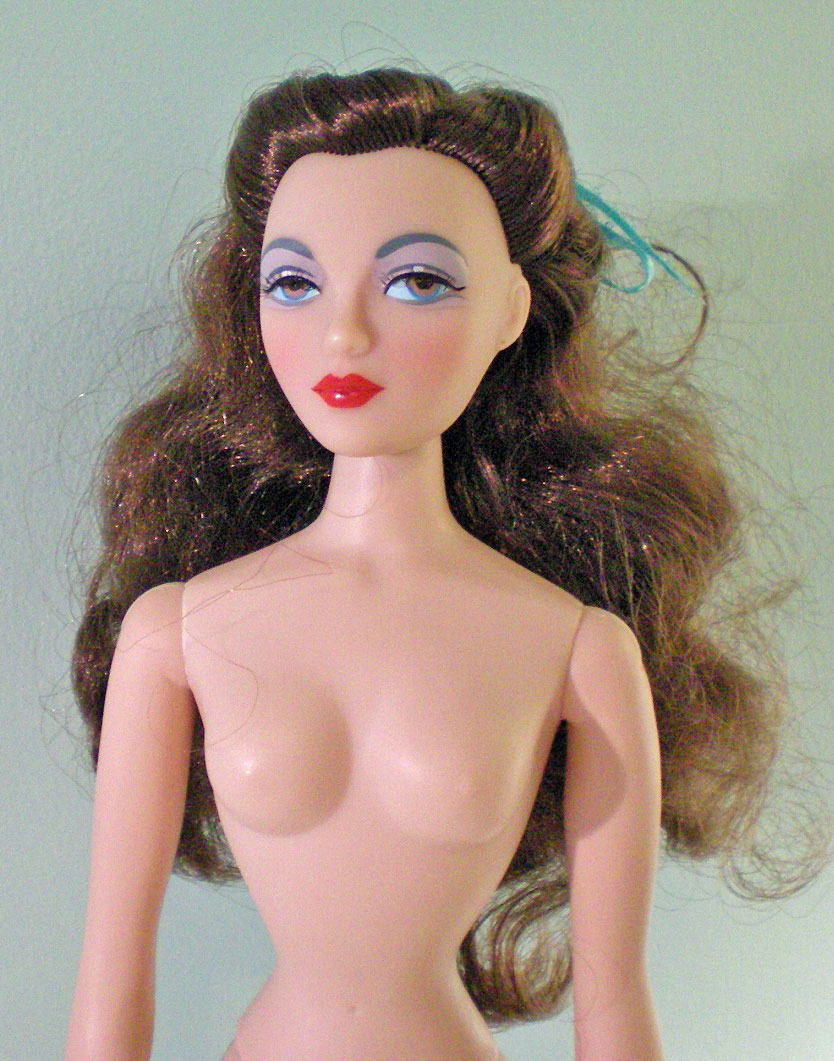
Simply Gene (Ashton Drake)
At first I was going to use a peach matte satin for the dress. However, I decided the color was wrong—too pinkish and too pale—and the fabric was rather heavy. I searched for something lightweight and found a copper-gold shot taffeta. The color was similar to many photographs of the costume. The gold shimmered and it had a slight crinkled texture to it, but the effect was quite subtle, so it was a compromise I was willing to live with.
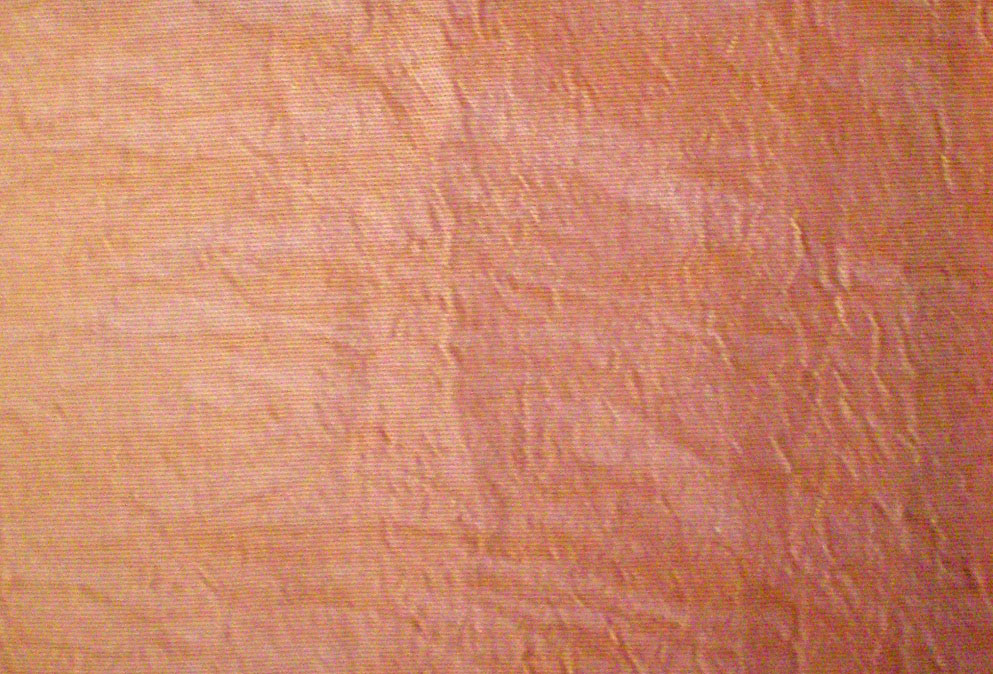
Shot Taffeta
-
Note on Scale
It’s vital to get the proportions right when creating a doll costume. You will destroy the delicate illusion of miniaturization if you use heavy fabrics, too-large prints, lace that’s stiff or oversized, or trims that are too wide.
The edges of the tiered ruffles are supposed to be embroidered in black, but I didn’t have an embroidery machine, and it would’ve been a great deal of work to hand-embroider such an intricate pattern on so many yards of ruffles! Since the premiere version of the costume, as worn by Sarah Brightman in London, used a black lace overlay instead of embroidery, I decided to follow their cue and use lace instead. I bought a ⅝” black Venise lace, which was a bit on the heavy side, but it was the best I could find.
Black Venise Lace
Originally, I’d planned to use a sheer white lace edged with gold for the sleeve ruffles, but the colors didn’t coordinate well with the rest of the costume. I replaced it with a delicate black lace.
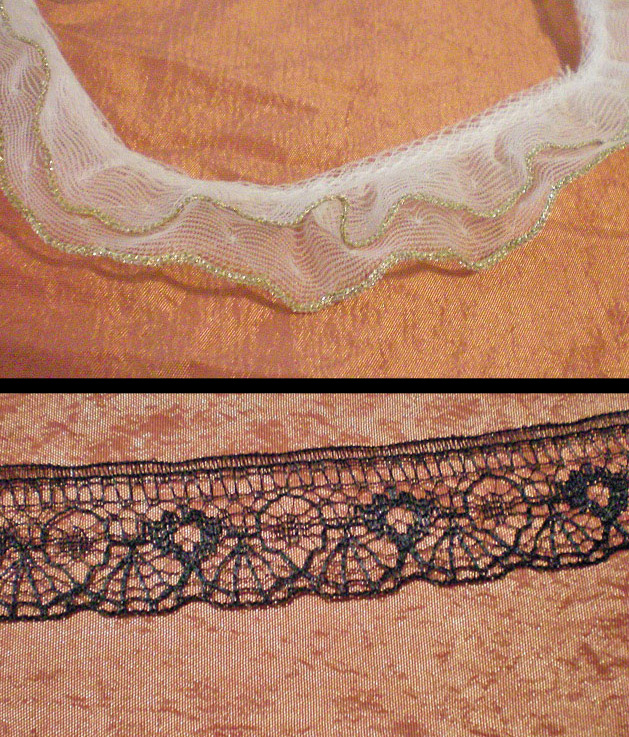
White/Gold Lace vs Black Lace
As with full-sized costumes, accessories are key. I went to my favorite source for doll shoes, Facets by Marcia, where I found a pair of black Victorian lace-up boots that were absolutely perfect.
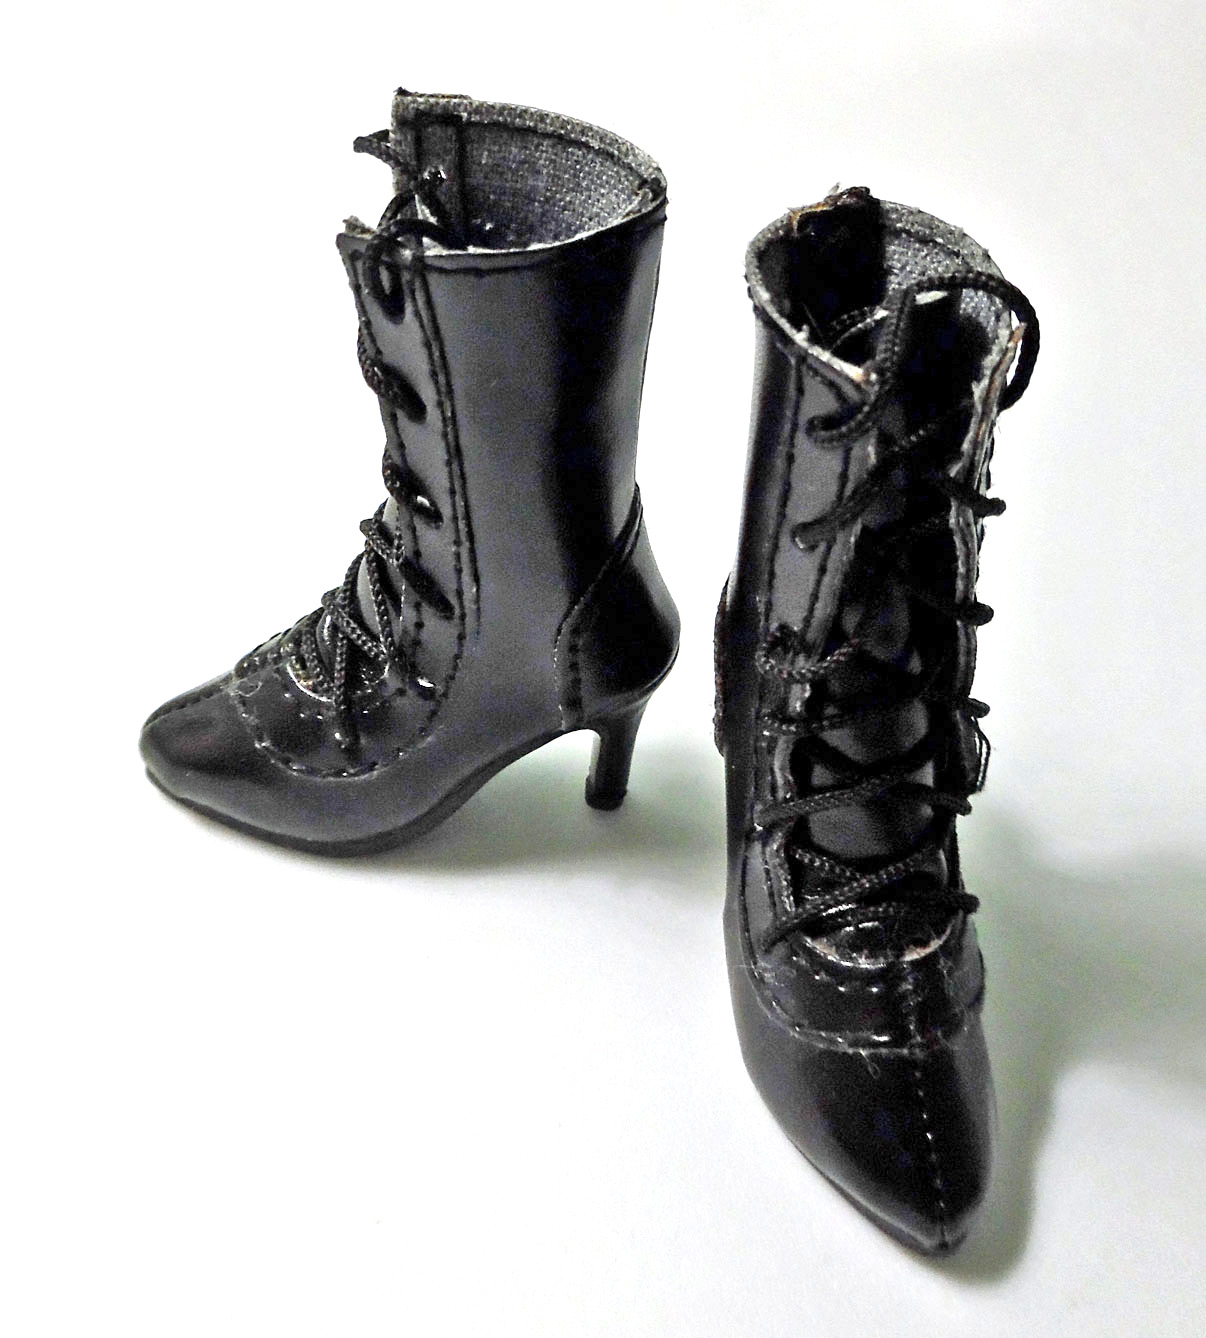
Victorian Doll Boots
The only other accessory for this costume is a black shawl embroidered with red and peach flowers. My original plan was to embroider the shawl myself, but as you’ll see shortly, this didn’t quite work out.
- Step #4: Construction—Petticoat
One of the hardest pieces to make was the petticoat. I had no photos to work from and no description of the costume’s underskirt, so I had to improvise. What made my task especially difficult was the fact that the skirt (and therefore the petticoat) is not a straightforward bell-shape, but is wider on the sides, 18th century-style.
To protect the doll’s stockings from getting snagged, I made the first layer out of a lightweight broadcloth. It’s tiered, so there are three sections, each wider than the one above it. I gathered two lengths of tulle and hand stitched them to the bottom and middle tiers. Instead of gathering the material evenly all the way around, I slid more tulle to the sides, which provided the shape I needed.
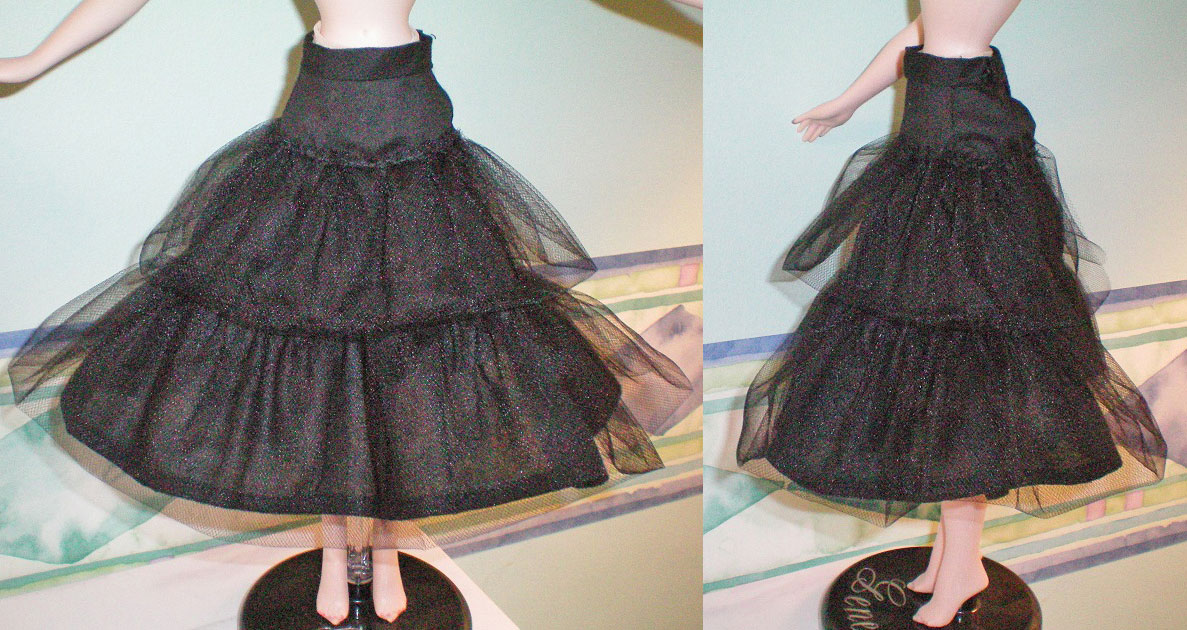
Petticoat, Front & Side View
- Construction—Skirt
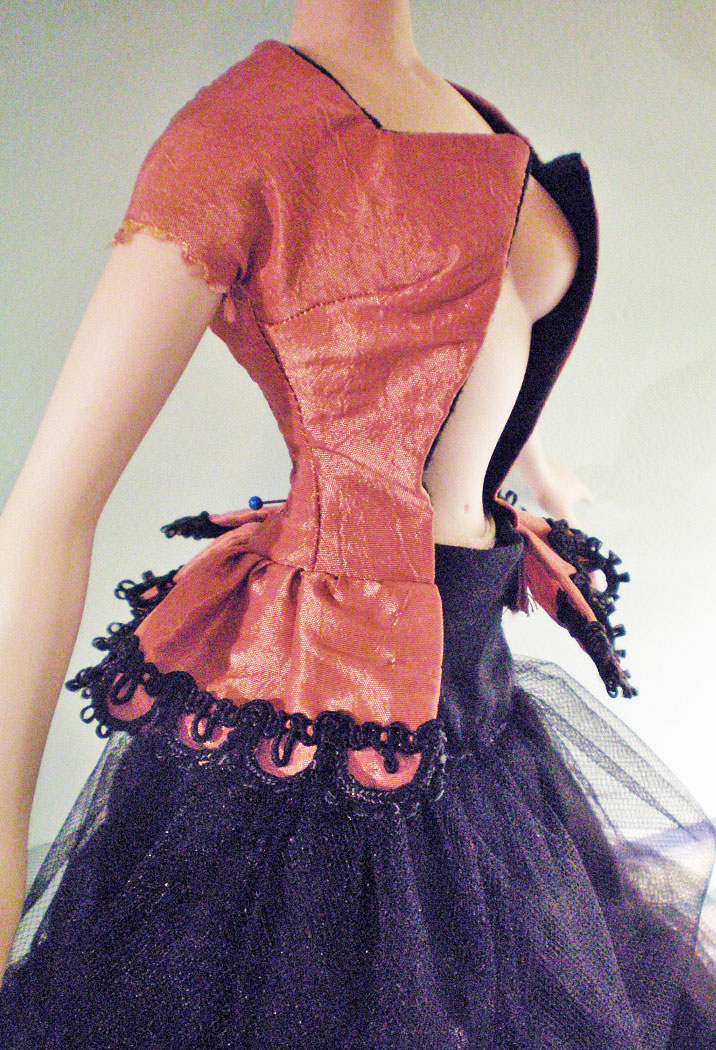
Before starting the main costume, I had to decide whether to make a one-piece dress or a separate skirt and bodice. Both versions have been used by the show, but I decided to go with separates. My skirt has three ruffles, and the bodice has a peplum. Together, these give the illusion of a ruffled dress.
Sketch of the Peplum Bodice & Skirt
I began with a base to which the ruffled tiers could be sewn. Initially, I used a fitted yoke attached to a gored skirt, but I had trouble getting this design to work. After some consideration, I changed it to a princess-seamed skirt with extra darts at the waist. I hemmed it with self-bias binding and added a waistband that fastens on one side.
Princess-Seamed Skirt, Back View
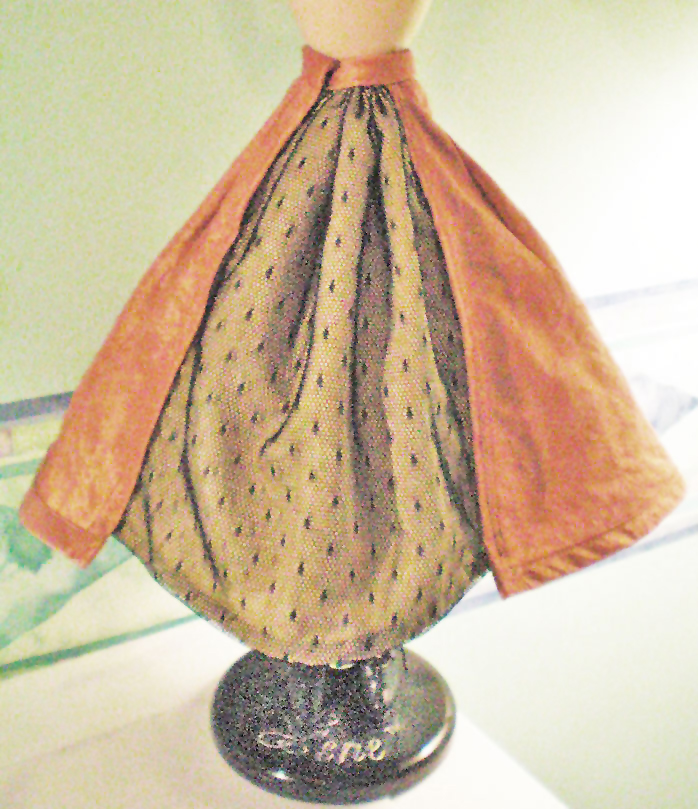
For the “underskirt” that peeks out in front, I tried layering sheer bronze organza over an antique-gold satin, but the organza made the inset too stiff. It also looked nothing like the original costume. After trying a few different things, I went with a fine black point d’esprit layered over a gold fabric. While not identical to the original design, it invoked the spirit of it. Sometimes, that’s the best way to go.
I must have erred in cutting the fabric, or else it stretched when I hemmed it, because the center of the underskirt hung down quite low, creating a deep U-shape, instead of the gentle curve it was meant to have.
Skirt Inset, Messed Up
To fix the problem, I trimmed the lower edge and re-hemmed it.
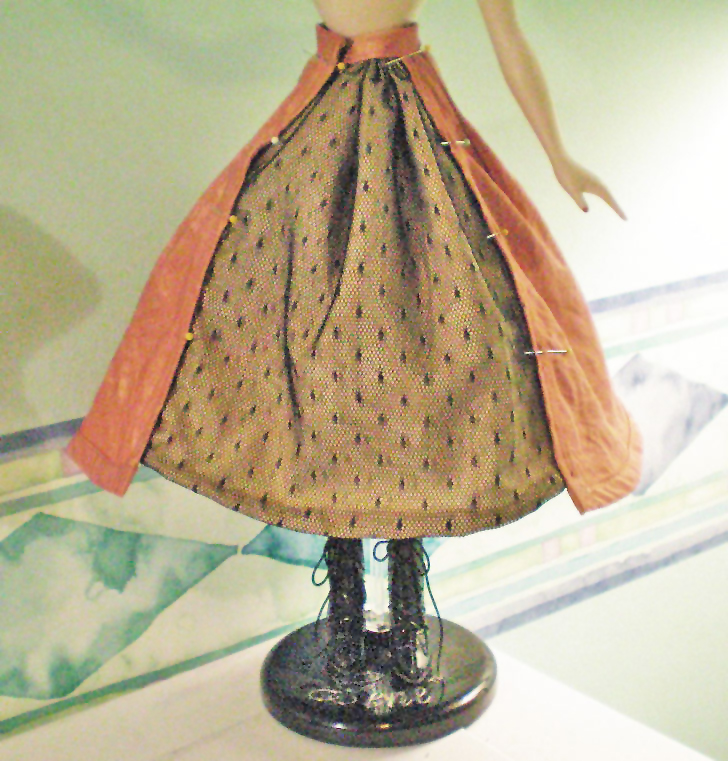
Skirt Inset, Fixed
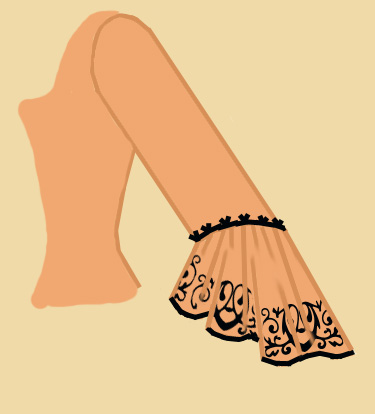
For the skirt’s ruffles, I cut three panels that were 3“ wide. I wanted the scalloped ruffles to match the scalloped lace, so I made a template by tracing the lace on an index card, and used this to trim the edges of each ruffle panel. Hemming such small scallops would have been impossible, so I used Fray Check to seal the edges. I then hand-stitched the Venise lace to the bottom of each ruffle. Despite my best efforts, the scallops refused to align. I had to trim the fabric again, then reapply more Fray Check. It took forever and was quite frustrating!
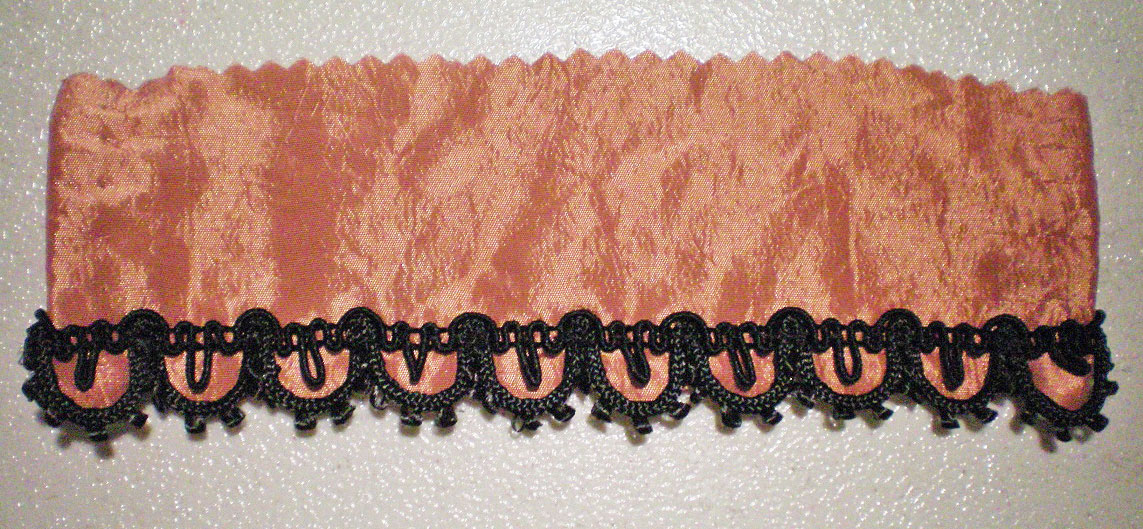
Scalloped Ruffle
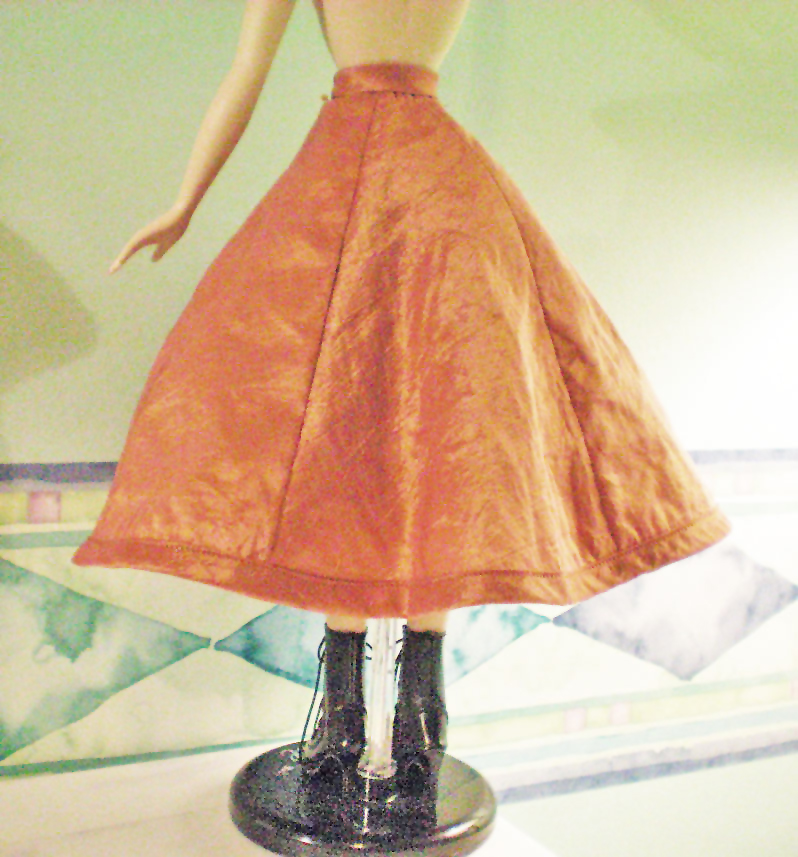
To gather the ruffles, I sewed a zigzag stitch over a length of crochet thread. One end of the thread gets anchored to the fabric, and when you pull the other end, it produces tiny, even gathers. After gathering all the ruffles, I sewed each one to the skirt upside-down, so that when flipped down, the gathers and raw edges would be hidden. This resulted in extremely puffy ruffles! The skirt actually stood up by itself.
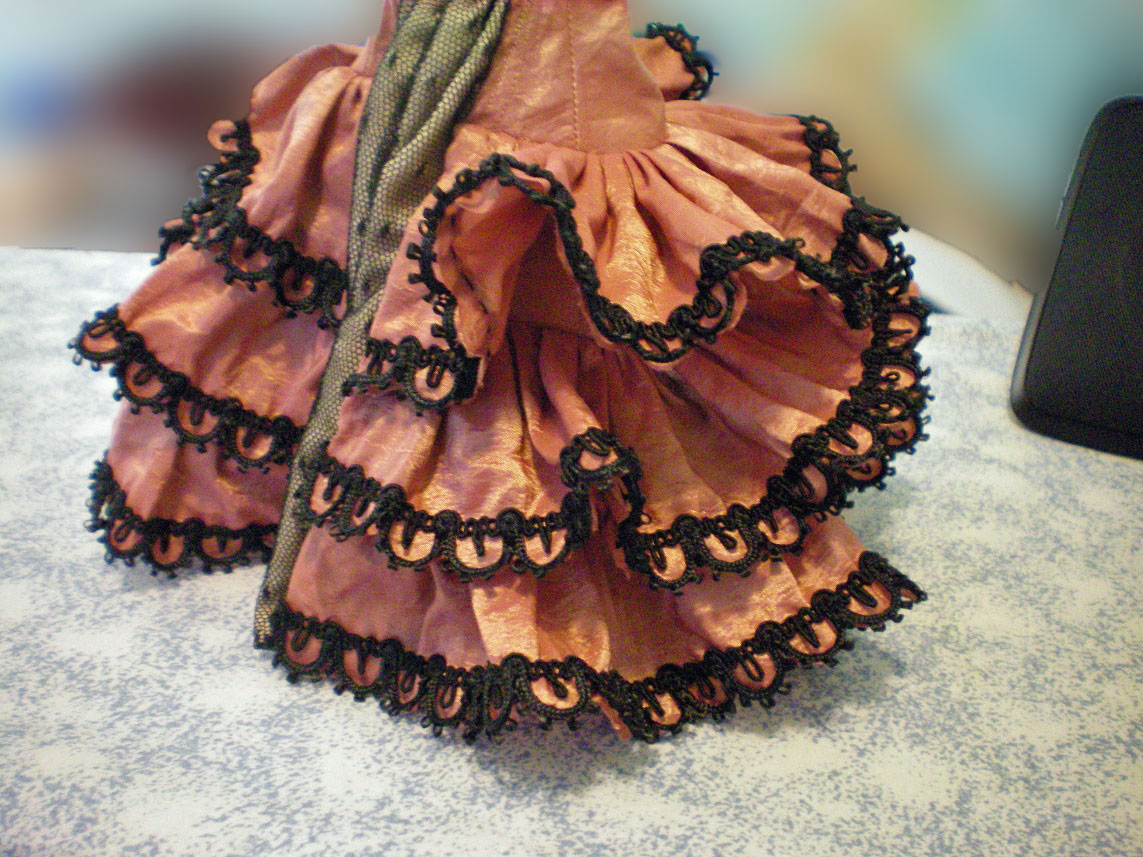
Puffy Ruffles
To tame the ruffles, I tacked them down about every inch. To my relief, this improved the look of the skirt tremendously.
Finished Skirt, Back View
- Construction—Bodice
When working in such small scale, the slightest imperfections are magnified. Since the bodice needed to fit like a glove, I made a mockup first. This allowed me to sort out the pattern design without wasting any of my good fabric.
-
Pattern-Drafting Tip
To draft doll-sized patterns, I previously used Viva-brand paper towels, but I recently found an alternative I like even more: Swedish tracing paper. It’s thin, but very sturdy, almost like lightweight interfacing. It’s semi-transparent, so you can trace over it. Because it’s flexible, you can wrap it around the doll as you design the pattern. You can pin, tape, or baste the pattern pieces together. You can even write notes directly on the material. It won’t crumple or tear, like tissue. Wonderful stuff!
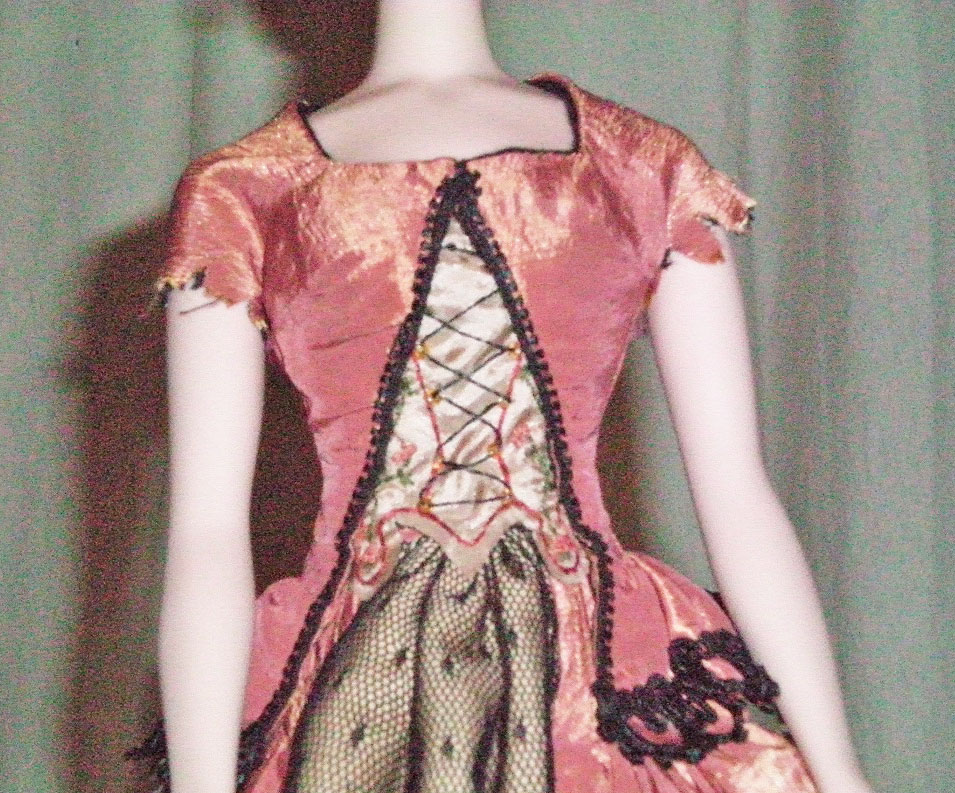
The bodice needed darts in order to fit the curves of the doll’s waist and hips. Because of the zone-front cutout, I couldn’t use normal waist darts, so I used horizontal armscye darts. (In hindsight, I made the darts too long. They don’t end just before the bust’s apex, so it looks a bit wonky.) The back used vertical fisheye or diamond-shaped darts. Once I was satisfied with my mockup, I cut the bodice out of the copper taffeta, assembled it, and lined it with black broadcloth.
Bodice-in-Progress
Next, I made the stomacher out of a champagne-gold taffeta. Since it’s so small, it would have been impossible to line it with finished edges. Therefore, I flatlined it for strength and sealed the raw edges with Fray Check. I simplified the embroidery design, using embroidery floss in rust red, dark peach, and olive green. For a bit of sparkle, I added gold seed beads. I created the zigzag lacing with black satin embroidery thread.

Stomacher-in-Progress
It took several tries to attach the stomacher to the bodice. Somehow, it ended up being too wide. In order to make it fit snugly, I had to overlap the edges of the bodice, which covered some of the embroidery. It doesn’t look bad, but it’s frustrating that so much of the embroidery is hidden.
Because the edges of the zone-front rippled, I reinforced them with a narrow black picot trim, which did a good job of stabilizing the edges.
Bodice-in-Progress
I made the sleeve ruffles in the same way as the skirt’s ruffles—raw scalloped edges sealed with Fray Check and covered with black Venetian lace.
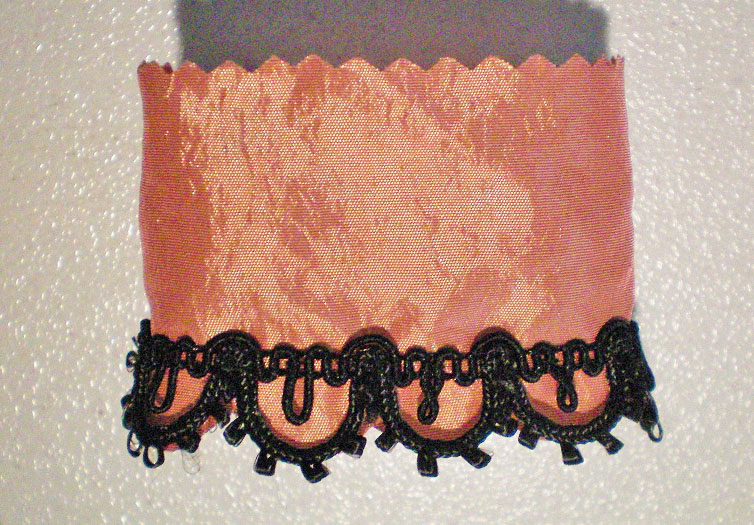
Sleeve Ruffle
Then, I gathered the delicate black lace and stitched it to the inside of the sleeve ruffle. Once the ruffle was complete, I gathered the top edge and attached it to the sleeve.
Now, normally, when sewing doll clothes, you attach the sleeve to the bodice flat—that is, before you sew the side seams. When I made this costume, however, I was quite inexperienced and had no idea how it was supposed to be done. Therefore, I sewed the side seams first, leaving an opening for the sleeve that was about the size of my thumb.
Because the sleeves were so tiny, I couldn’t use the sewing machine. I had to hand baste the sleeve into the armscye, check that it was aligned properly, and then hand sew it using a tiny combination stitch (a running stitch with the occasional backstitch for reinforcement). Once that was done, I added a tiny picot braid to the juncture of sleeve and ruffle.
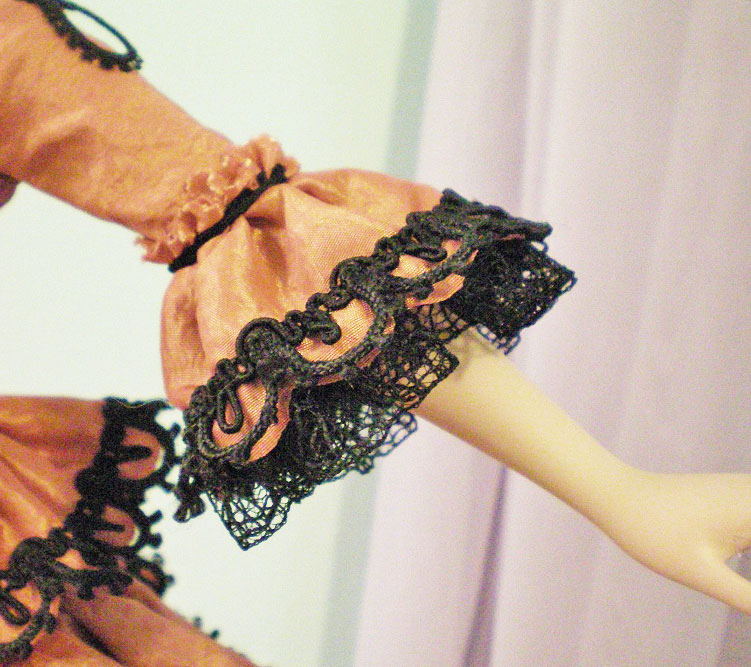
Finished Sleeve
Because this costume was so small, I had to order special snaps—size 5/0. These are the smallest snaps produced and most fabric stores don’t carry them. (I ordered mine from Mini Dolls, a website that specializes in doll-sized sewing supplies and trims.) Black seemed the obvious choice.
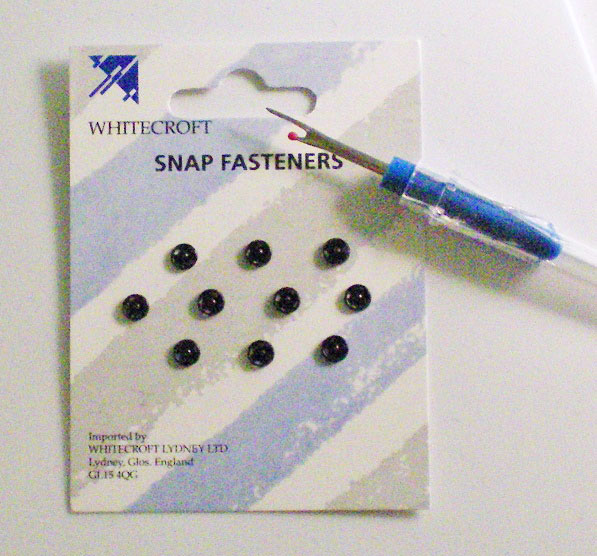
Tiny Snaps
- Step #5: Embellishment
At last, my favorite part: embellishing! I added black picot braid to the edges of the neckline. Because of the scale, I wasn’t able to add a lace ruffle to the neckline, as it would have been too bulky.
Using the same picot braid, I created epaulettes for the shoulders and a bow for the center front. It’s not identical to the original costume, which has lace, braid, and sometimes even fringe at the neckline, but for doll replicas, it’s often better to simplify.
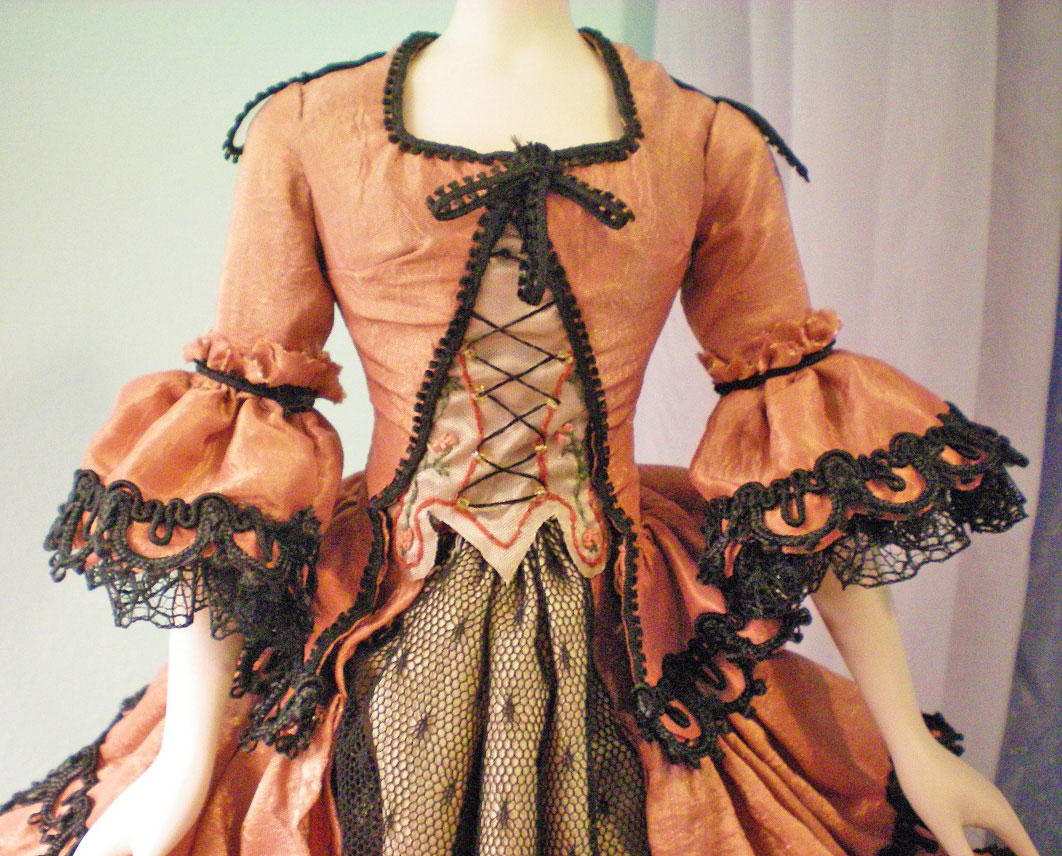
Finished Bodice, Front View
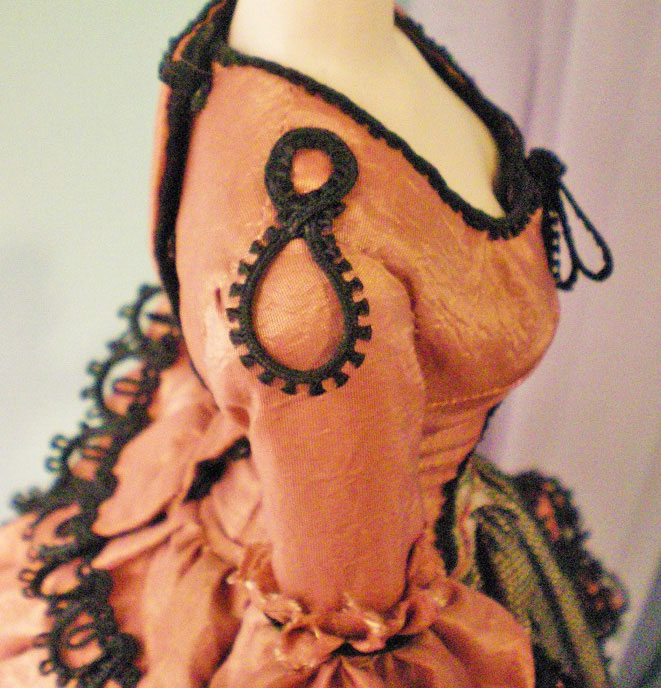
Epaulettes
- Construction—Shawl
In the show, when Christine first walks onstage in this costume, she wears a black shawl that’s embroidered with colorful flowers. The costume wouldn’t be complete without it, so I set about making one. My first attempt failed.
I used a lightweight matte satin and embroidered it with lazy daisy flowers, French knots, vines, and satin-stitch leaves. I loved the color combination: rust-red, coppery peach, and olive green. However, I made the flowers too large for the scale of the doll and didn’t even notice until after I’d sewn the lining and fringe. Plus, the shawl was too heavy for the doll. It was lovely, but it didn’t look right.
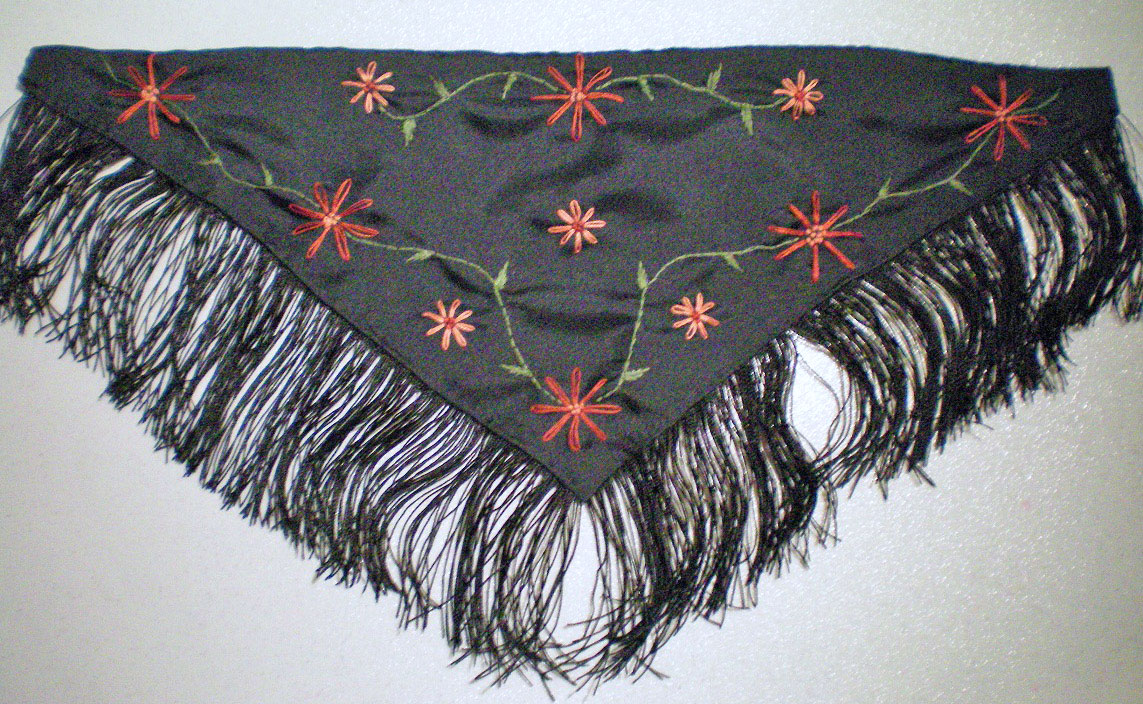
Embroidered Shawl
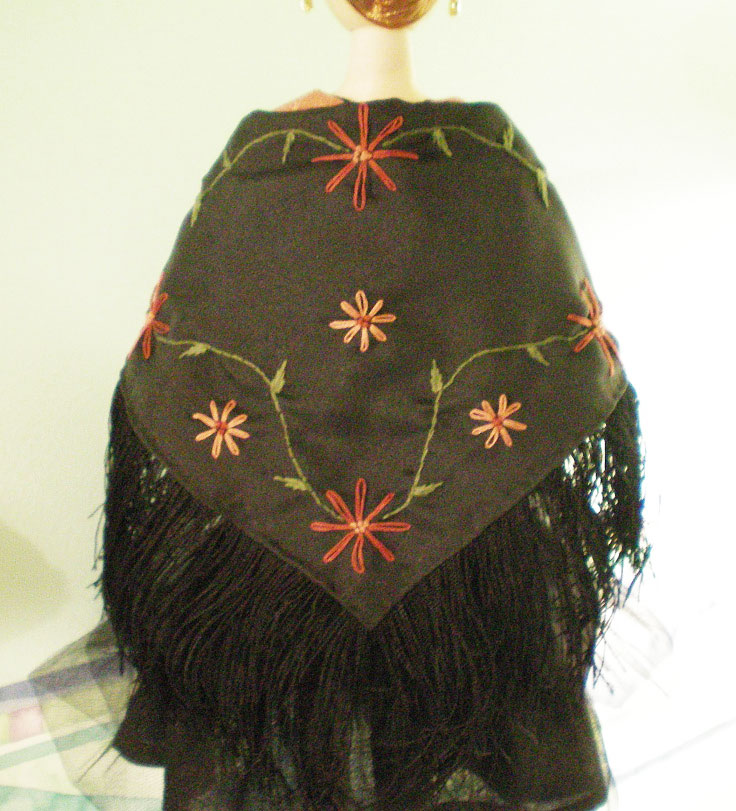
Embroidered Shawl on Doll
For my second attempt, I used a very fine point d’esprit (dotted net lace). I cut a triangle shape and hemmed the top edge, then recycled the fringe from the first shawl, sewing it to the bottom edges. The result looked much more natural on the doll. I admit, I miss the colorful embroidery, but in this case, something had to be sacrificed for the sake of scale.

Point d’Esprit Shawl
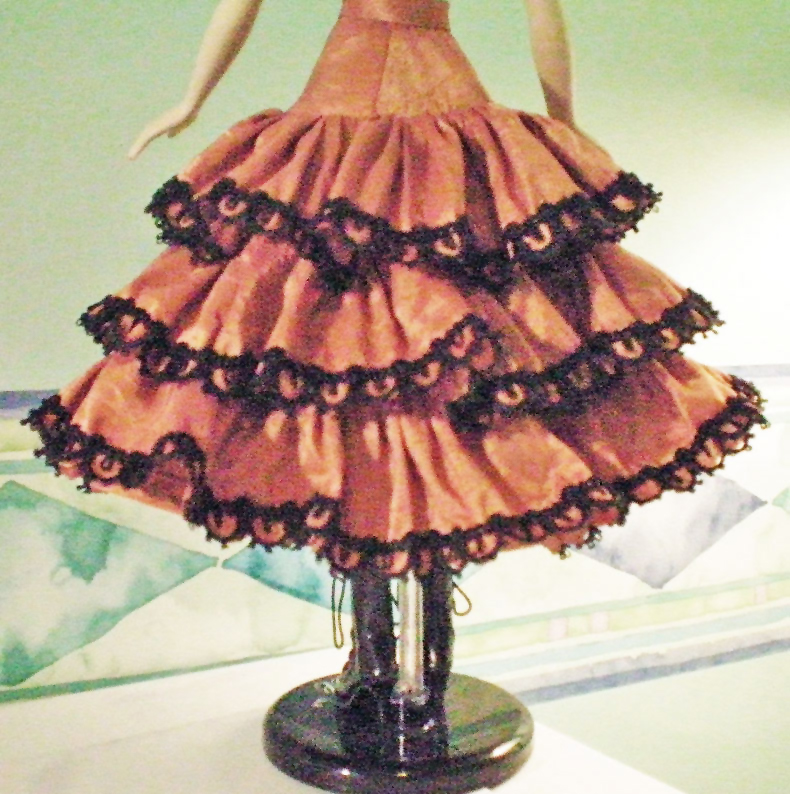
Finished Doll Costume
Are there things I would do differently today? Absolutely. I made this costume several years ago, and at the time, I had precious little experience with doll sewing. I made plenty of mistakes! If I was to redo this costume, I would try to make more of an authentic replica, not simplifying it quite so much. But given my skill level and abilities when I made this, I’m pleased with the results.

The Phantom of the Opera in Miniature: “Point of No Return”
Conclusion
It can be overwhelming to look at someone else’s handiwork with the aim of replicating it. You want to respect the original design, while at the same time, injecting something of yourself. For this costume, I believe I succeeded in meeting that goal.
Without a doubt, replicating a costume is a great deal of work—whether it’s a doll costume or a full-sized one! If you keep the five steps in mind, the process will be less intimidating and you’ll end up with a costume you can be proud of.
Remember:
- Research the original costume as best you can. Study photographs and video clips. Document every detail by writing a description of the costume and making sketches.
- Plan your design. If there are multiple variations of the costume, which version will you copy? Or will you mix-and-match certain features?
- Begin searching for materials. Keep a folder with swatches of fabric, lace, and trims, so you can make sure everything coordinates.
- Construct your costume, drafting or altering patterns, if necessary. Don’t forget to create a mockup first, so you won’t waste your good fabric if your design fails or the costume doesn’t fit.
- Add detailed embellishment to give the costume nuance and depth.
You might consider keeping a diary of the sewing process, so you can look back and remember all of the trials you endured, and the mistakes you made, as well as the moments of inspiration and jubilation. If you post it online, others can benefit from your learning process. Perhaps you’ll end up helping someone who’s trying to make the very same costume.
Above all, remember to have fun with your project! I did this for the challenge of making something, but also because I enjoy the thrill of the hunt for suitable fabrics, the ecstasy of finding the perfect trim, and the sense of accomplishment as I see my costume coming together. There’s truly nothing like it.
~~*~~
Looking for more sewing advice? You’ll find lots of beginner-friendly help in Sewing Basics. More advanced resources can be found in our Articles and Tutorials. If you enjoy reading about the creative process, you might explore our Sewing Diaries, too.