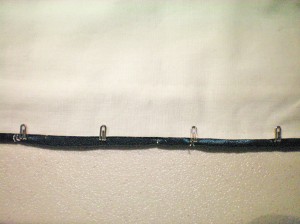
Hooked Together—Sewing With Hooks & Eyes

by Lisha Vidler

(This article was first published at Your Wardrobe Unlock’d.)

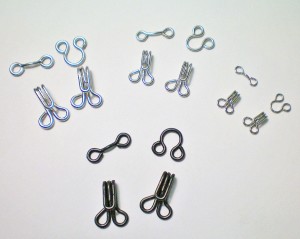
Hooks and eyes are small metal devices that are often used to fasten garments. They are generally made of twisted wire and have two round loops on either side, with which to be sewn down. Hooks and eyes come in a wide range of sizes, from miniscule to immense, depending on their purpose.

Hooks and Eyes

Closeup of Hooks & Eyes

They have a number of functions, most frequently in couture sewing. For example, a single hook and eye is often placed at the top of a zipper to hold the neckline or waistband edges together. They are used to fasten collars and sleeve cuffs, custom belts, waist stays, and lingerie guards, or anywhere that a larger fastener would be inconvenient. Doll clothes sometimes use hooks and eyes, and they are a popular choice for historic costumers, since they’ve been in existence for centuries.

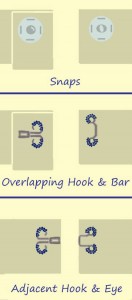
Hooks and eyes have the advantage over snaps, in that they can be used not only with overlapping edges, but also with abutting fabric edges. Snaps can only be used with edges that overlap. A snap is more likely to pop open under pressure, however hooks to tend to unfasten easier when jostled in different directions.

Snaps vs. Hooks

Snaps vs. Hooks

Choosing Hooks & Eyes
Once you’ve determined that a hook and eye is the best choice for your project, select the smallest size that will work. They are sold in white, black, or nickel, so pick the least conspicuous color for your fabric. Keep in mind that frequent or strenuous use might chip the enamel on white or black hooks, revealing the nickel underneath.

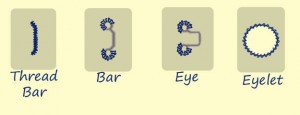
Hooks attach to either a rounded metal eye or a flat bar. You can create your own thread bar or eyelet, as well. A metal eye or bar is much sturdier, but a thread bar has the advantage of blending in with your fabric. With an eyelet, the hook will lay flat against the garment. However, it isn’t always appropriate to put a hole in your garment.

Eyes, Bars, Thread Bars, & Eyelets

Thread Bars, Metal Bars, Metal Eyes, & Eyelets

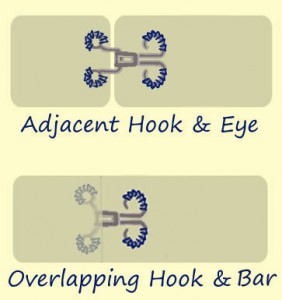
Should you use bars or eyes to fasten your hooks? It depends on whether your fabric edges will abut or overlap. Often, eyes will show when used on overlapping closures. Therefore, they’re best used with abutting edges, where they’ll be hidden. Bars work best for edges that overlap, because they won’t show.

Where do you place your hooks? Generally, hooks are sewn about 1/8″ from the edge of your garment, on the underside of the fabric. If you’re not overlapping the edges, eyes will likewise go on the underside, about 1/8″ from the edge—far enough that neither hook nor eye will show when the closure is pulled taut. If you are overlapping the edges, you’ll place your bars on the outer side of the fabric. Their position is not crucial and they can be moved, if necessary, for a good fit.

Overlapping and Adjacent Edges

Adjacent and Overlapping Edges

Attaching Hooks & Eyes
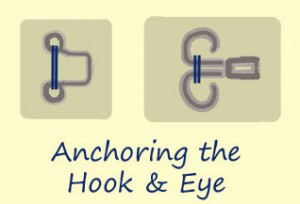
Mark your garment with a chalk pencil or fabric pen to ensure accurate placement. (It’s a good idea to test your fabric first, to be sure the marks will come off.) Select a hand needle that’s sturdy enough to pass through all the layers of fabric, but small enough to easily fit through the hook’s holes. Thread your needle and knot the ends together, then wax the thread to strengthen it. When you begin, either “pop” the knot, so it’s hidden between two layers of fabric, or start on the wrong side of the fabric, so the knot isn’t seen. Take two or three stitches across the metal loops, just to anchor the hook or eye in place.

Anchoring the Hook or Eye

Anchoring the Hook or Eye

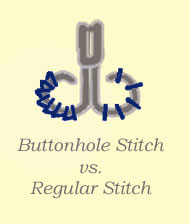
Using small buttonhole stitches, sew the loops to the fabric. Using buttonhole stitches takes slightly longer than simply sewing over the metal loop, but it provides a neat, professional finish.

Buttonhole vs. Regular Stitch

Buttonhole vs. Regular Stitch

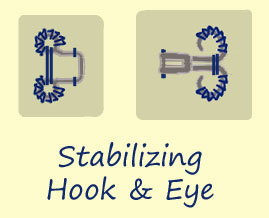
After you’ve sewn the loops of your hook or eye, you’ll need to stabilize it. With hooks, this means stitching down the top part, just beneath the curved part of the hook. With eyes, you must stitch down the sides of the eye, just below the top curve. Bars don’t require stabilization.

Stabilizing Hook & Eye

Stabilizing a Hook & Eye

Creating Thread Bars
If you prefer things to match, a pretty option is to fashion a bar out of thread. It can be nearly invisible, but be aware that it will not hold up the way a metal bar will. Use it only for hooks that won’t be under strain.

Thread Bar

Thread Bar

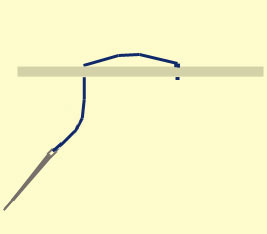
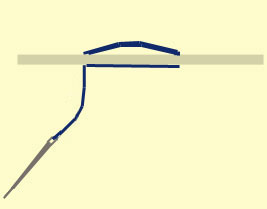
Thread your needle, knot it, and wax the thread. Hide the knot beneath the fabric and take two tiny stabilizing stitches. Determine how wide you need the bar to be, keeping in mind the thickness of the hook. A stitch the exact width of the hook won’t allow the hook to slip beneath it, so make it a little wider. Take a single stitch, being careful to keep the tension loose.

First Stitch

First Stitch

Return your needle to where you began, bringing the thread across underneath and back up to the right side of the fabric. Go across the width of the bar again, adding a second strand of thread to thicken the bar. Repeat, so you have a bar comprised of three layers of thread, both under and on top of the fabric.

Creating the Bar

Creating the Bar

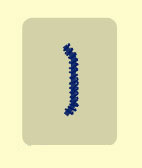
Now you’re going to sew buttonhole stitches across the length of the bar. Slide the needle under the bar, but don’t pull the thread all the way through. Pick up the loop of thread and slip it over the needle, then pull taut. Repeat until your entire bar is covered with buttonhole stitches.

Buttonhole Stitching

Buttonhole Stitching

Another option is to simply wrap the thread around the bar, creating a spiral bar. This isn’t as sturdy, but it will be thinner, which is good if you have trouble getting your hook to fasten over the bar.

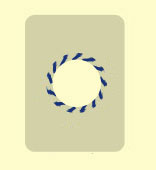
Creating Eyelets
If you’d like your hook to lie completely flush with your garment, you might fasten it to a handmade eyelet. Consider carefully, however, and always make a test sample first, because an eyelet can’t be undone.

Eyelet

Eyelet

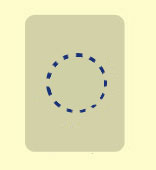
#1. To make an eyelet, first sew a running stitch in a circle. Stitch through all layers of fabric and make it the exact size you want your finished eyelet to be.

Step #1

Step #1

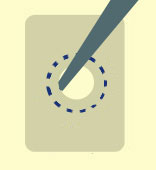
#2. Use an awl or tapestry needle to spread the threads of your fabric apart, creating a small hole. Never cut a hole in the fabric, for this can rapidly tear and cause a much bigger hole than intended. Once your hole is established, use a tapered awl, a small crochet hook, or a round chopstick to enlarge it. Twist it through the hole, but go gently, carefully spreading the threads apart without breaking them.

Step #2

Step #2

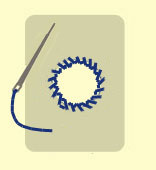
#3. Once your hole is the right size, take several whip-stitches around the edge to keep it from closing.

Step #3

Step #3

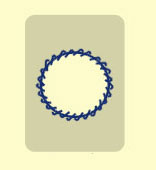
#4. Sew around the edge of the hole with buttonhole stitches. Make them close together, for they will prevent the hook from wearing through the fabric.

Step #4

Step #4

#5. Once you’ve gone all the way around, knot your thread. Don’t cut it immediately, but pull the needle between the layers of fabric for some distance, so that the loose end will be hidden.

Step #5

Step #5

Using Hooks & Eyes
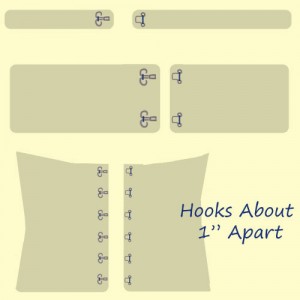
How many hooks and eyes do you need? That depends on how wide an area you need to fasten. A narrow ribbon belt, for example, or the top of a zipper, needs only one. A waistband could use one large hook in the middle or two smaller ones spread apart, depending on which looks better. For the front of a historic bodice, space your hooks about an inch apart.

Hook Spacing

Spacing Your Hooks

Remember that hooks aren’t appropriate for all purposes. They hold fast by being pulled in opposite directions. For this reason, they work quite well for waistbands and bodice closures, but they tend to come undone if used for securing things that get jostled around. For example, it isn’t wise to use hooks to attach a dust ruffle to the underside of a trained gown, or to secure the tapes of a bustled skirt, because these tend to move around in different directions and the hooks may come undone.

Illustration

Securing a Bodice
If you’re using hooks to close something like a snug-fitting jacket, a bustier, a Victorian bodice, or a corset, you need to anchor the hooks to prevent gaping. At a minimum, the hooks must be sewn through the lining and interlining. If you only attach them to the lining, they’ll pull away from the outer layers, causing wrinkling and gaping.

Gaping Bodice Closure

Gaping Bodice Closure

There are two solutions. You can sew the hooks and eyes through all layers of fabric (lining, interlining, and fashion fabric) and hide the stitches with buttons or trim. If you don’t want the stitches to show, you can anchor the hooks to the interlining before the bodice is assembled.

For the second option, some planning is required. Make a mockup of your bodice first, to be absolutely certain everything fits. Any fluctuations in size will have to be addressed later by altering the fit at the seams, not by shifting the hooks over.

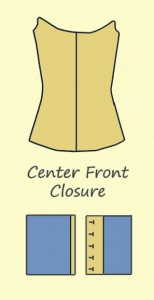
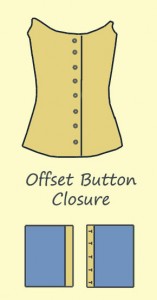
Take the front pieces of the bodice before they’re sewn to the sides and baste the fashion fabric and interlining together. Fold the front edges under. The width of this fold will vary based on whether you want the edge of the closure at the exact center front or if you want it offset to allow room for non-functioning buttons down the front.

For a centered edge, turn under more on the right and less on the left. When it’s time, you’ll place your hooks near the edge on the underside of the right and you’ll place your bars a good distance from the edge on the outer left side.

Center Front Closure

Aligning the Hooks For a Center Front Closure

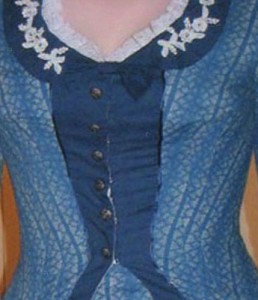
For an overlapping false button closure, turn under an equal amount on each side. When it’s time, you’ll place your hooks on the underside of the right side, about 1/4″ from the edge. Your bars will go on the left side; shift them toward the edge so they’ll remain hidden beneath the overlap. Remember that your closure must overlap enough that your buttons will fall down the center front line of the bodice.

Offset Button Closure

Aligning the Hooks for an Offset Button Closure

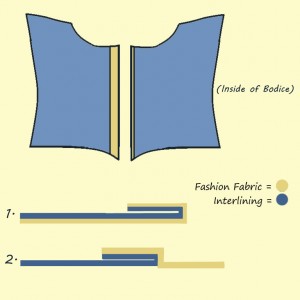
Steps For Placing Hooks

1. Once you’ve determined the width of your front edges, fold them over by that amount. You’ll have a thickness of four layers: two fashion fabric and two interlining. 2. Fold the top fashion layer back out of the way, leaving you with just three layers.

Steps 1 & 2

Steps #1 & #2

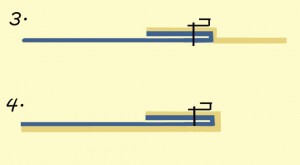
3. Stitch the hooks through both layers of interlining and the inner layer of fashion fabric, keeping them free of the (folded back) outer layer of fashion fabric.

4. Once finished, fold the top layer of fabric back in place, but don’t stitch it.

Steps 3 & 4

Steps #3 & #4

5. When the hooks are all sewn in place, attach the lining, folding the edge so that it hides all but the outer edges of the hooks and eyes. Slipstitch the lining along the folded edge of your bodice. This is a historic technique that leaves your garment neatly finished.

Step 5

Step #5

Lined Bodice

Lined Bodice

Conclusion
Hooks and eyes are a great way to fasten your garments. Be sure to choose the right size for the job, space them properly, and sew them on securely.

~~*~~

Have you used hooks and eyes, thread bars, or eyelets in your recent sewing projects? What techniques do you find useful?

30 Responses to Hooked Together—Sewing With Hooks & Eyes

  1. John says:

    Hello,

    I found this page while searching for the hook and eyes shown at the top, for 1/6th scale figure projects. Could you share with me a link or two on where to order online?

    Thank you so much,
    John

    • Lisha Vidler says:

      I’ve three links for you to try. First, you can try Mini Dolls.com. They carry tiny snaps and hooks & eyes. I’ve used them personally and can vouch for their excellent service. Second, there’s Mini World. I haven’t used them, but they carry both black and nickel 0-size hooks. Third, there’s eBay. There’s two searches you can use: search for “doll hooks” and narrow the search to the category of crafts, or search for “0 hooks eyes” and narrow it to crafts. You should find several auctions that sell the tiny hooks there. Hope this helps!

  2. beverly says:

    I am making a wedding belt for my daughter. I have overlapped the 2 end pieces and I am using a hook and bar. Yet the belt closure does not lay flat and I still see the hardware. Any tips. I want to sew a decorative button on top.

    • Lisha Vidler says:

      If you’re using a hook and bar, it should lay pretty flat, although if you’re overlapping the ends, there will always be a slight amount of rise, given that the two pieces are lying on top of each other and the hooks are not absolutely flat. For something truly 100% flat, you’ll need to abut the ends, rather than overlap them. You might try using smaller hooks/bars first, and see if that makes a difference. Or you could squeeze the hooks with pliers to flatten them a little, but be careful that you don’t flatten them so much that they can’t hook over the bar.

      As for the hardware showing, I can think of a couple of possible causes. How far back did you place the hooks? Try shifting them back away from the edge, so that the ends of the hooks are at least a quarter to half an inch away from the edge. The other possibility is that the fabric is shifting, causing the hooks to show. This happens frequently when making historic bodices and the solution is the same. Assuming your belt has interfacing or interlining inside, you need to be sure the hooks are sewn through the top layer of fabric, as well as the interfacing or interlining. This is best accomplished before it’s fully sewn, when you still have access to the inside of the belt, but if it’s too late, you can sew through all the layers and then add something decorative to hide the stitches. Having the hooks “anchored” in this way will prevent the fabric from shifting and causing the hooks to show.

      Hope this helps! Let me know if you still have trouble.

  3. Jackie G. says:

    Thank you for such a helpful and clear instruction. I’ve been sewing for years and hooks and eyes always boggle my mind. I liked your illustrations. I found you by a web search and after seeing 3 other sets of instructions, liked yours best. Thanks for taking time to post and help us!

  4. Charna says:

    I am making my own bra, and have done really well so far – I need to create a back closure and wondered if there are instructions for making my own hook and eye tape for the back.

    • Lisha Vidler says:

      Your best bet would be to buy a set of pre-made bra hooks. These are available at most fabric stores (in the notions aisle), or you can probably find them online. They have three sets of hooks and eyes, so you can adjust the sizing. That would be the easiest solution! If you’re dead set on making your own, I would buy some wide twill tape and sew the hooks and eyes to that, but it would be a LOT more work, it won’t be as sturdy, and it won’t be as comfortable against your skin. Have you looked at the articles on bra-making at Foundations Revealed? It’s a subscription site, but well worth the price, and some articles are free. In any case, there might be another solution there. Congrats on making the bra and I hope you find something that works!

  5. Pingback: Musings À La Mode: DIY Oriental Wrap Skirt ~ 2 Ways | Daisy and the Fox

  6. christine jacob says:

    I need your assistance ASAP. I need to sew 4 Dritz coat hook & eyes for the front of a jacket. Do I turn the eyes up or down, I cannot find the answer anywhere. Please let e know . Thank you for your help

    • Lisha Vidler says:

      If you’re sewing eyes, which are rounded, you want the single curved loop to face the edge of the garment. The double loops should face away from the edge. However, if you’re sewing a jacket with overlapping edges, you actually want to use bars, not eyes. (Only use eyes if the garment edges abut, side by side.) If the edges overlap, the loops on the eyes will show, whereas bars will be hidden. You can buy metal bars to match your hooks, or you can make thread bars, which are almost as sturdy and have the benefit of blending in with your fabric. I hope that answers your question, but if not, please feel free to use the “contact me” form to email me.

  7. Pingback: Calling all hammy hammock pros - Page 2 - Hamster Central

  8. Tom Christensen says:

    Thank you for an informative guide. I am looking for a certain type of hook & eye closures.

    Take a look: http://i.imgur.com/S2eZz7q.jpg

    Do you have an idea which supplier carries these for sale?

  9. Khimba says:

    Thank you! Am closing the back of an 1850’s bodice using hooks and eyes and no matter how carefully sewn, the closure has gaped–am using small hooks, closely placed (1/2″), the trick seems to be anchoring them to more than the single inner layer of fabric, and to make sure the hooks and the eyes are stitched down so that they can’t lift away from the fabric; your tips have given me enough strength to try again!

    • Lisha Vidler says:

      For a front-closing bodice, I use medium-sized hooks placed about an inch apart. To be honest, I’m not sure if small hooks will be strong enough to hold the bodice edges together without buckling. The big secret, as you mentioned, is anchoring the hooks to the lining and interlining, so they don’t pull the fabric layers apart and cause gaping. This is best accomplished before the bodice is assembled, so you can hand sew through both the lining and interlining, leaving the outer layer free, so the stitches will be hidden. I hope you finish your bodice successfully!

  10. Mary Doherty says:

    I have an Irish Dance Costume with a zipper that keeps falling down as my daughter dances. In fact, even if she rolls her shoulders forward the zipper falls down. Her dance teacher recommended a hook and eye to fix this. Will just one sewed on to the top of the dress work? I need to fix asap as she has a major dance competition in 2 weeks and I don’t want the zipper to fall down on stage. Please help – stressed out Irish Dance mom! :)

    • Lisha Vidler says:

      Unfortunately, a hook and eye will not prevent a zipper from coming undone. It’s more of a safety measure, so that if the zipper fails, the skirt won’t fall off. From what I’ve researched, there is no fix for a zipper that keeps failing. The only real solution is to replace the zipper entirely. (Any alterations shop can easily do this.) If you can’t replace the zipper for some reason, depending on whether you’re talking about a skirt or a dress, you might be able to attach the zipper pull to something, so it can’t come undone. For example, with jeans, you can slip a key ring loop through the zipper pull, and hook the key ring over the button, so the zipper literally cannot fall down. You might be able to do something similar with a safety pin, but check to be sure the pin won’t pop loose, or worse, tear the costume if your daughter stretches or pulls against the zipper while dancing. But honestly, the best thing is to replace the zipper with a new one, especially if she’ll be dancing in a competition, where it would be a major disaster if the zipper failed!

      • Mary Doherty says:

        Thank you Lisha! Yes, I pinned the dress for a small competition that she had yesterday and it held. I did pick up 2 large hook & eyes over the weekend. I am going to ask a friend that is a seamstress to help me before this regional competition. I may need to replace the zipper entirely. I appreciate your help.

  11. Mary Doherty says:

    Thank you Lisha! Yes, I think I may need to replace the zipper.

  12. Christine says:

    I need one for a dress but there isn’t any room on top for the hook and eye. How can I add to a dress without the room above the zipper?

    • Lisha Vidler says:

      Does your dress have a lining or neckline facing? If so, try sewing a short piece of grosgrain ribbon or twill tape behind the zipper, on the inside, at the top of the dress. You’ll want to attach it to the facing or lining. Sew it going the wrong direction, facing away from the zipper, so when you flip it the right way, the raw edge is hidden. Fold the opposite end of the ribbon under and hem it. (Use Fray Check, if necessary, to prevent the ends from fraying.) Attach the hook near the hemmed end of the ribbon. Sew a bar (not an eye) to the dress lining or facing. You can use a metal bar, or if you prefer, create a thread bar. (Thread bars are prettier, less noticeable, and more comfortable to wear, but they aren’t as strong.) The ribbon will cross behind the zipper, so it should work the same way as an ordinary hook and bar at the top of a dress, keeping the edges together for an easier zip-up. Choose a ribbon or twill tape that matches your dress color. If you’re hand sewing it, use very small stitches and make sure they aren’t visible from the right side of the garment.

      Did my explanation make sense? If not, send me a private message via the “Contact Me” form and I’ll draw you a diagram showing how it works. Hope this helps!

  13. Christine says:

    Can I sew the hook and eye on the inside zipper lining?

    • Lisha Vidler says:

      If you mean the dress lining, yes–if there’s room at the top of the zipper. (If there’s no room, see my comment below about using twill tape.) If you mean you want to sew the hook to the zipper tape, it might work, but if it gets covered by your lining or facing, it would be hard to fasten. If you have a lining or facing, it’s probably best to sew the hook and eye to the lining, making sure to catch the dress’s seam allowance with every stitch, to anchor it. If it’s only sewn through the lining, the lining will pull and gape when you fasten the hook. Hope that helps–it’s hard to give advice without seeing what you’re talking about! If you’re in doubt, why not baste the hook and eye onto your dress and try it? If it doesn’t work, it’s easy enough to remove the stitches. If it does work, you can sew it on properly.

  14. JoAnne Sorlie says:

    Thank you for your article–the best one on this subject I’ve run across after quite some googling! I have a dressy gown with a hook and thread bar at the very top of the collar in the center back. The problem is the hook keeps catching on my hair and pulled my hairstyle apart when I wore it this weekend. The fabric of the collar is very heavy, brocade-like, with a basketweave texture.

    Would an eyelet work here? It would bury the offending hook that catches the hair. But, this part of the garment does have to move around when I move my neck, and there is little or no tension to hold the hook in place. I’m afraid of replacing one problem with another! Would you happen to have any other ideas of how to solve this problem?

    Thank you so very much!

  15. Jake says:

    How do I know what size hook and eye I need for dress?

  16. Pingback: The “Who Likes Short Shorts?” Shorts – Anna-Jo Sews

  17. Thanks so much for this very informative tutorial. I was struggling with attaching hook&eyes and I think I got it now.

  18. Pingback: Attempt 9: A Silk Dupioni Gown with Darts and Tulle Pettycoat (=Complete 3) – Maddie's Dolls and Outfits

  19. Pingback: Sewing tips reference sites – Maddie's Dolls and Outfits

  20. Elizabeth says:

    What style and size hooks and eyes are best to close the back bodice of a stage ballet costume. Thank you.

Leave a Reply to Jake Cancel reply

Your email address will not be published. Required fields are marked *