A Sewing Diary
by Lisha Vidler
(Click any illustration to view it full-sized.)
Inspiration
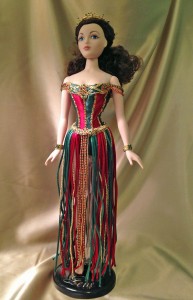
I’ve always been in love with the costumes from Andrew Lloyd Webber’s The Phantom of the Opera, but when I saw the 25th anniversary special, my love affair was renewed. Years ago, I made a replica of the blue Wishing dress, as well as a Barbie-sized version of the Hannibal ballet costume. Now I’d like to make each of the major costumes in miniature, for a 15.5″ fashion doll. I began with Christine’s “Point of No Return” dress and the Phantom’s suit and cloak. Next, I made the Hannibal ballet costume.
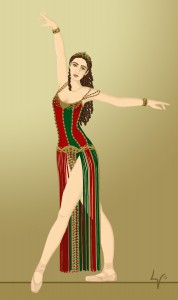
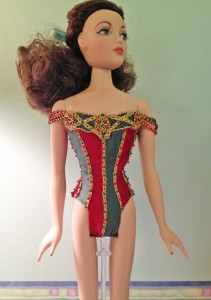
This costume is worn by Christine Daaé during the first dance sequence of the show. Intended to be a Victorian interpretation of an ancient Carthaginian slave dancer’s outfit, it consists of a green and red leotard and a matching rope skirt.
Costume Design
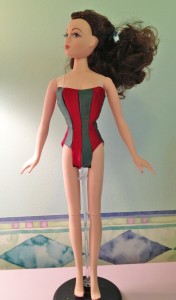
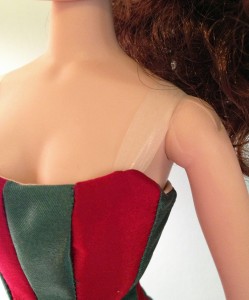
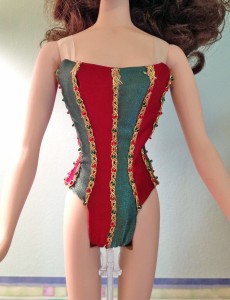
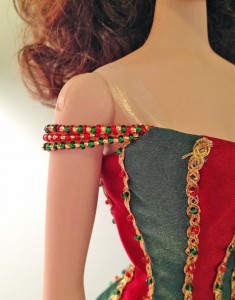
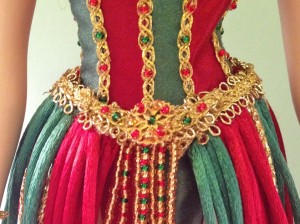
Bodice: The bodice is actually a leotard made of alternating panels of dark green and red velvet. Gold braid covers the seams, sometimes spaced with red or green jewels. Skin-colored straps hold the leotard up, while strands of red, green, and gold beads drape across the shoulders. A gold breastplate decorates the neckline, but its exact design varies widely.
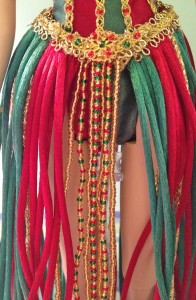
Rope Skirt: The skirt is suspended from a gold belt that sits at the hips. This belt is decorated with a crescent-shaped gold medallion at the front and back. Red and green “ropes” fall from the belt, typically made of slashed velvet strips or satin cords. In some productions, the strands are grouped by color, matching the alternating red and green of the bodice, while other versions have the colors mixed randomly. (I prefer the color-blocked version.) The center front features a cluster of beaded strands.
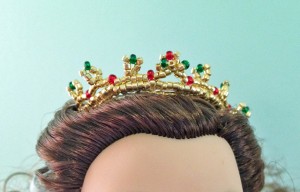
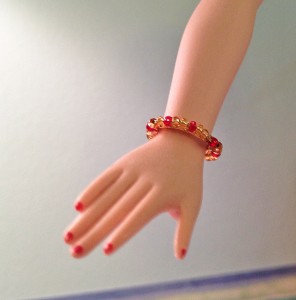
Accessories: The costume is worn with flesh-colored tights, pink pointe shoes, a gold tiara decorated with red and green gemstones, and a pair of jeweled bracelets. Occasionally, you’ll see a cuff on Christine’s upper arm, but this is rare.
Patterns
- Leotard: Self-Drafted
- Rope Skirt: Self-Drafted
There are no commercial doll patterns similar to this costume, so I drafted my own.
Materials
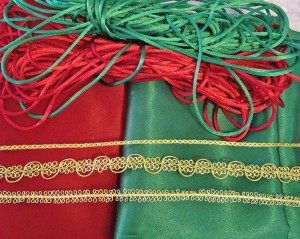
Originally, I’d planned to use crimson and dark green velveteen for the leotard. But when I washed the velveteen, it bled quite badly. Even with a vinegar bath, the dye wouldn’t stop bleeding. This excess dye would have rubbed off on the doll’s vinyl, staining it. I didn’t want to risk that, so I switched to satin, instead.
For the rope skirt, I used red and green satin rat-tail cord. I had several kinds of gold braid to decorate the bodice and the skirt’s belt with. Seed beads and metallic gold embroidery thread provided the necessary sparkle.
Mockup—Leotard
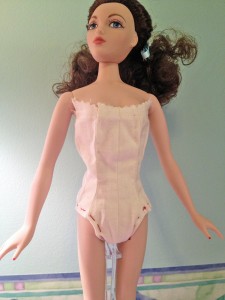
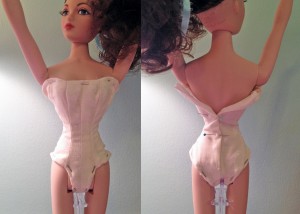
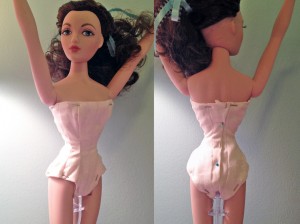
For some reason, the mockup of this leotard was finicky. My first attempt was too wide in the crotch and too short at the neckline, barely covering her bust. It also fit rather loosely, instead of the skin-tight fit I wanted.
For the second mockup, I added height to the neckline, made the crotch section narrower, nipped in the waist, and curved the top over the bust, almost like a princess seam. When pulled snug, it had a much better fit through the hips and waist. However, the bust was still a bit wrong. It was too high in the underarms, the front crotch was too narrow, and it was much too small across the upper back.
The third mockup was much closer to what I’d envisioned, but it still had some issues. The hips somehow ended up too loose, so they stuck out away from the doll’s body. I also decided the leg openings were too low-cut.
The fourth mockup needed a few tweaks, as well. I adjusted the pattern accordingly, then went ahead and started the actual leotard.
Construction—Leotard
I cut the leotard panels out of red and green satin. I was disappointed to discover that the red satin was much stiffer than the green satin. I would have preferred a more fluid satin for the red panels, but I had to work with what I had.
Since I had no matching lining fabric, I decided to use a light tan lining. It’s almost skin-toned, so it worked.
I sewed the lining to the leotard along the center back edges and up across the neckline, then flipped it right-side out. The leg openings were tricky; I had to fold the edges under by 1/4″, then slipstitch all the way around the curve. The finished leotard fits the doll quite nicely.
I attached clear elastic straps to the shoulders. This will help keep the neckline from slipping too low.
The next step was to sew a row of six snaps to the back of the leotard. I used size 5/0, the smallest manufactured—perfect for doll garments.
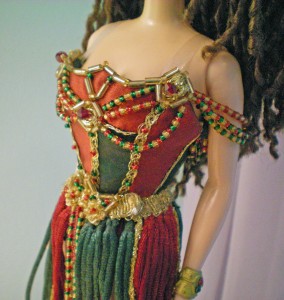
At last came my favorite part—embellishing! I needed to recreate the breastplate, as well as the beaded strands that fall from the shoulders. When I made the Barbie-sized version of this costume, I used strands of beads that draped across each breast. This time, I wanted to try the solid version of the breastplate.
For my first attempt, I took a piece of felt and cut it to fit the neckline, with a scalloped bottom edge. I then covered the felt with gold embroidery. However, in order to keep the felt background from showing through, I had to embroider quite densely. The felt ended up distorted and much too thick—it wouldn’t lie flat against the costume anymore. It was so ugly, I tossed it into the trash without taking a photo!
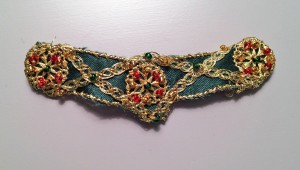
For my second attempt, I took some of the green satin and pressed it to a scrap of fusible interfacing. This reinforced the flimsy satin and kept the edges from fraying when I cut it in the shape of the breastplate. Next, I couched some gold cord around the edges. It didn’t contour to the shape of the scallops, so the piece lost some of its curvy shape, but I liked it anyway.
When I first beaded the breastplate, it didn’t turn out well. I used bugle beads, which were too large and looked out of place. Plus, some of them turned out crooked, despite my best attempts at straightening them. Dissatisfied, I removed the bugle beads and decided to try gold filigree circles. I placed one in each corner and one in the center, then beaded them with red, gold, and green seed beads. There was a lot of empty space when I finished, so I crisscrossed some narrow gold braid through the gaps, then added more seed beads. The finished result was much more in scale with the doll’s size.
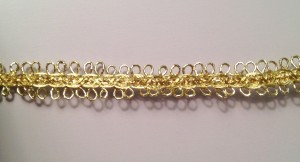
Before attaching the breastplate, I needed to decorate the leotard. The original costume has gold braid running down the seam of each red/green panel. One version uses a wider gold braid for the center front, so I’d planned to do the same. When I pinned the loopy gold braid down the middle of the leotard, however, I found the effect too busy. I nixed the loopy braid and limited myself to the narrow gold braid. After sewing the braid to each seam, I added red and green seed beads for some sparkle.
The next step was to add the beaded strands that drape off the shoulders. Using waxed thread, I placed three strands on each side: one of alternating green and gold beads, one of red and gold beads, and one of gold, red, and green beads.
I used to use a regular sewing needle to sew beads, but I ended up throwing away a lot of beads that didn’t fit over the eye of the needle. I’d assumed it was a manufacturing defect, until I discovered the beading needle, which is slender enough to fit through all beads. It’s astonishing what a difference the beading needle makes!
Once the leotard was embellished, I attached the breastplate. I used a slipstitch and sewed all the way around the edge, anchoring it securely to the top of the leotard.
Construction—Rope Skirt
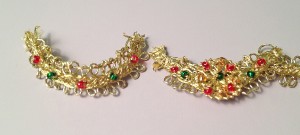
I began the skirt by creating the crescents for the front and back of the belt. I’d ordered some crescent-shaped gold filigree pieces, but they were out of stock, so I decided to solve the problem using gold braid, instead.
First, I layered a piece of narrow gold braid over a slightly wider looped braid. By running gold embroidery thread through the bottom loops, I was able to draw the piece into a crescent shape. Once they were the right shape and size, I began embellishing them. To the front, I added a beaded filigree circle. For the back, I simply alternated red and green beads.
For the belt itself, I again layered the narrow gold braid over the looped braid.
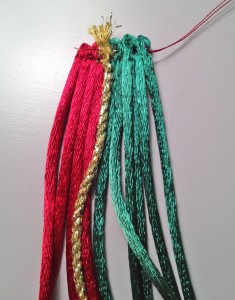
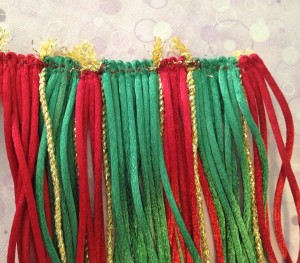
To create the rope strands, I cut a length of satin cord twice as long as needed, then folded it in half and hand-stitched the folded ends together. Between each red and green section, I placed a single metallic gold cord to match the trimming on the leotard.
I did my best to match the ropes to the color-blocking of the leotard, so the skirt appears to be an extension of the leotard, but I had a difficult time. The colors of the leotard widen and narrow according to the doll’s curves, so in order to get the skirt’s colors to line up with the leotard’s, I had to position the belt in the exact position it would hold when finished. Yet, every time I checked the color-blocking, the belt managed to line up differently. When the skirt was done, the front colors lined up great, but the back was off a little.
After sewing the belt to the top edge of the rope strands, I found that my crescent wasn’t going to work. To make it fit in the center, I had to flip it upside down. I also realized that I couldn’t have a crescent in the back—not unless I cut the belt at the center back and fastened the crescent as a bridge between the two halves. I decided against this, since it would have drastically impacted the fit of the skirt.
I added a tiny hook and thread bar to fasten the belt. Then I created long strands of beaded ropes to fill the gap beneath the crescent. These ropes used up a lot more beads than I anticipated, so I wasn’t able to place them as close together as I’d planned. And despite my best efforts, they didn’t come out equal lengths.
As I sewed the skirt’s satin cords together, I noticed they were rather thick. It wasn’t until I’d finished that I compared the cords with those used for the Barbie version. The Barbie’s skirt used a much smaller satin cord! I was quite aggravated when I discovered this, as the smaller cord would have looked better.
Accessories
When I was ready to create the doll’s jewelry, I began with the tiara. After months of searching the internet for a suitable doll-sized tiara, I realized I would have to make my own. Originally, I was going to twist gold wire into a crown, adding seed beads for color, but after a little experimentation, I decided to try bead-weaving instead. I used metallic gold beads, along with red and green accent beads. When I was done, I sewed the tiara to a twisted wire base, so it would slip into the doll’s hair. The spikes are a bit floppier than I would have liked, but other than that, I like it.
The costume also needed a pair of cuff bracelets. For my first attempt, I cut a length of gold wire and twisted the ends together tightly, creating a circle. I bent the circle into a tight oval, then sewed gold and red seed beads onto the wire. It was just an experiment, to see how it would turn out. I thought it was quite pretty, although more of a bangle bracelet, not a true cuff bracelet.
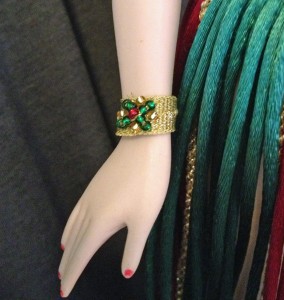
Because the first bracelet was too narrow, I made a second set of bracelets using metallic gold ribbon and seed beads. The bracelets fasten around the doll’s wrists with tiny snaps. They’re much closer to the jewelry used with the actual costume, so I chose to use them for the finished look.
Conclusion
This was one of my favorite doll costumes to create. The color-blocked leotard was a pain and a half to draft a pattern for, but once the dull construction parts were over with, I got my fill of embellishing! Lots of trim and plenty of beading, all of which equaled one sparkly costume.

Pingback: The Phantom of the Opera in Miniature: Hannibal Ballet Costume | Yesterday's Thimble
Pingback: The Phantom of the Opera in Miniature—Masquerade | Yesterday's Thimble
I’m working on a PoTo journal and came across your site while doing research and I just wanted to say that these costumes are AMAZING! I don’t have the attention span for something this small and detailed so I LOVED reading your progress!!
I’m glad you enjoyed!