
(Click on any illustration to view the full-sized image.)
Awhile back, I made a crazy-quilted pillow for my bedroom. It turned out so well, I decided to make a second one as a gift for a friend. This one turned out even better!
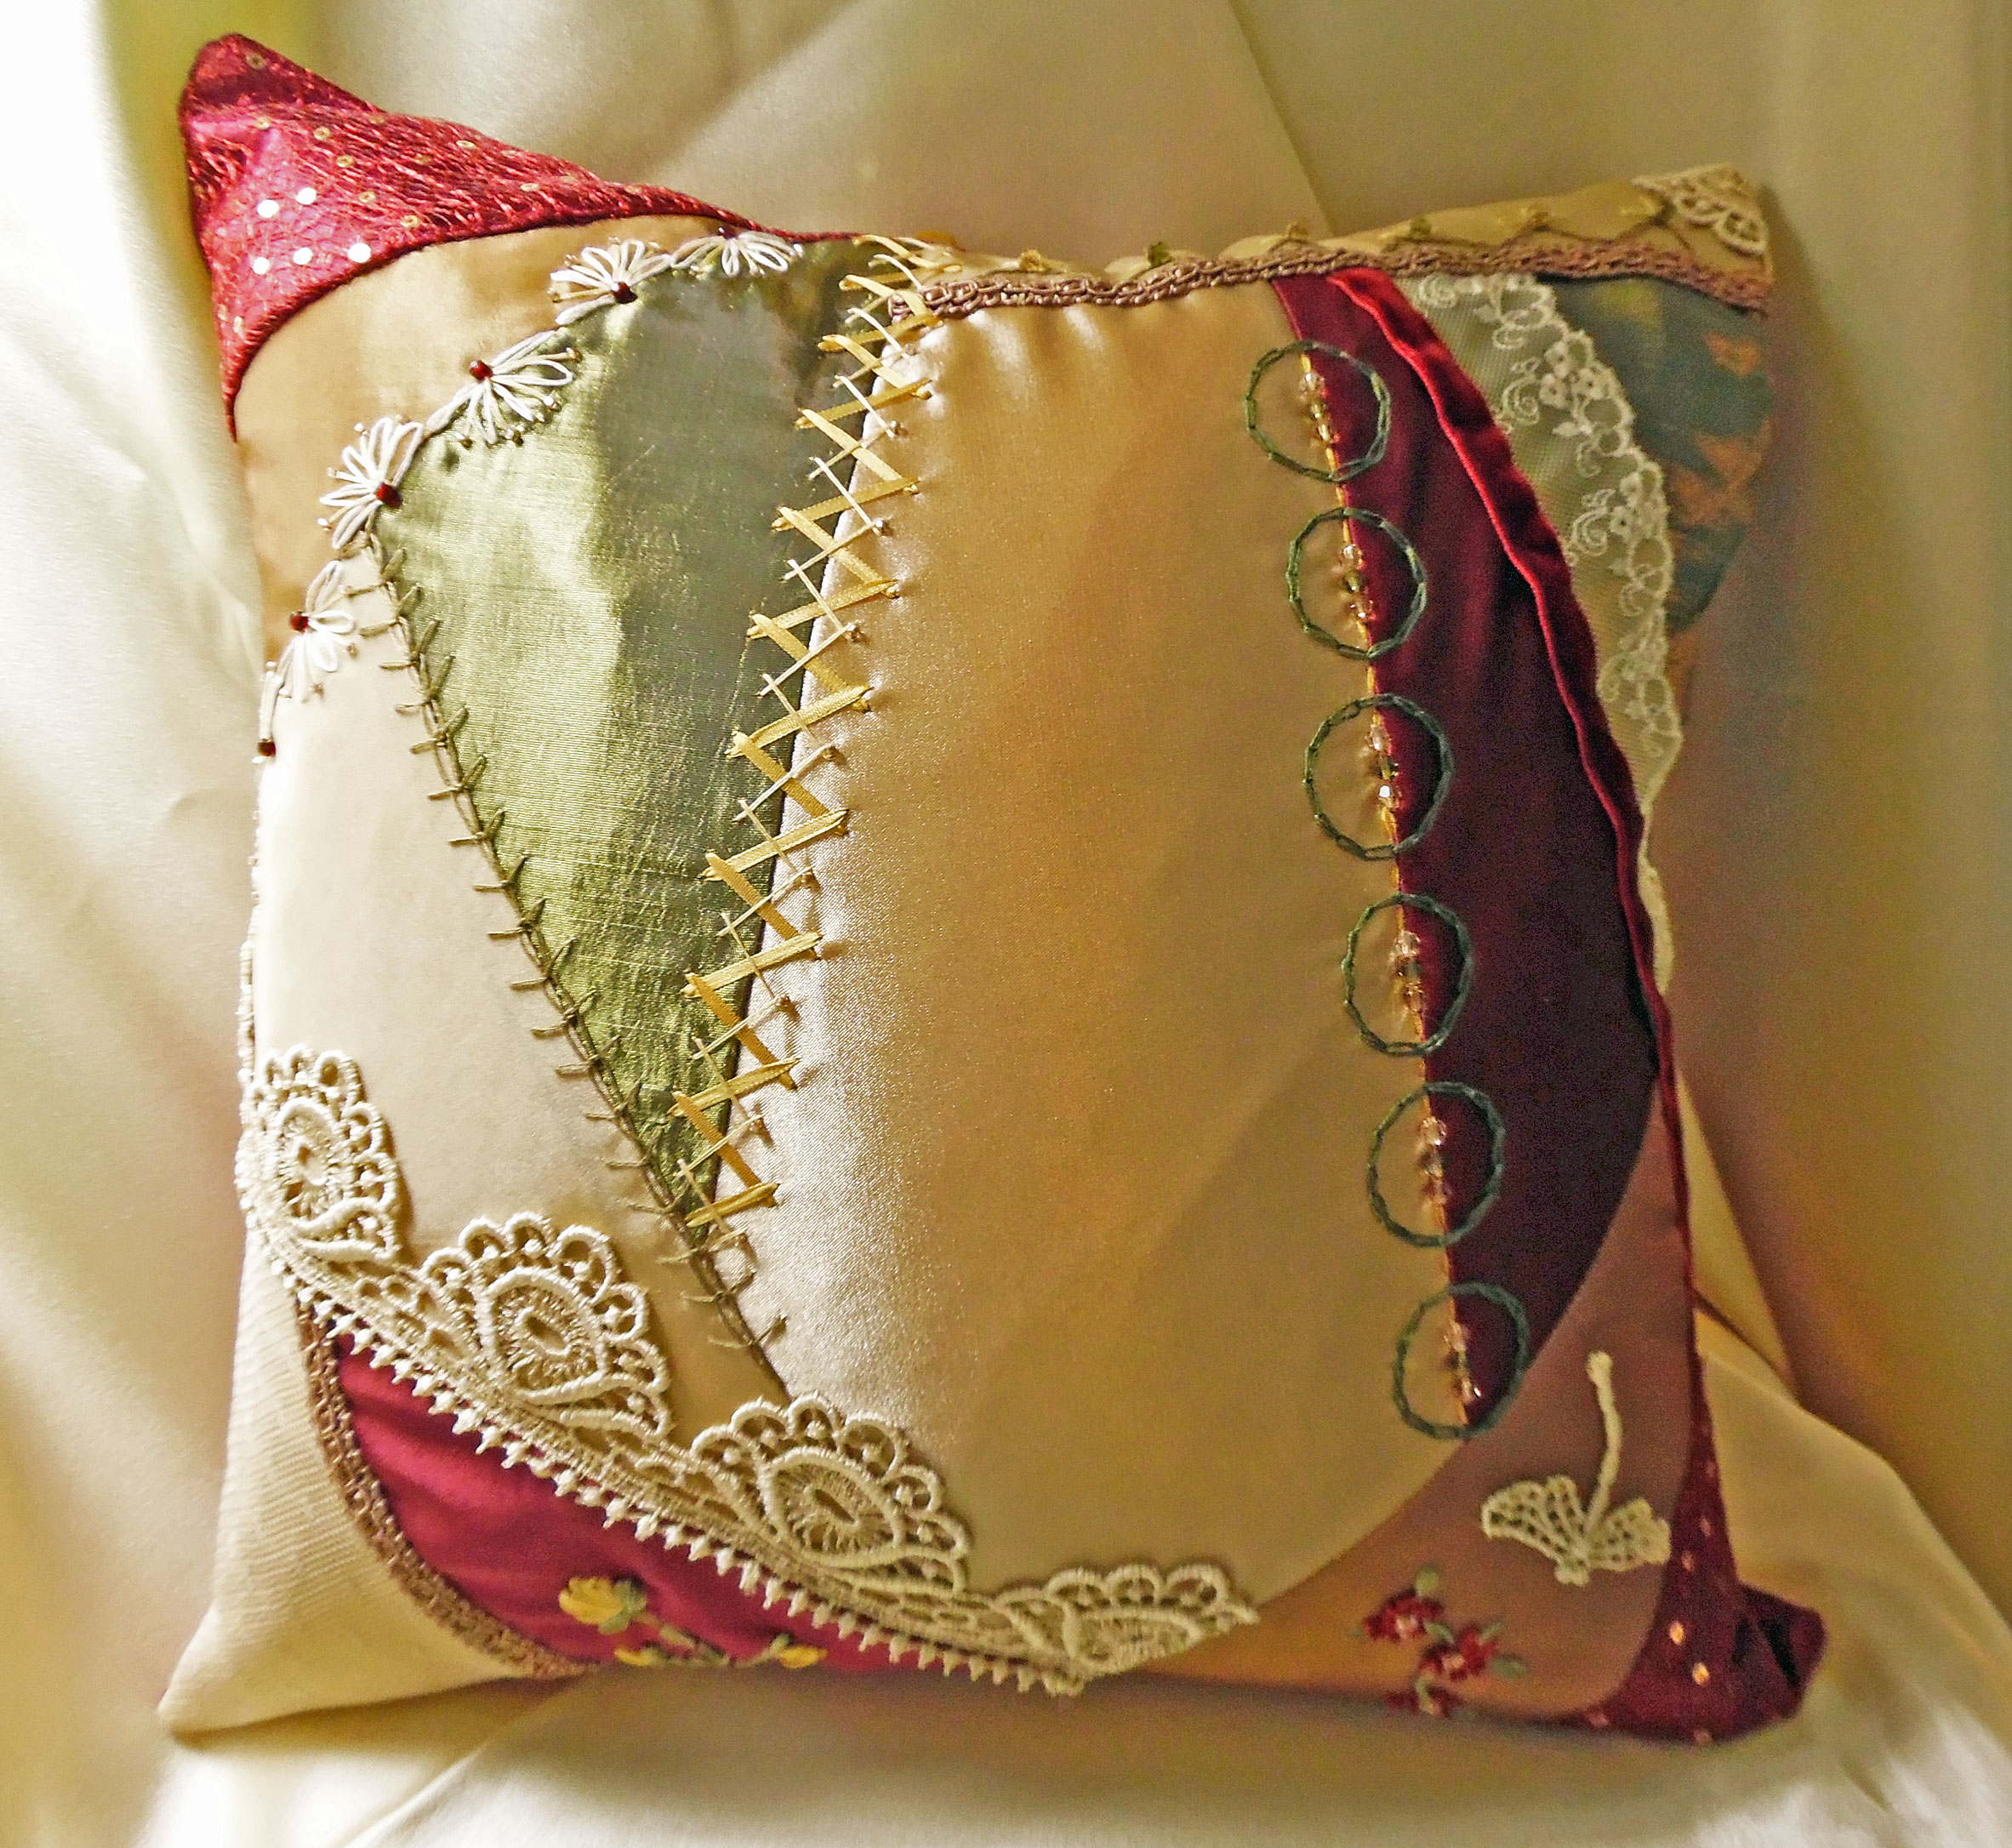
Finished Pillow
Inspiration & Design
First, came a little spy work. I couldn’t remember what colors our friends’ living room was decorated with, and I wanted the pillow to be a surprise, so I couldn’t just ask. So, to discover the color palette I needed to use, I drafted my husband as a spy. The next time he went to our friends’ house, he was supposed to determine their living room’s color scheme. Unfortunately, my husband possesses almost no sense of color. He dutifully reported that their walls were some shade of tan and there might be some green accents. When I asked which shade of green—mint, lime, forest?—he shrugged helplessly.
In the end, I was forced to do my own reconnaissance. There was indeed a lot of tan, plus some deep reds and olive greens. So, I came up with a neutral color palette of champagne and dark gold, along with burgundy and warm green accents.
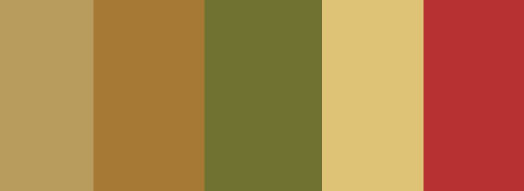
Color Palette
I found lots of crazy-quilted pillows to drool over for inspiration. Here’s a few.
- Crazy-Quilt Heart Pillow (Pinterest)
- Crazy-Quilt Pillow (Pinterest)
- Lemon & Raspberry Sherbert Pillow (Pinterest)
- Crazy-Quilted Ring Bearer’s Pillow (Pinterest)
At first, I wanted to use a more traditional quilting pattern—one that resembles a broken spiral. I painted a quick sketch of the basic design in Photoshop Elements, and embellished it with lace and embroidery, just to see what it would look like.

First Design Layout
Then I found the ring bearer’s pillow (linked to above) and decided it would look gorgeous with my color palette. To help me decide, I drew a sketch of the second design, and as before, embellished it.
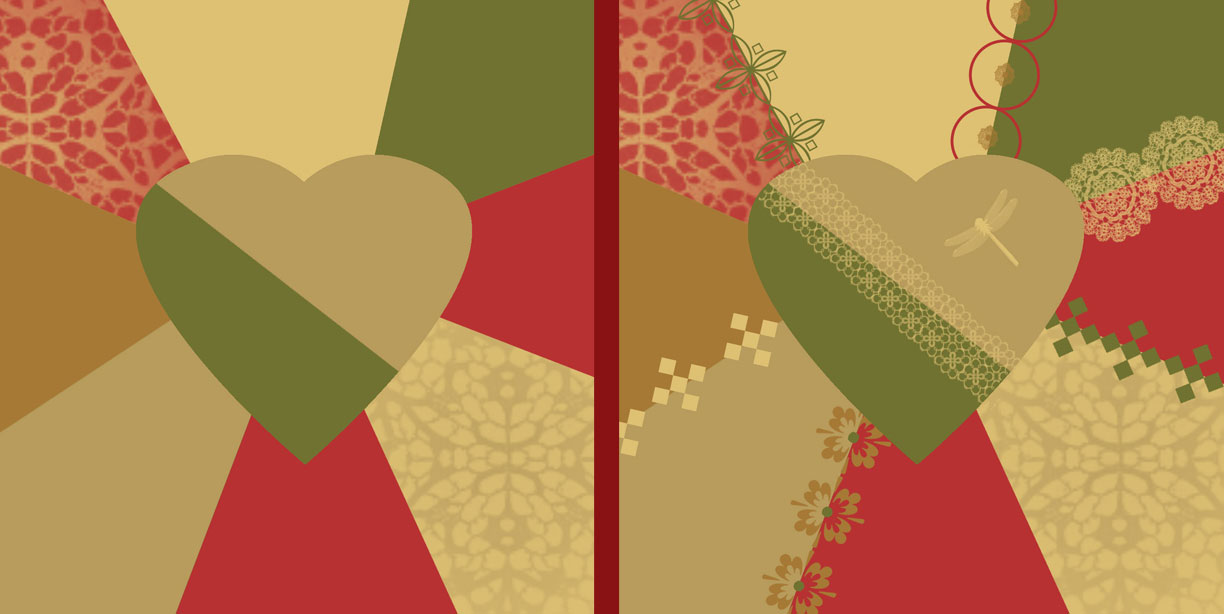
Second Design Layout
After sleeping on it, I decided I preferred the first version, not the heart design.
Materials
In my stash, I found a length of raw silk in a deep wine-red. I had some very lightweight satin in almost the same color, plus I bought a burgundy mesh lace at JoAnn’s, decorated with tiny gold sequins. To go with these fabrics, I ordered some dark gold satin, champagne taffeta, and an olive green taffeta. This gave me a nice assortment of colors and textures.
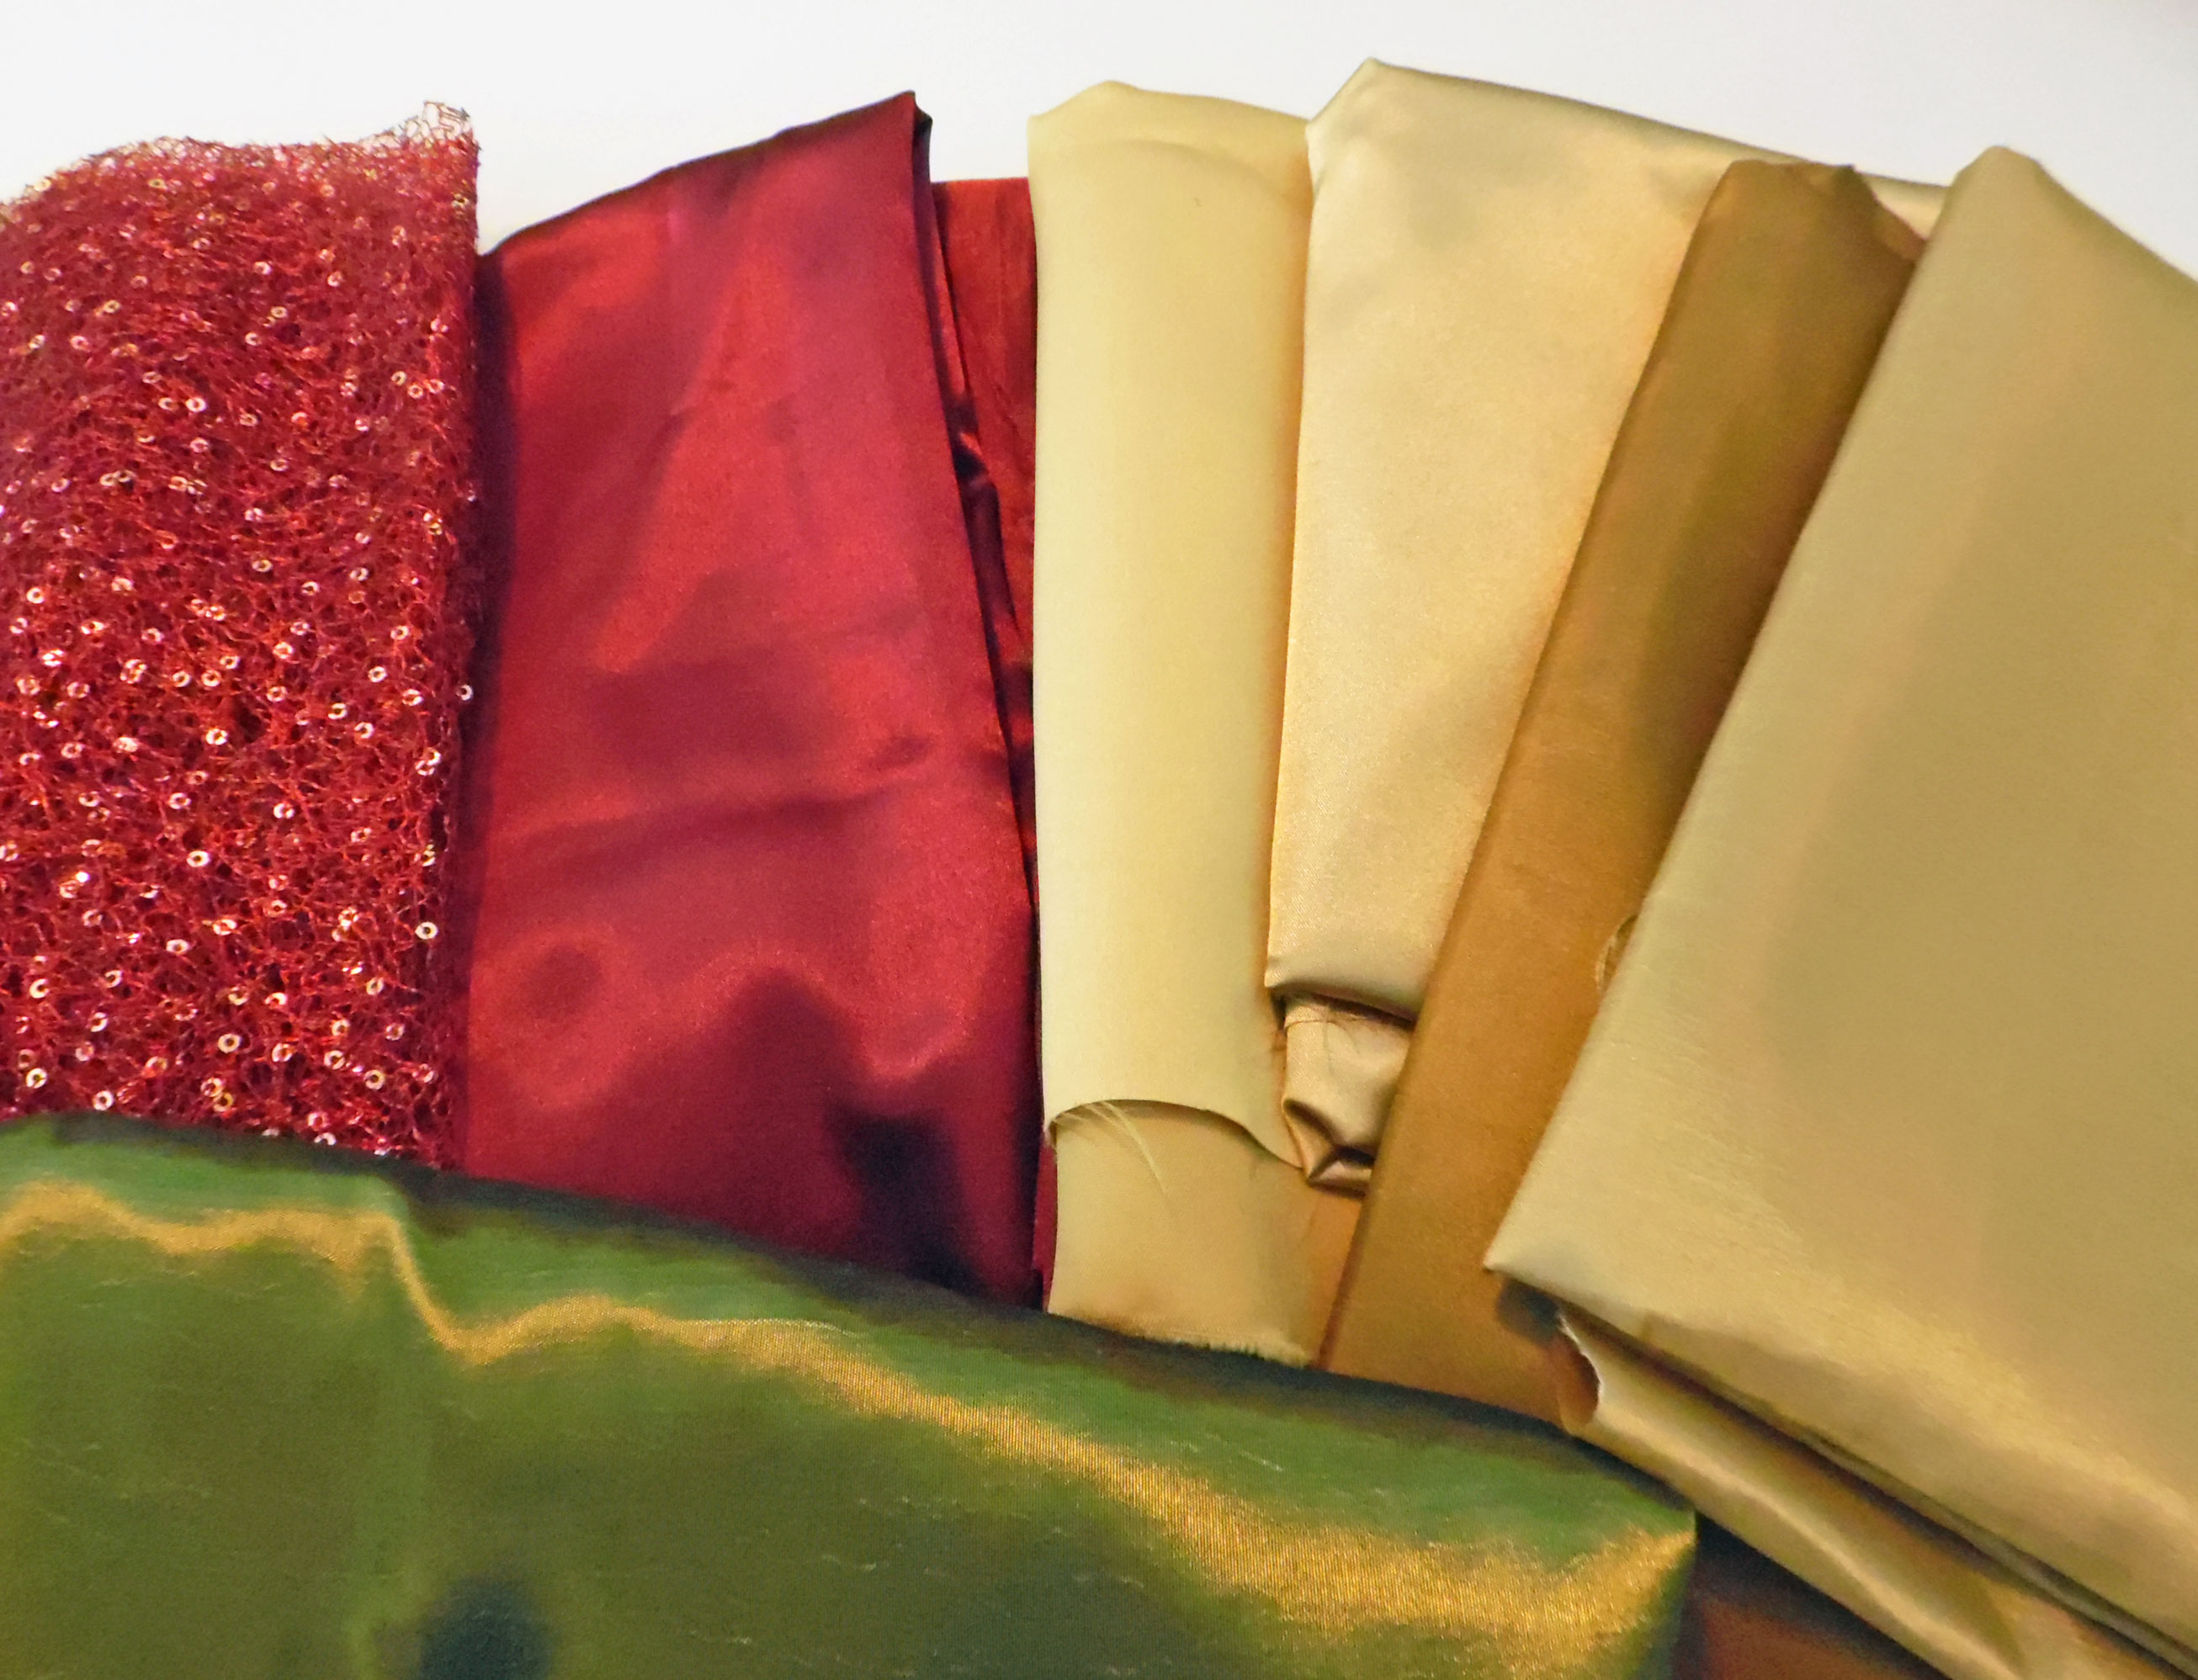
Fabrics
For embellishing the pillow, I planned to use some of my precious stash of antique lace, as well as Venise lace in gold, ecru, and green, a burgundy velvet ribbon, and various shades of embroidery floss, seed beads, and genuine Swarovski crystals. Not everything ended up going on the pillow, but I like to gather together everything that might work, just so I have plenty of options.

Lace & Trims
Pattern
I didn’t need a pattern for this project. I just took the pillow’s measurements and added a half-inch to be sure it would fit.
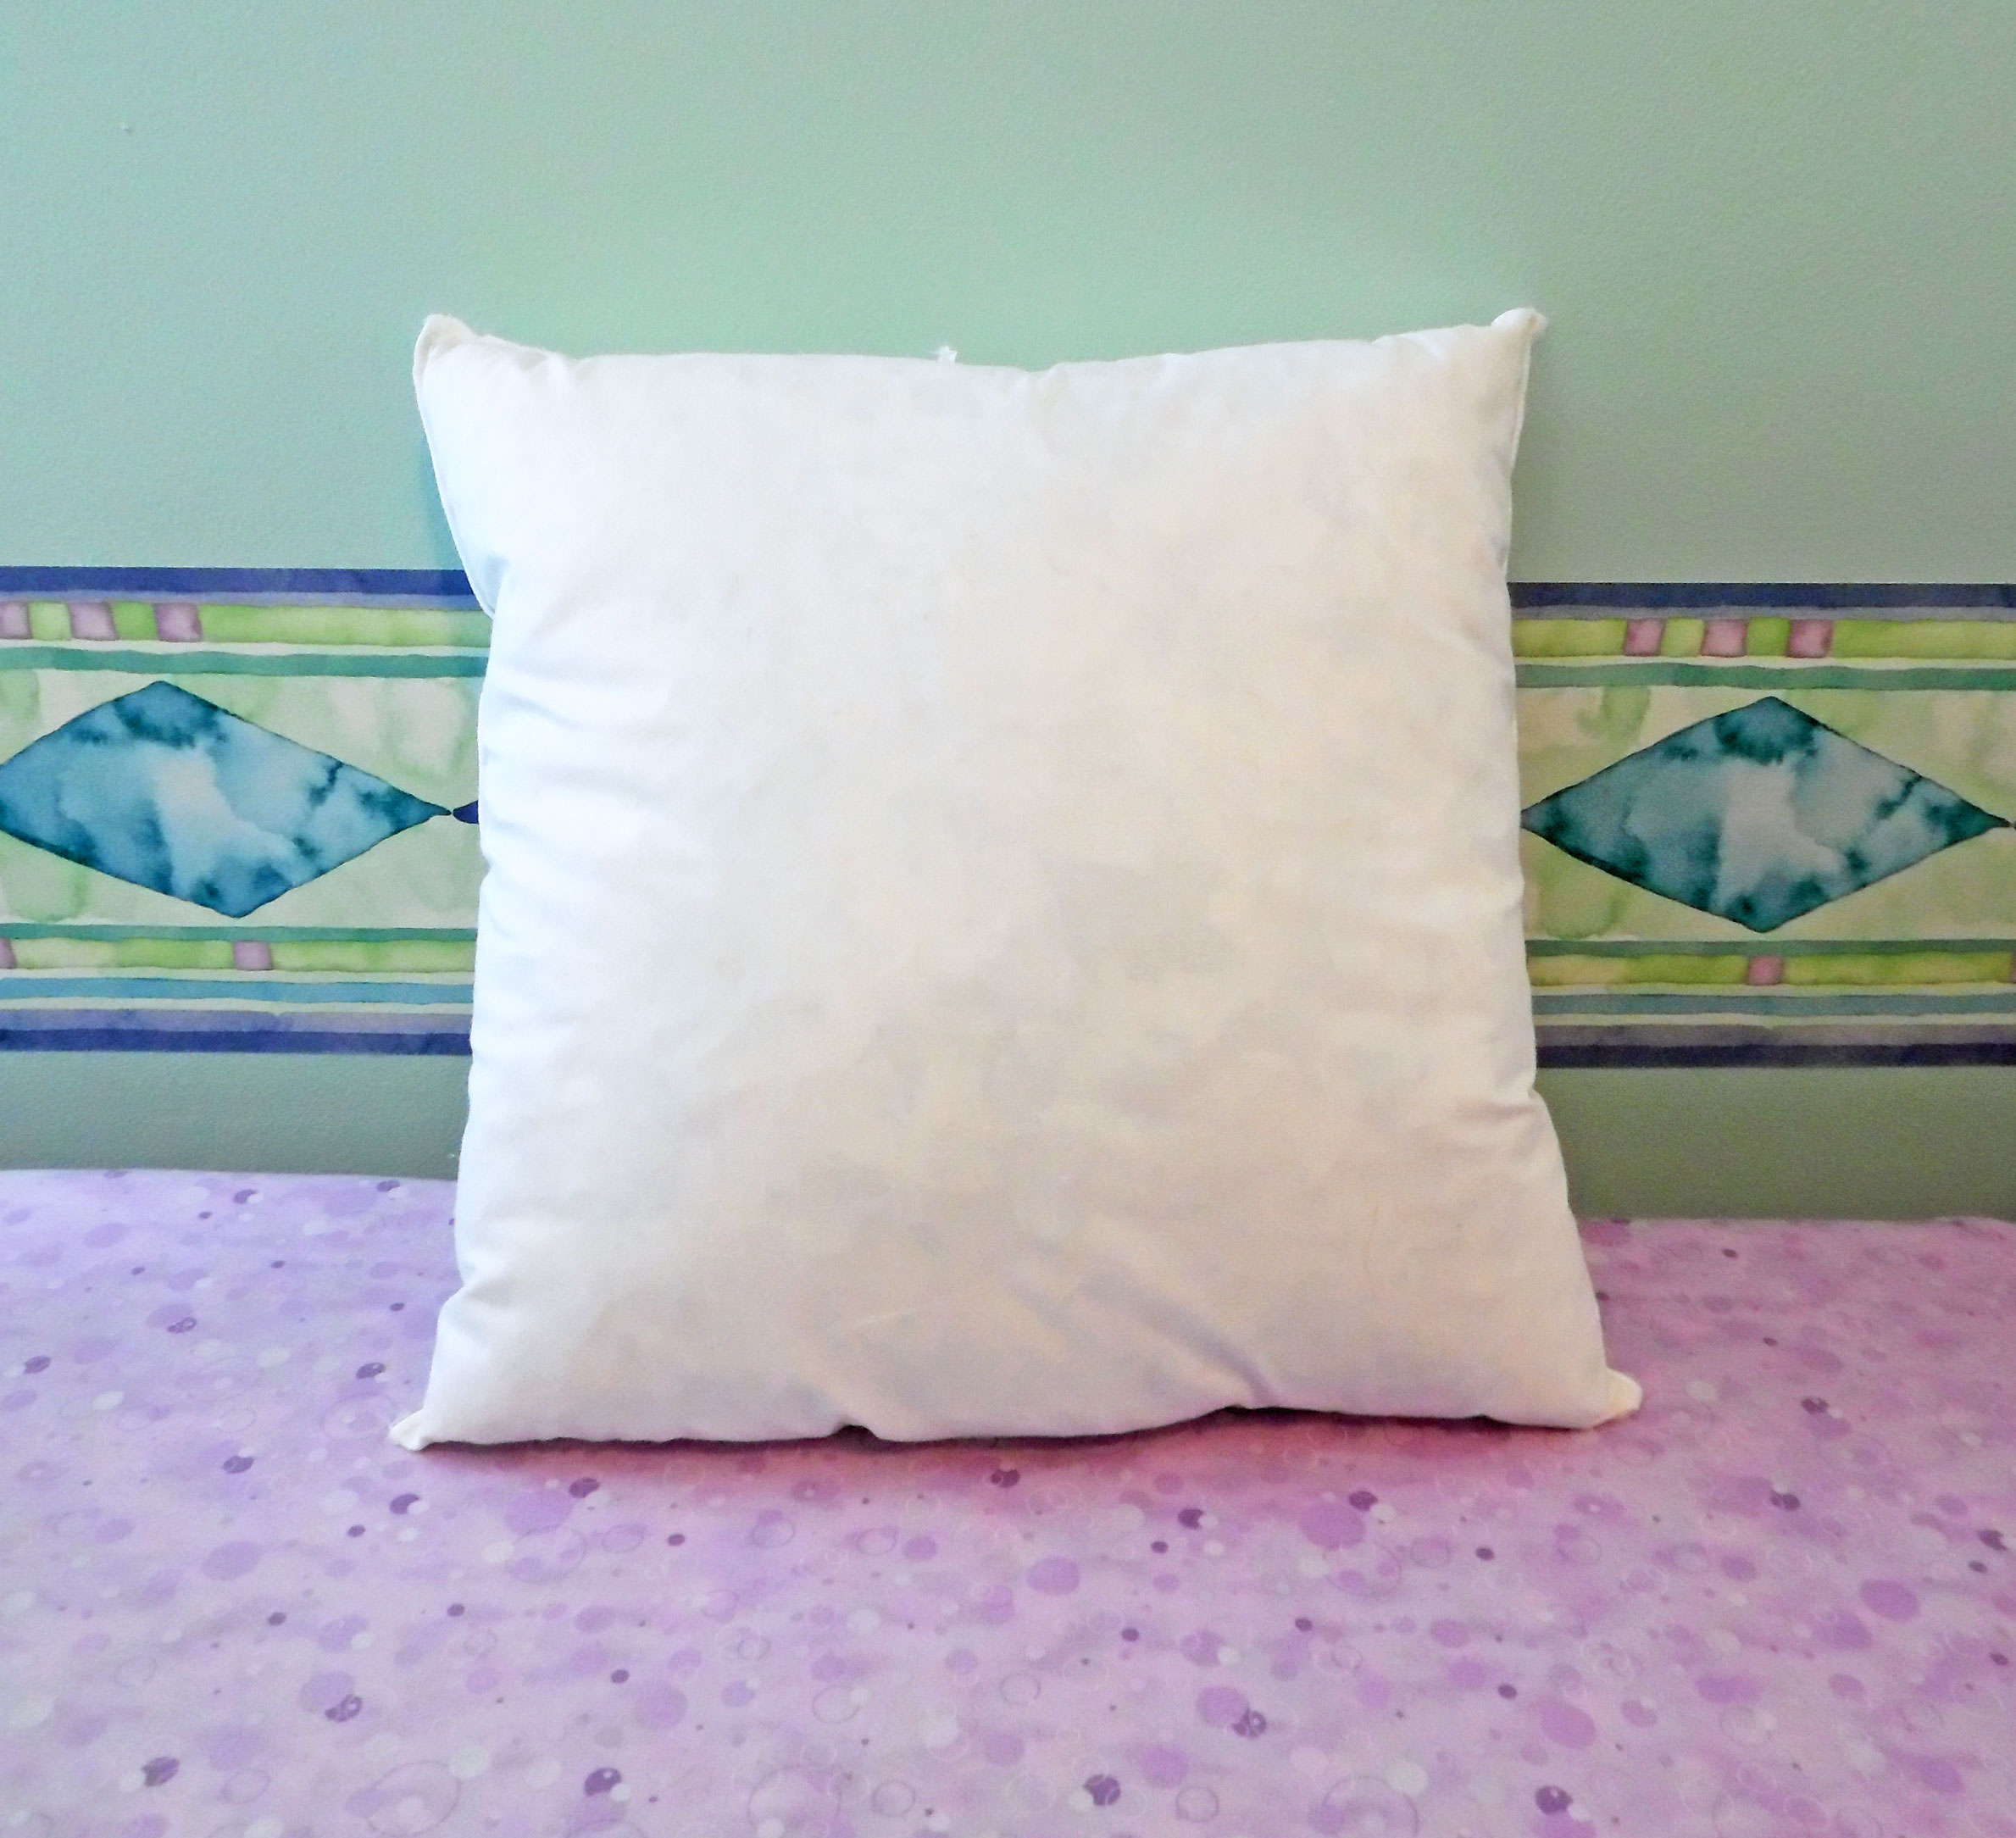
Pillow Form
Mockup
As with my first crazy-quilted pillow, I made a quick mockup. I cut two squares, pinned them together, and slid the pillow halfway inside, just to check the size. I thought about using the mockup as a lining, but I decided not to waste good muslin making an unnecessary lining. Instead, I used one of the mockup squares as the quilt base.
Quilting
First, I drew a bunch of diagonal lines on the base, to use as a sewing guide for the crazy quilt.
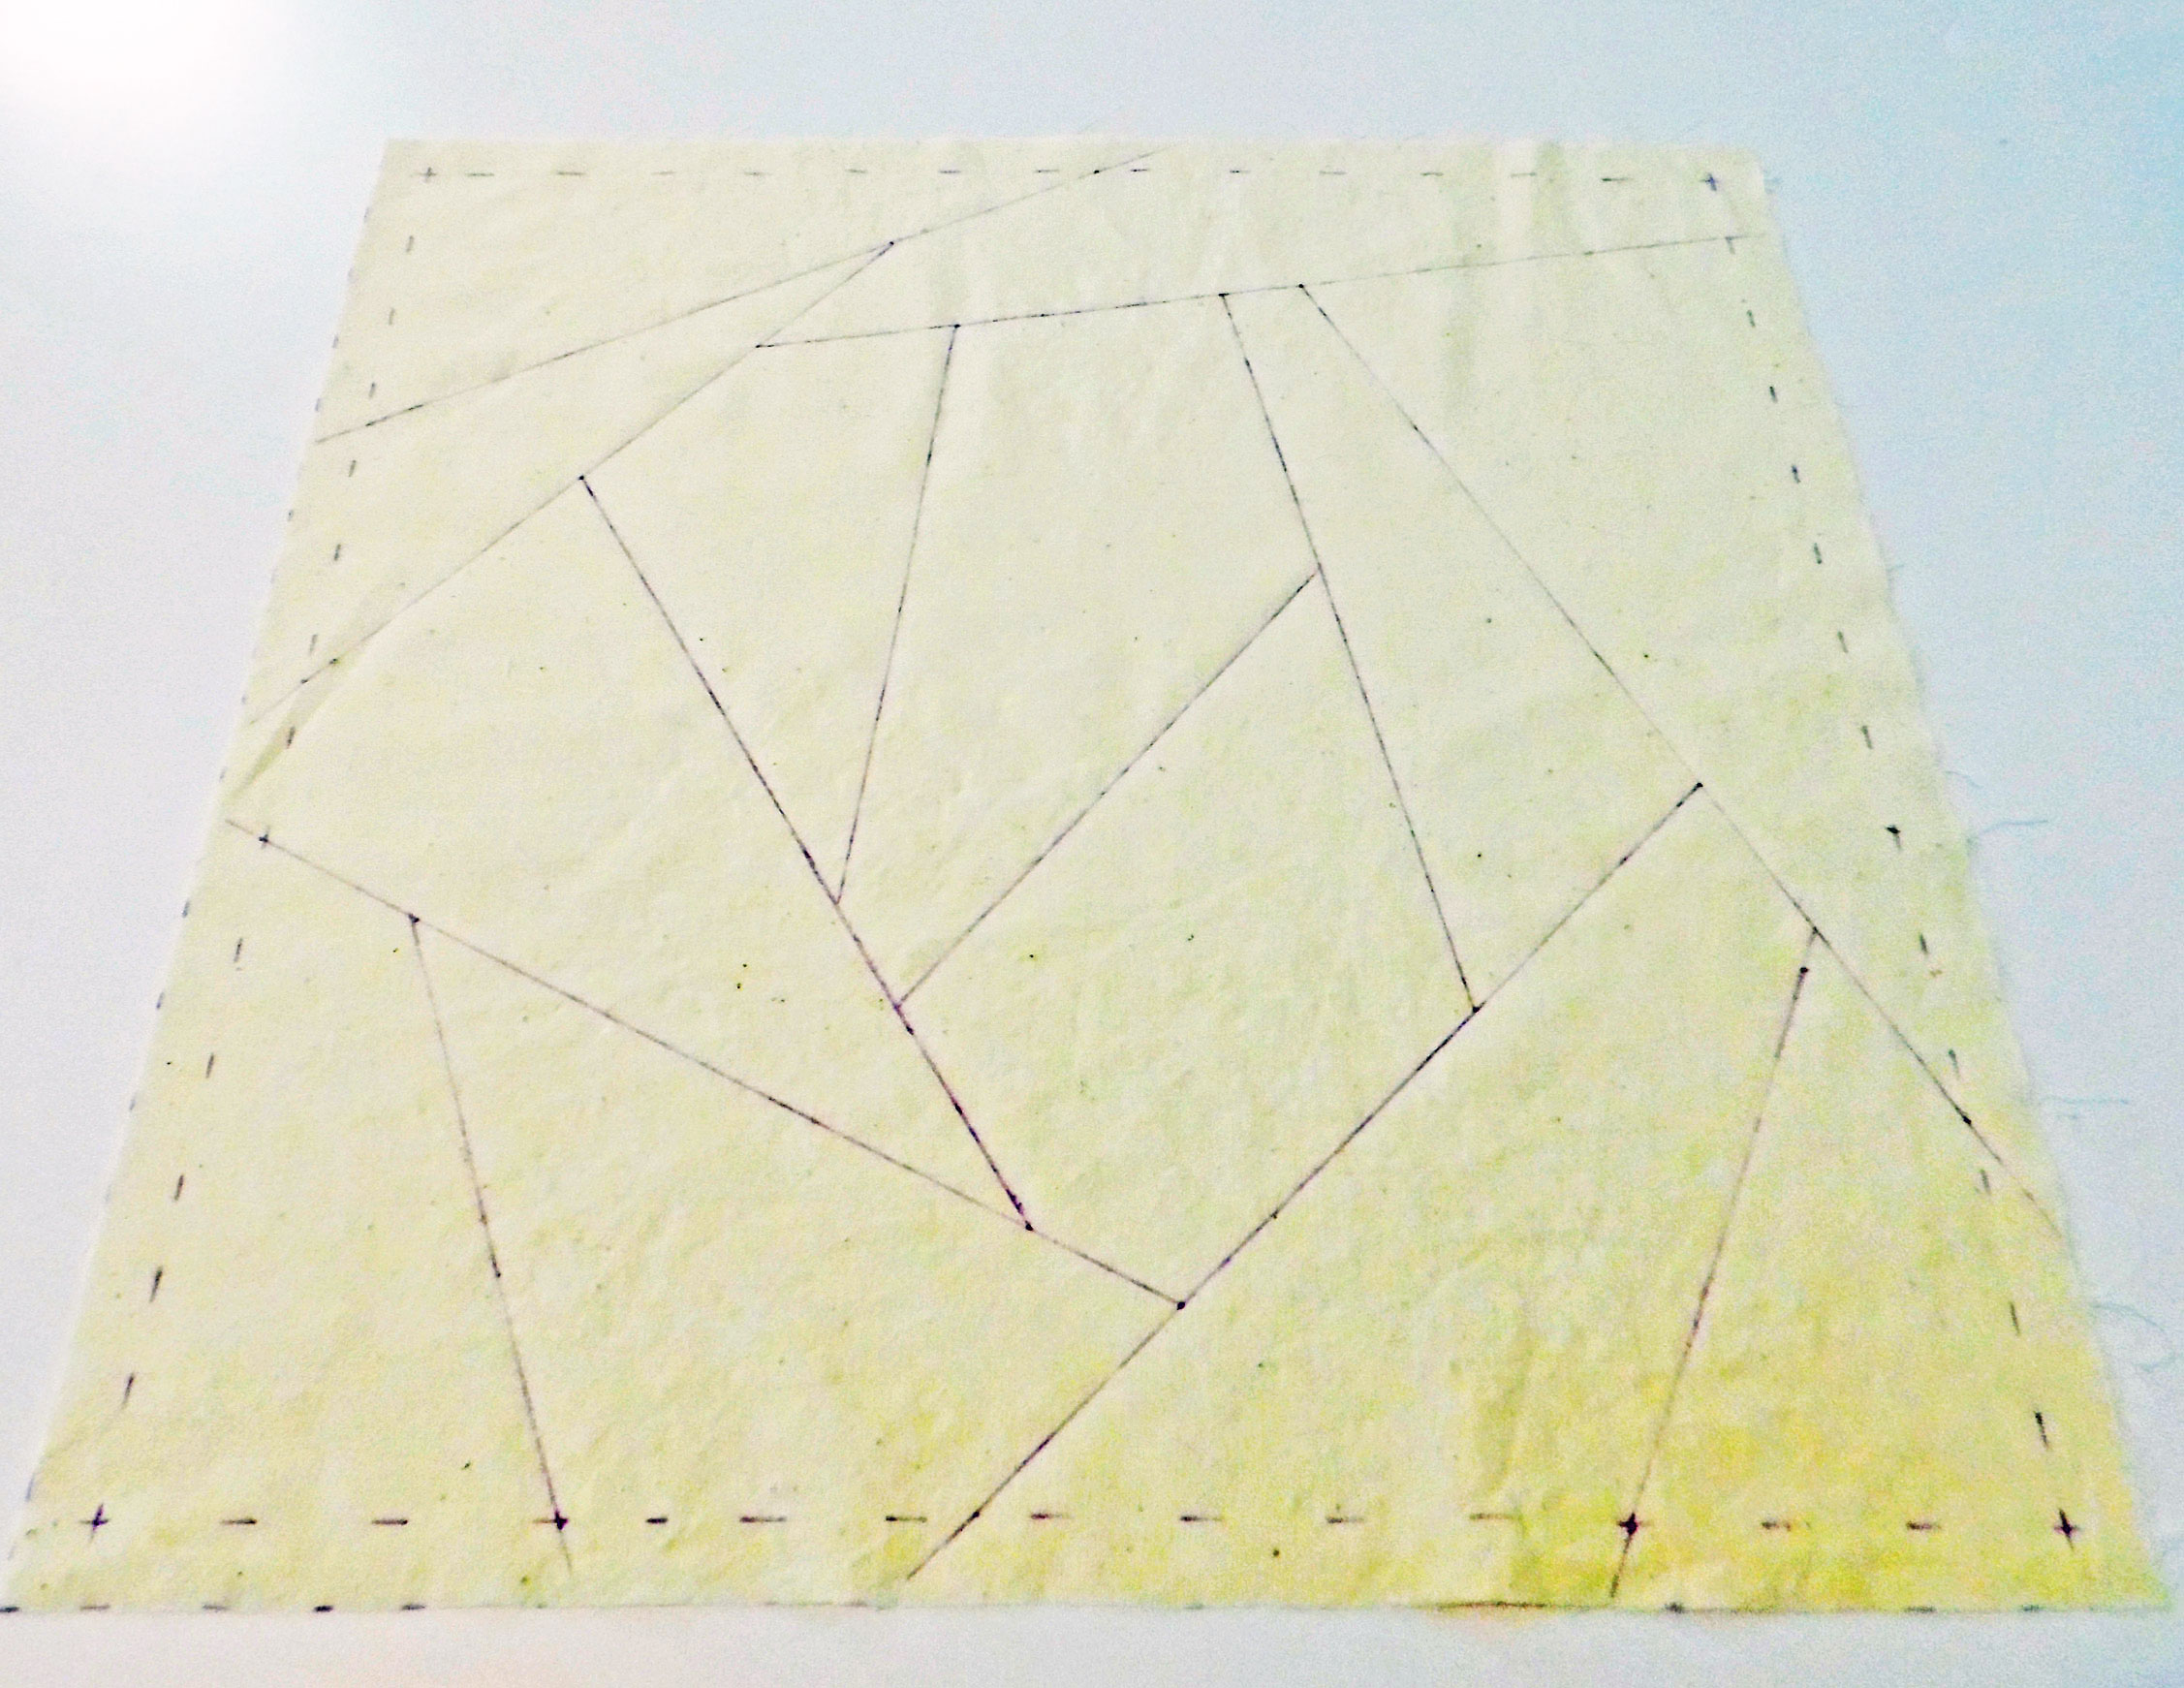
Quilt Base
Then, I traced the quilt base onto Swedish tracing paper. This would be my template, so I’d be able to cut each piece of fabric in the right shape. I numbered each segment, to make it easier to reassemble the pieces in the right order.
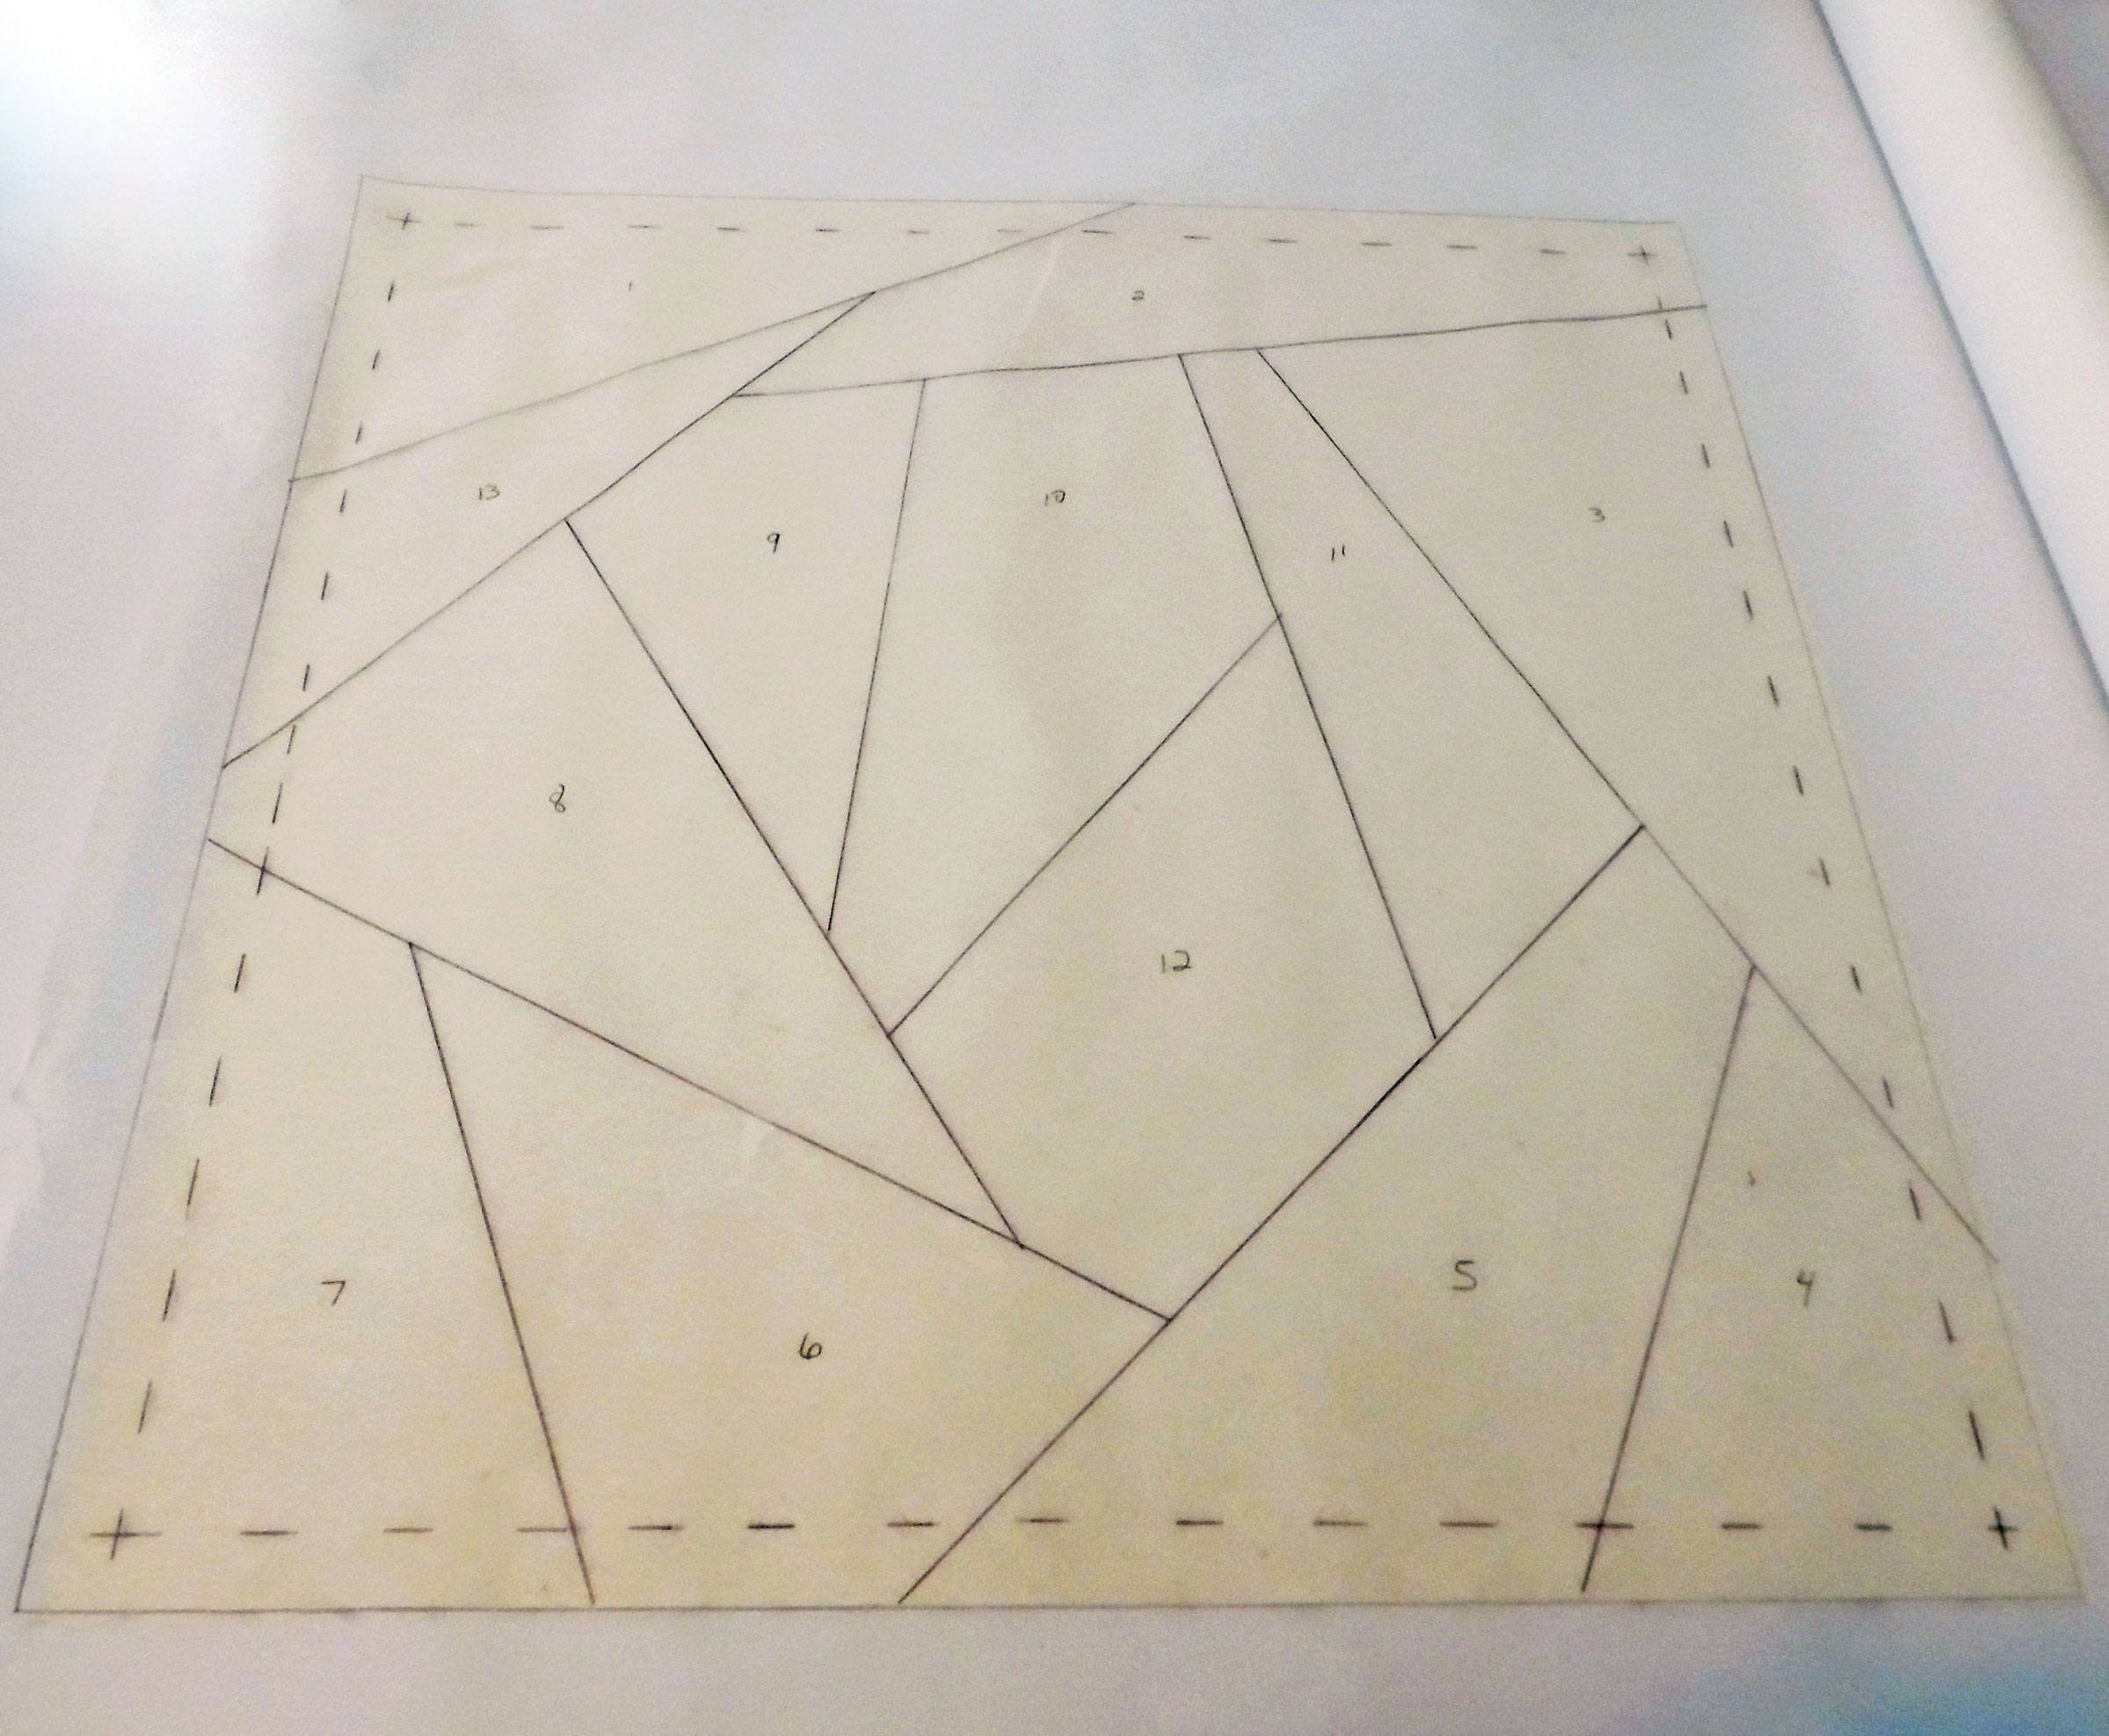
Template
I cut the template apart, so I could use the pattern pieces. Each piece needed a ¼” seam allowance added to it, but that’s easy enough to do while cutting the fabric.
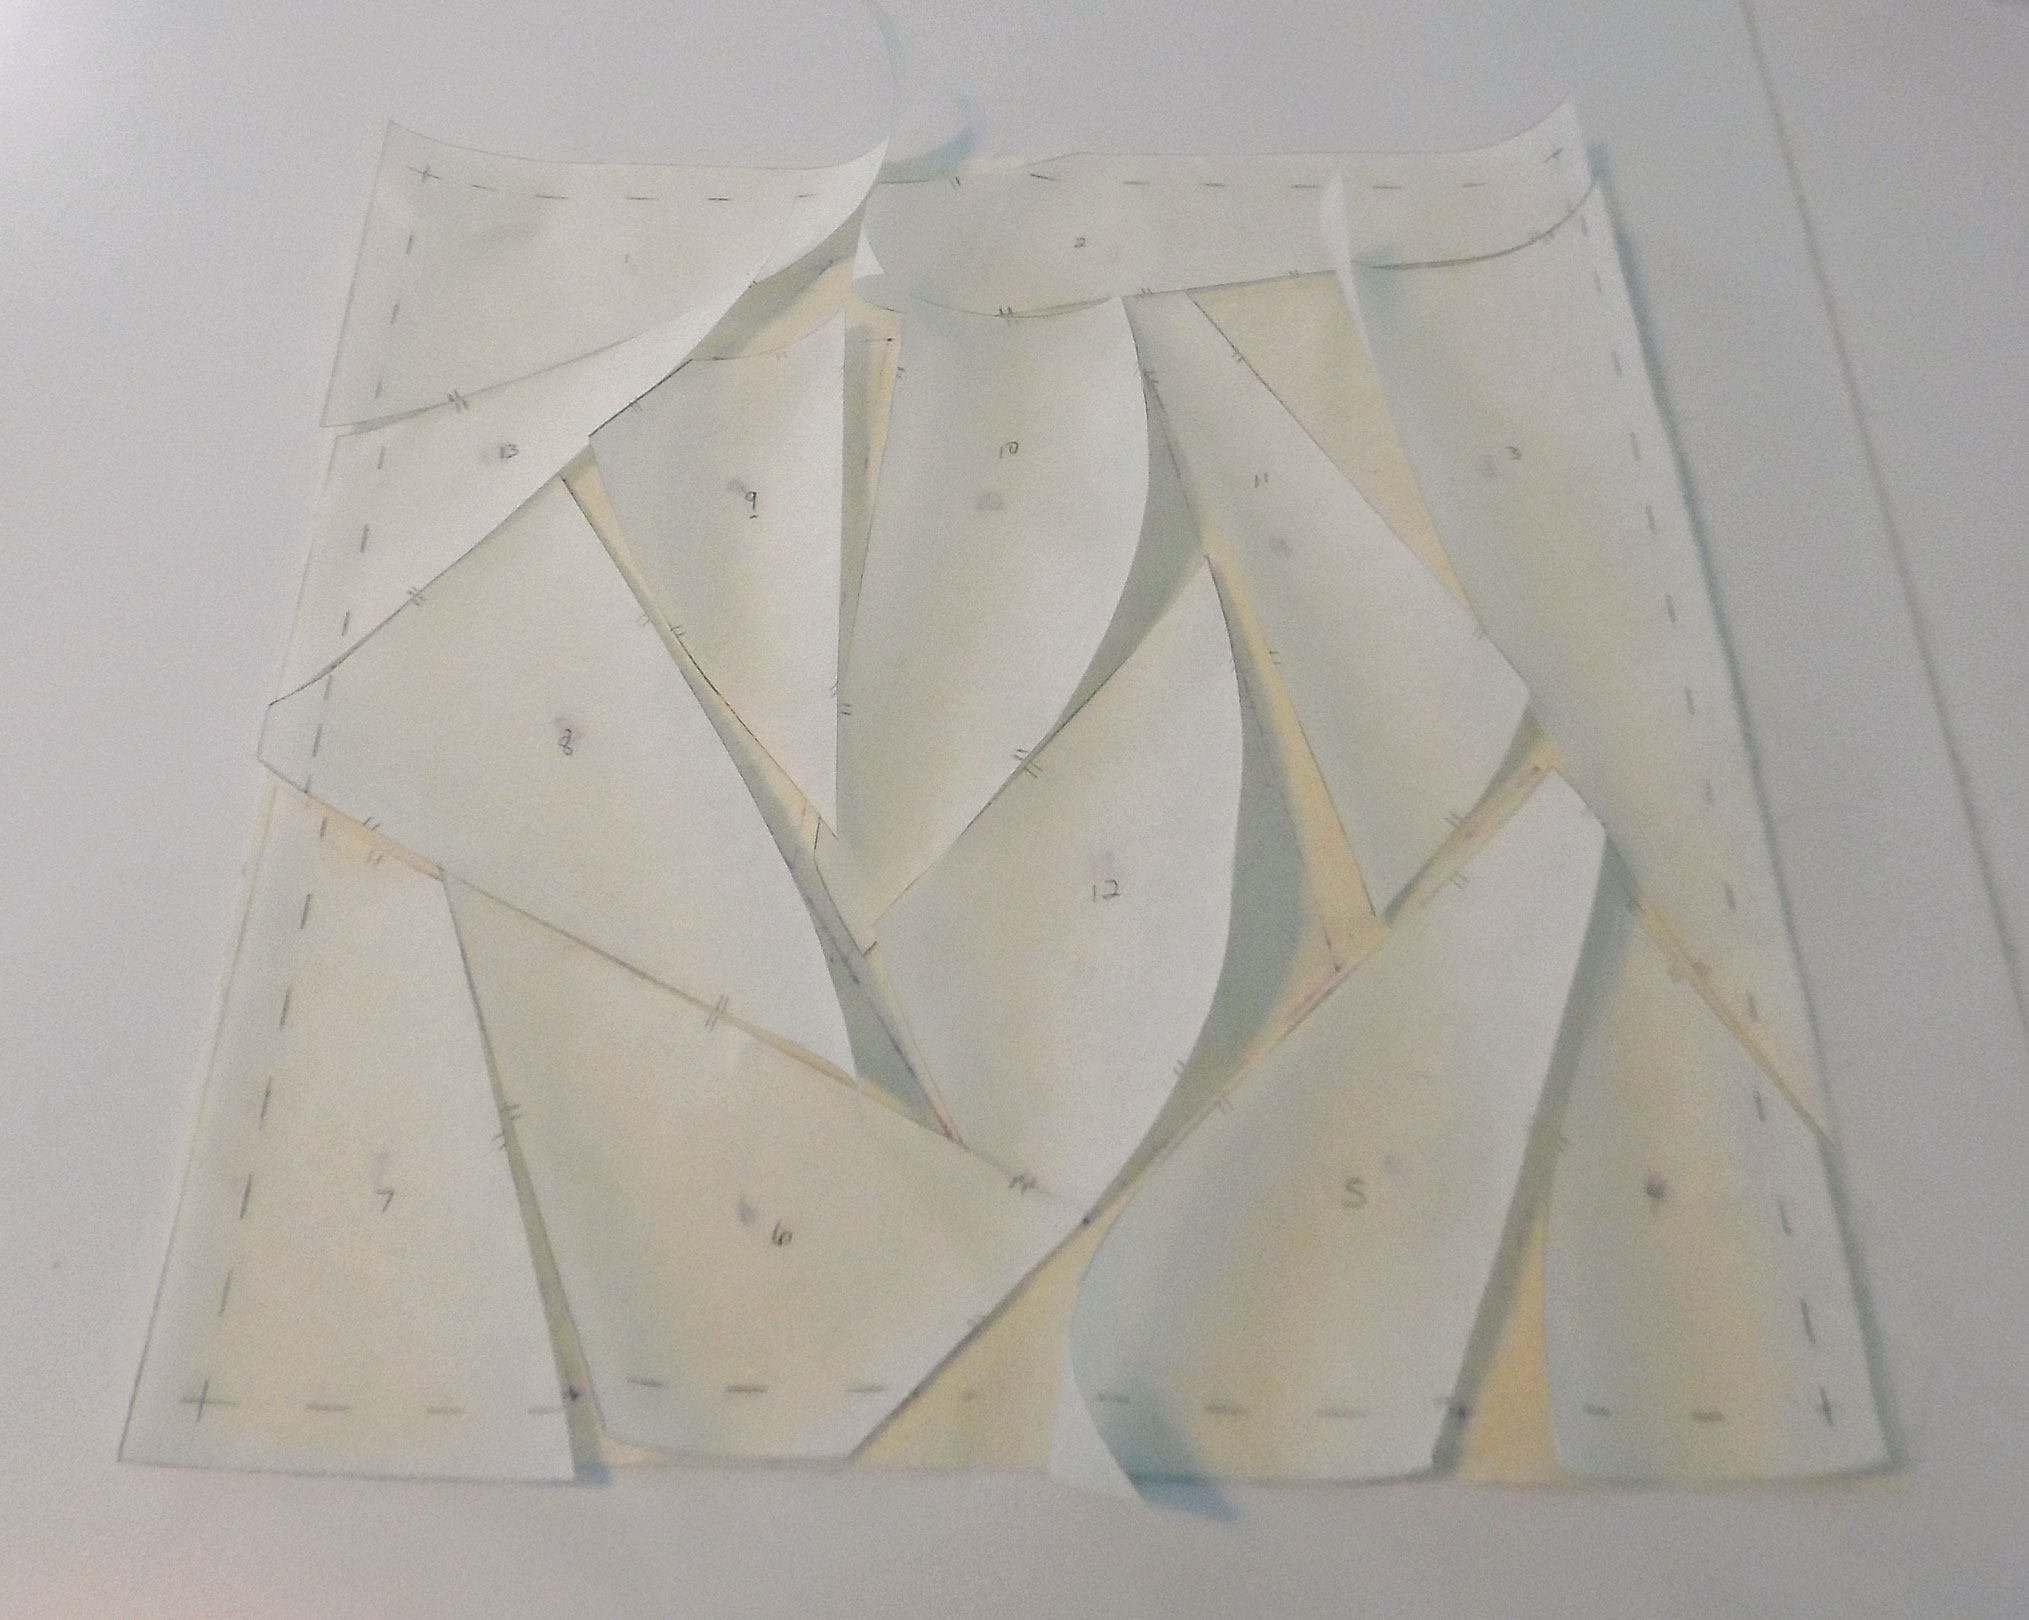
Pattern Pieces
It was at this point I realized I wasn’t happy with the layout. There were too many pieces ending along the same plane, which creates a spot that draws the eye (and not in a good way). So I went back to the drawing board, and after a bit of experimentation, came up with this.
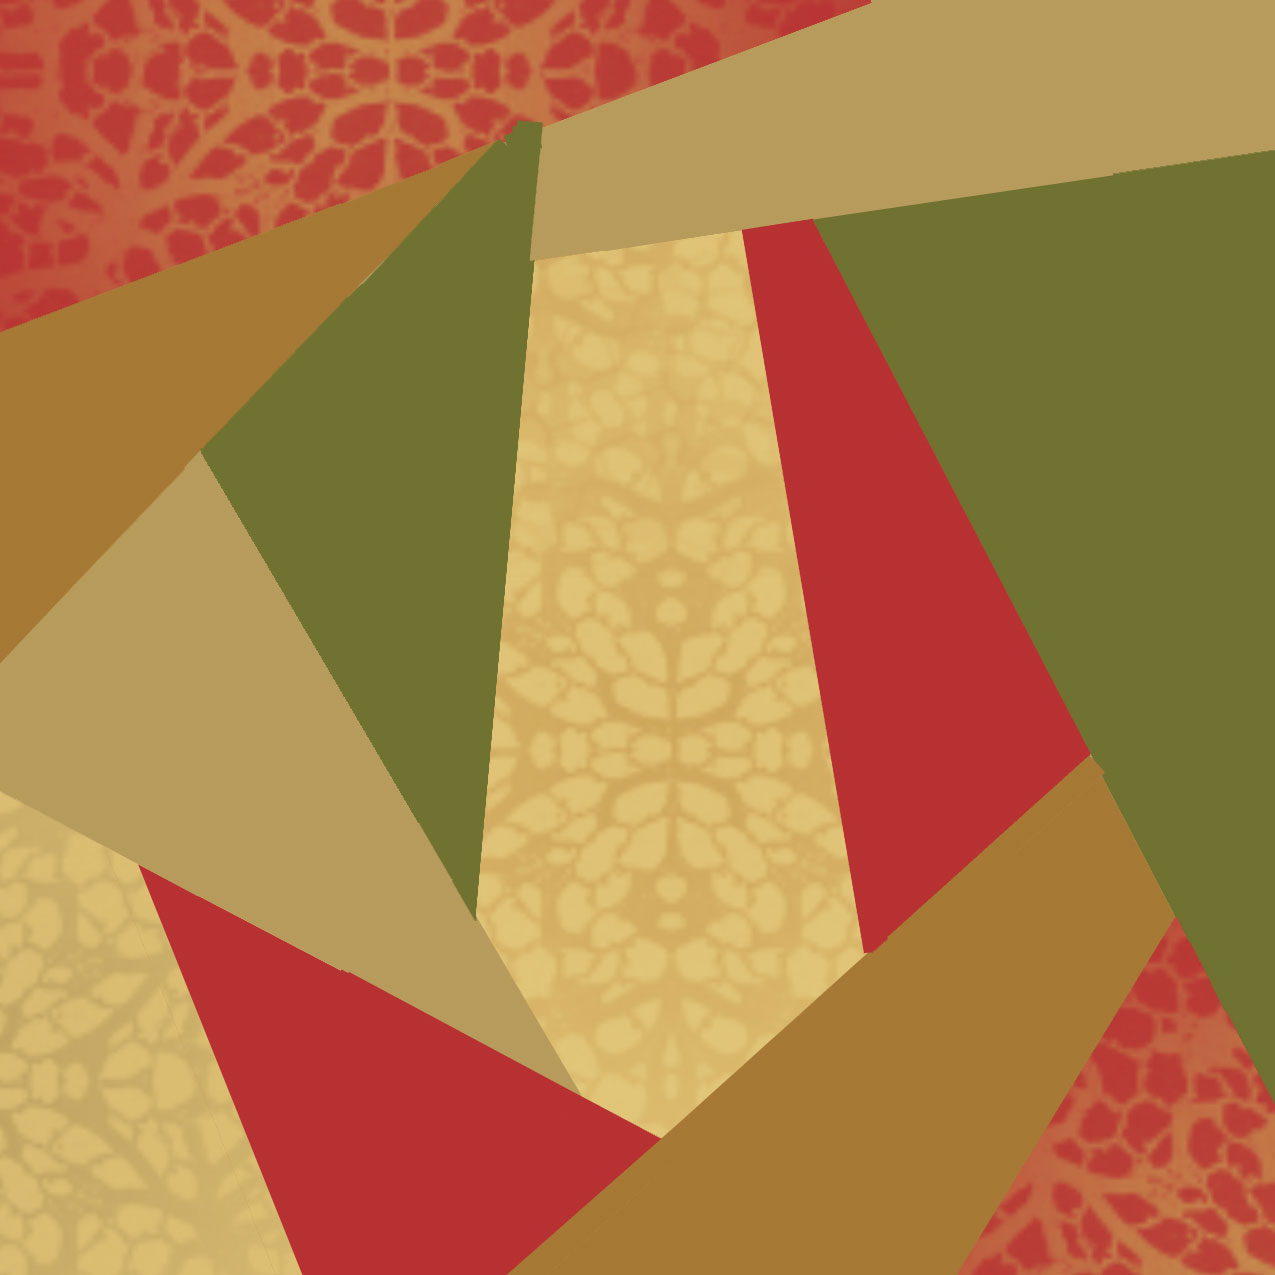
New Layout Sketch
I had to cut a couple of new pattern pieces for my template, but that only took a minute. Then I went ahead and cut the fabric.
I used my favorite method of quilting: foundation piecing. First, you place one piece on the muslin base and stitch it down on all sides. It generally works best if this piece is near the center of the quilt, and you must make sure it’s utterly flat, with no wrinkling or distortion. The second piece is stitched right-side down, then flipped over and pressed flat.
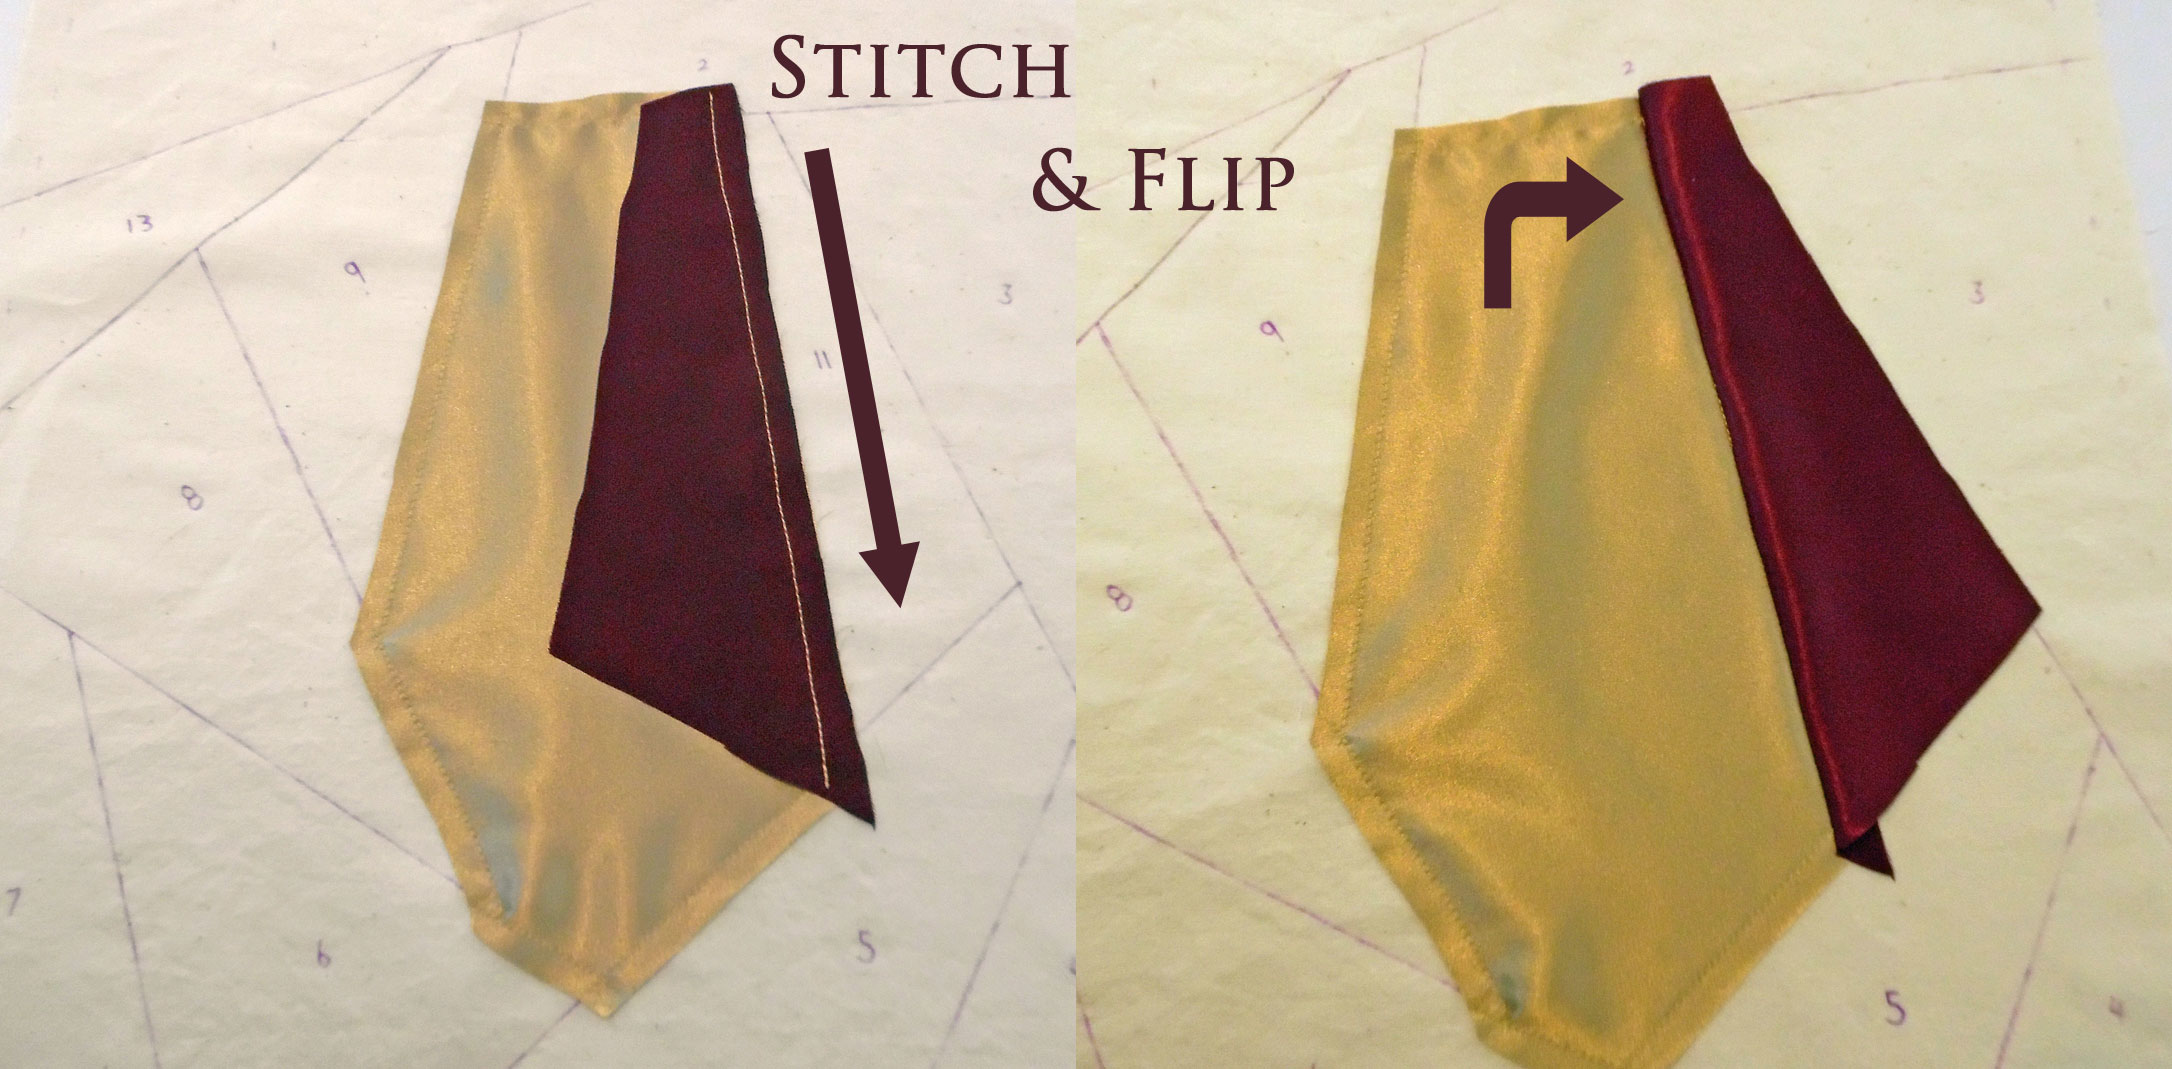
Stitch and Flip
You do the same for each subsequent piece, stitching it right-side down, then flipping it over and pressing it flat.

Stitch and Flip
The finished quilt was a bit messy around the edges, so I basted about 3/8″ from the edge, all around the square, and trimmed away the excess fabric.
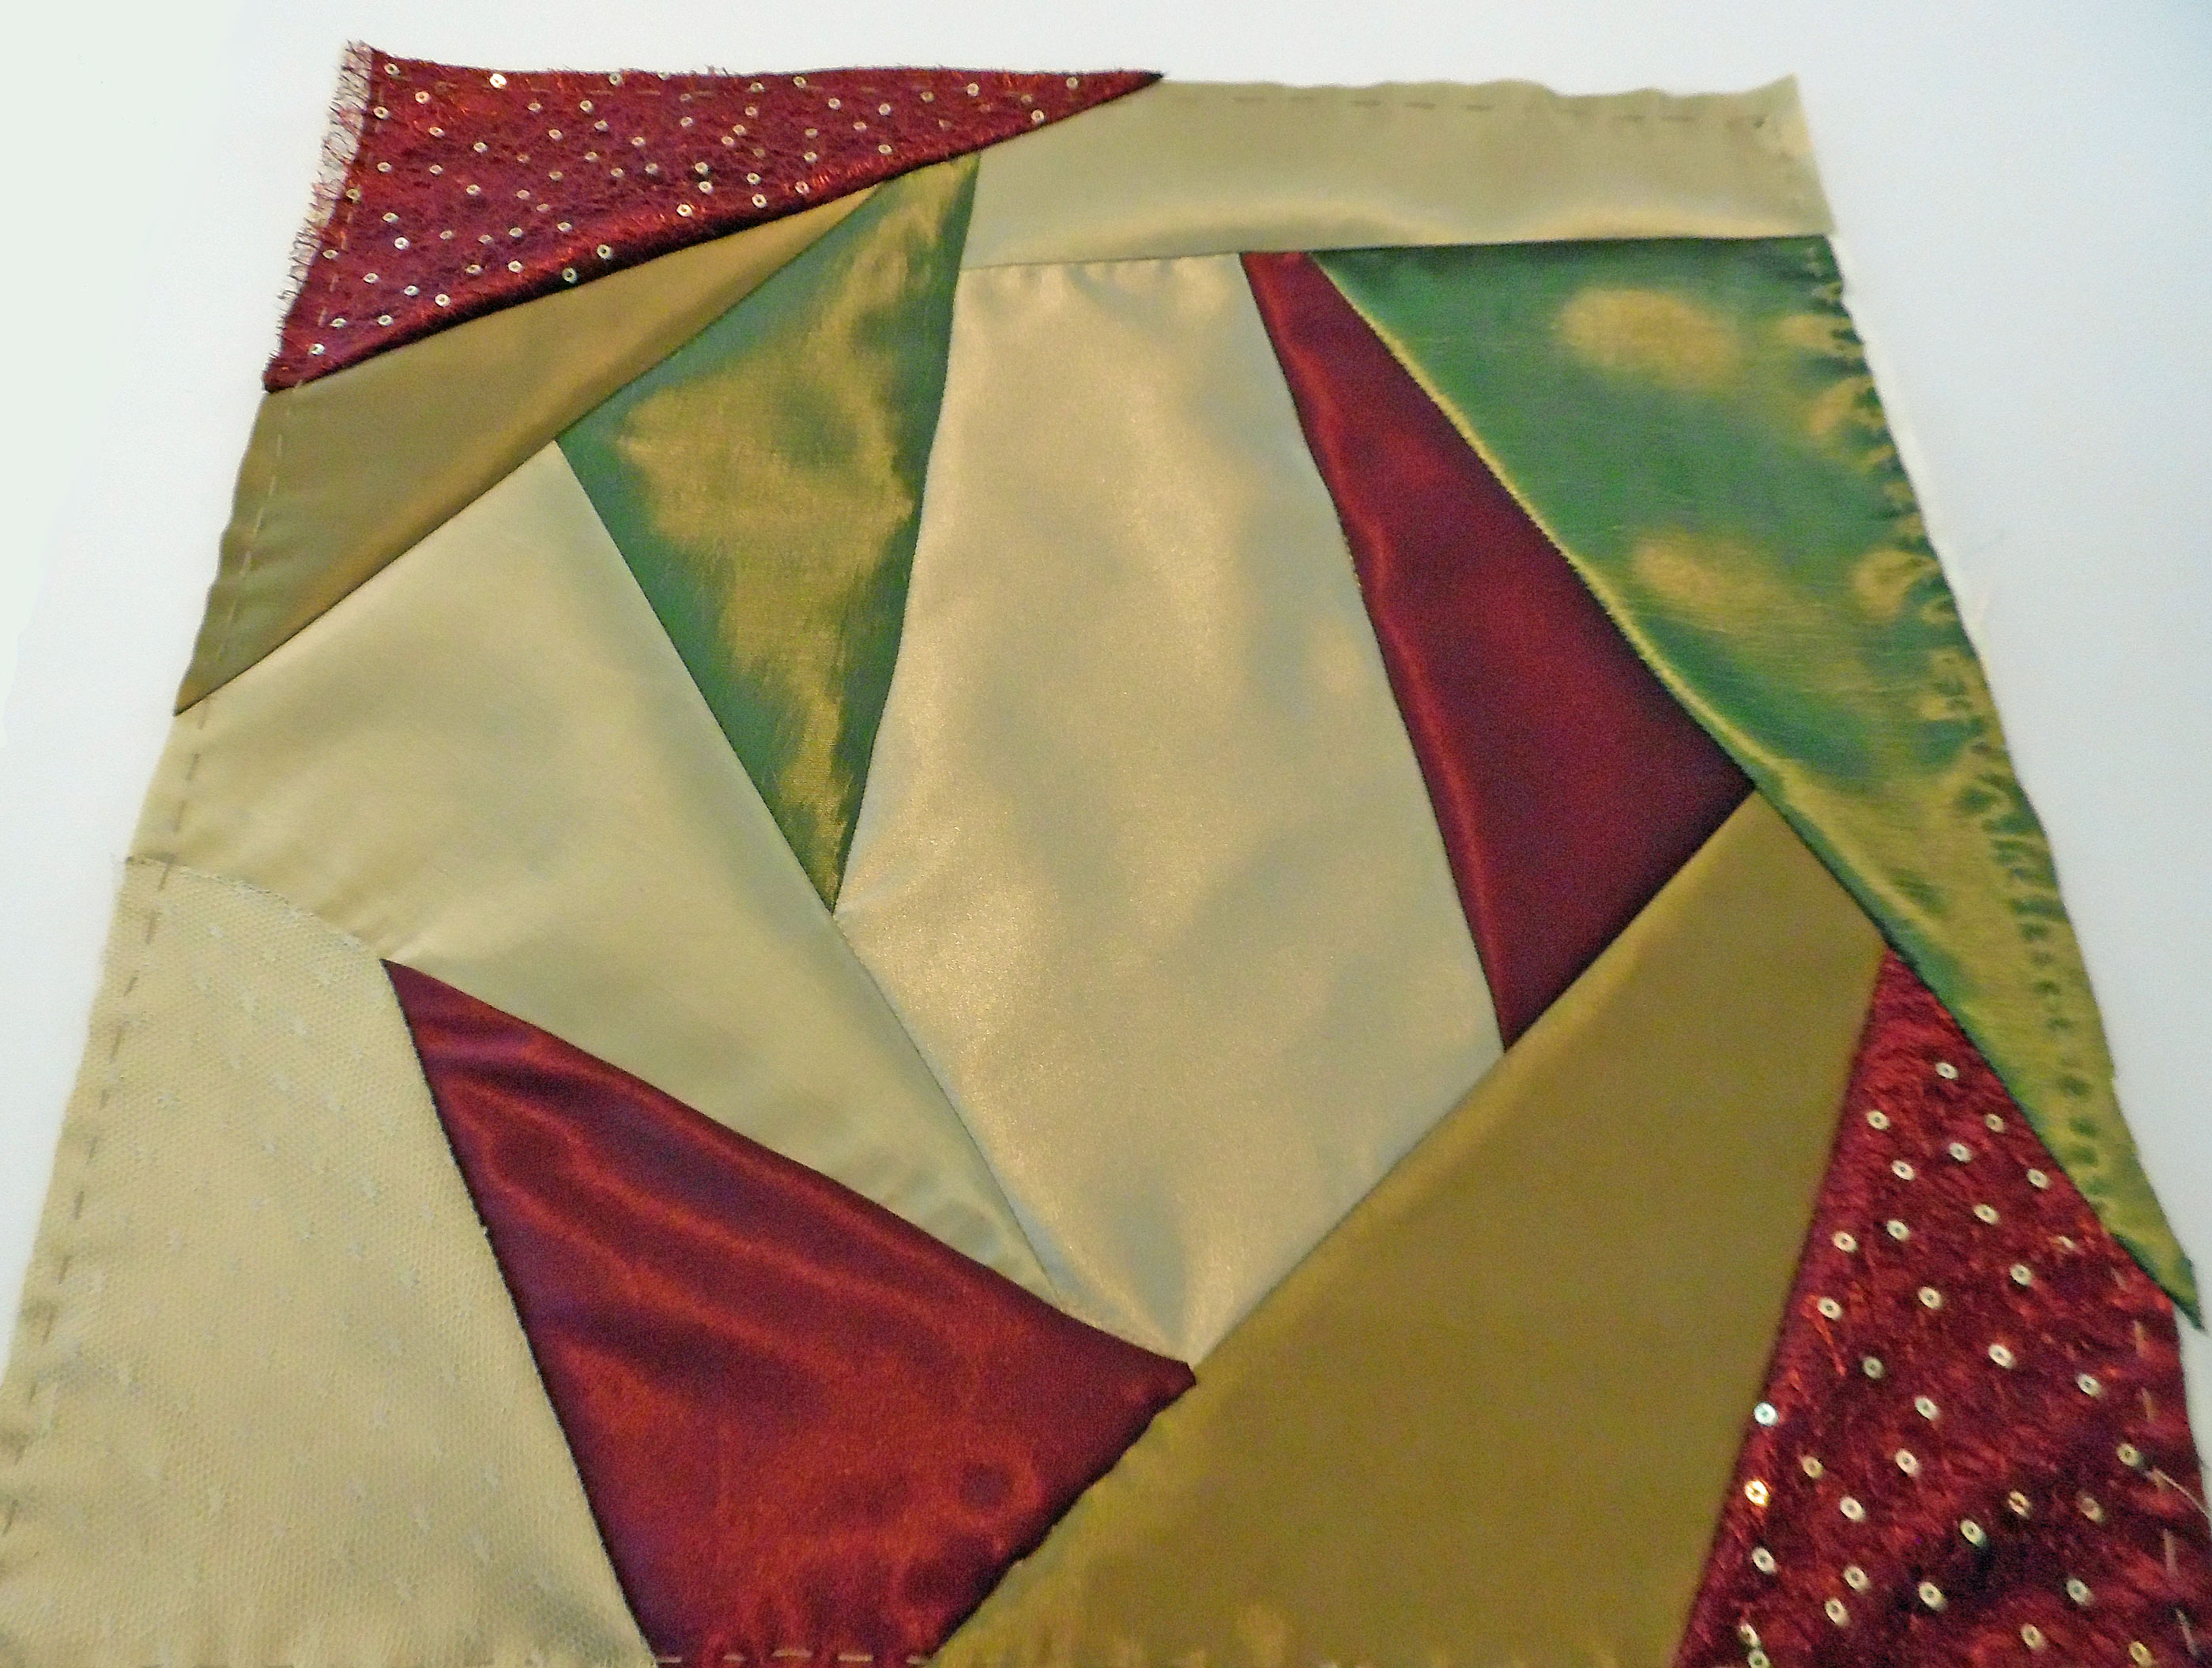
Pieced Quilt
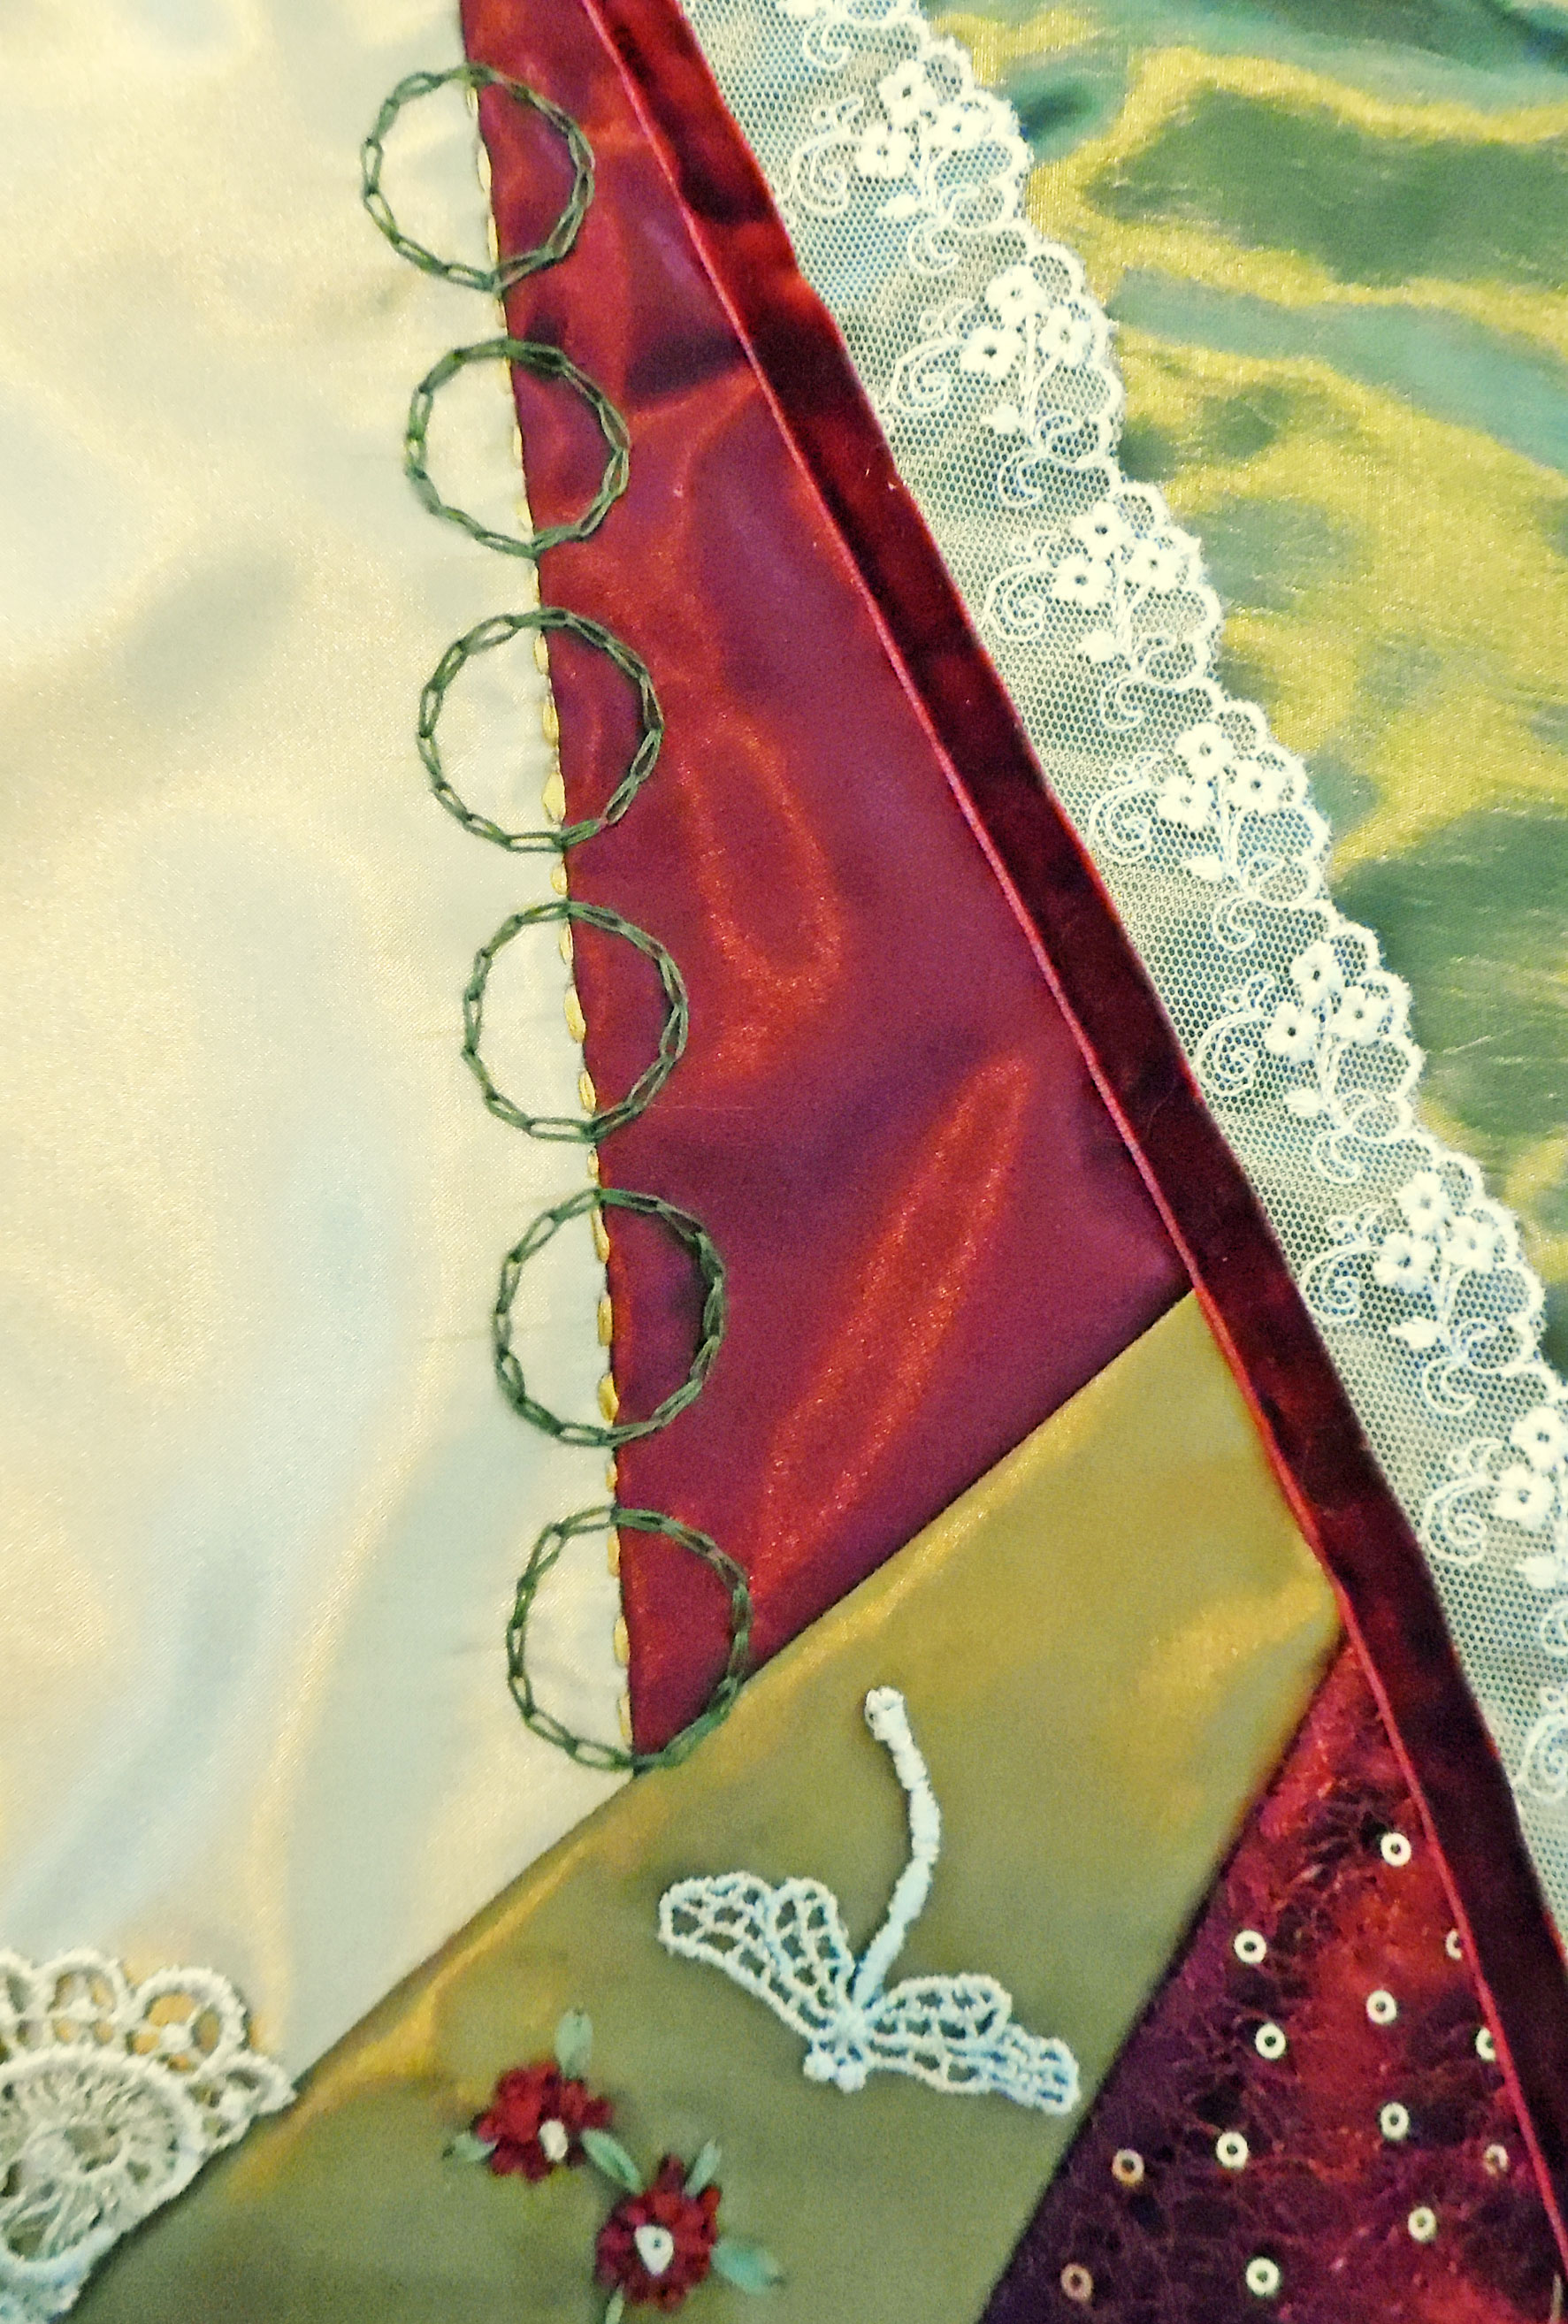
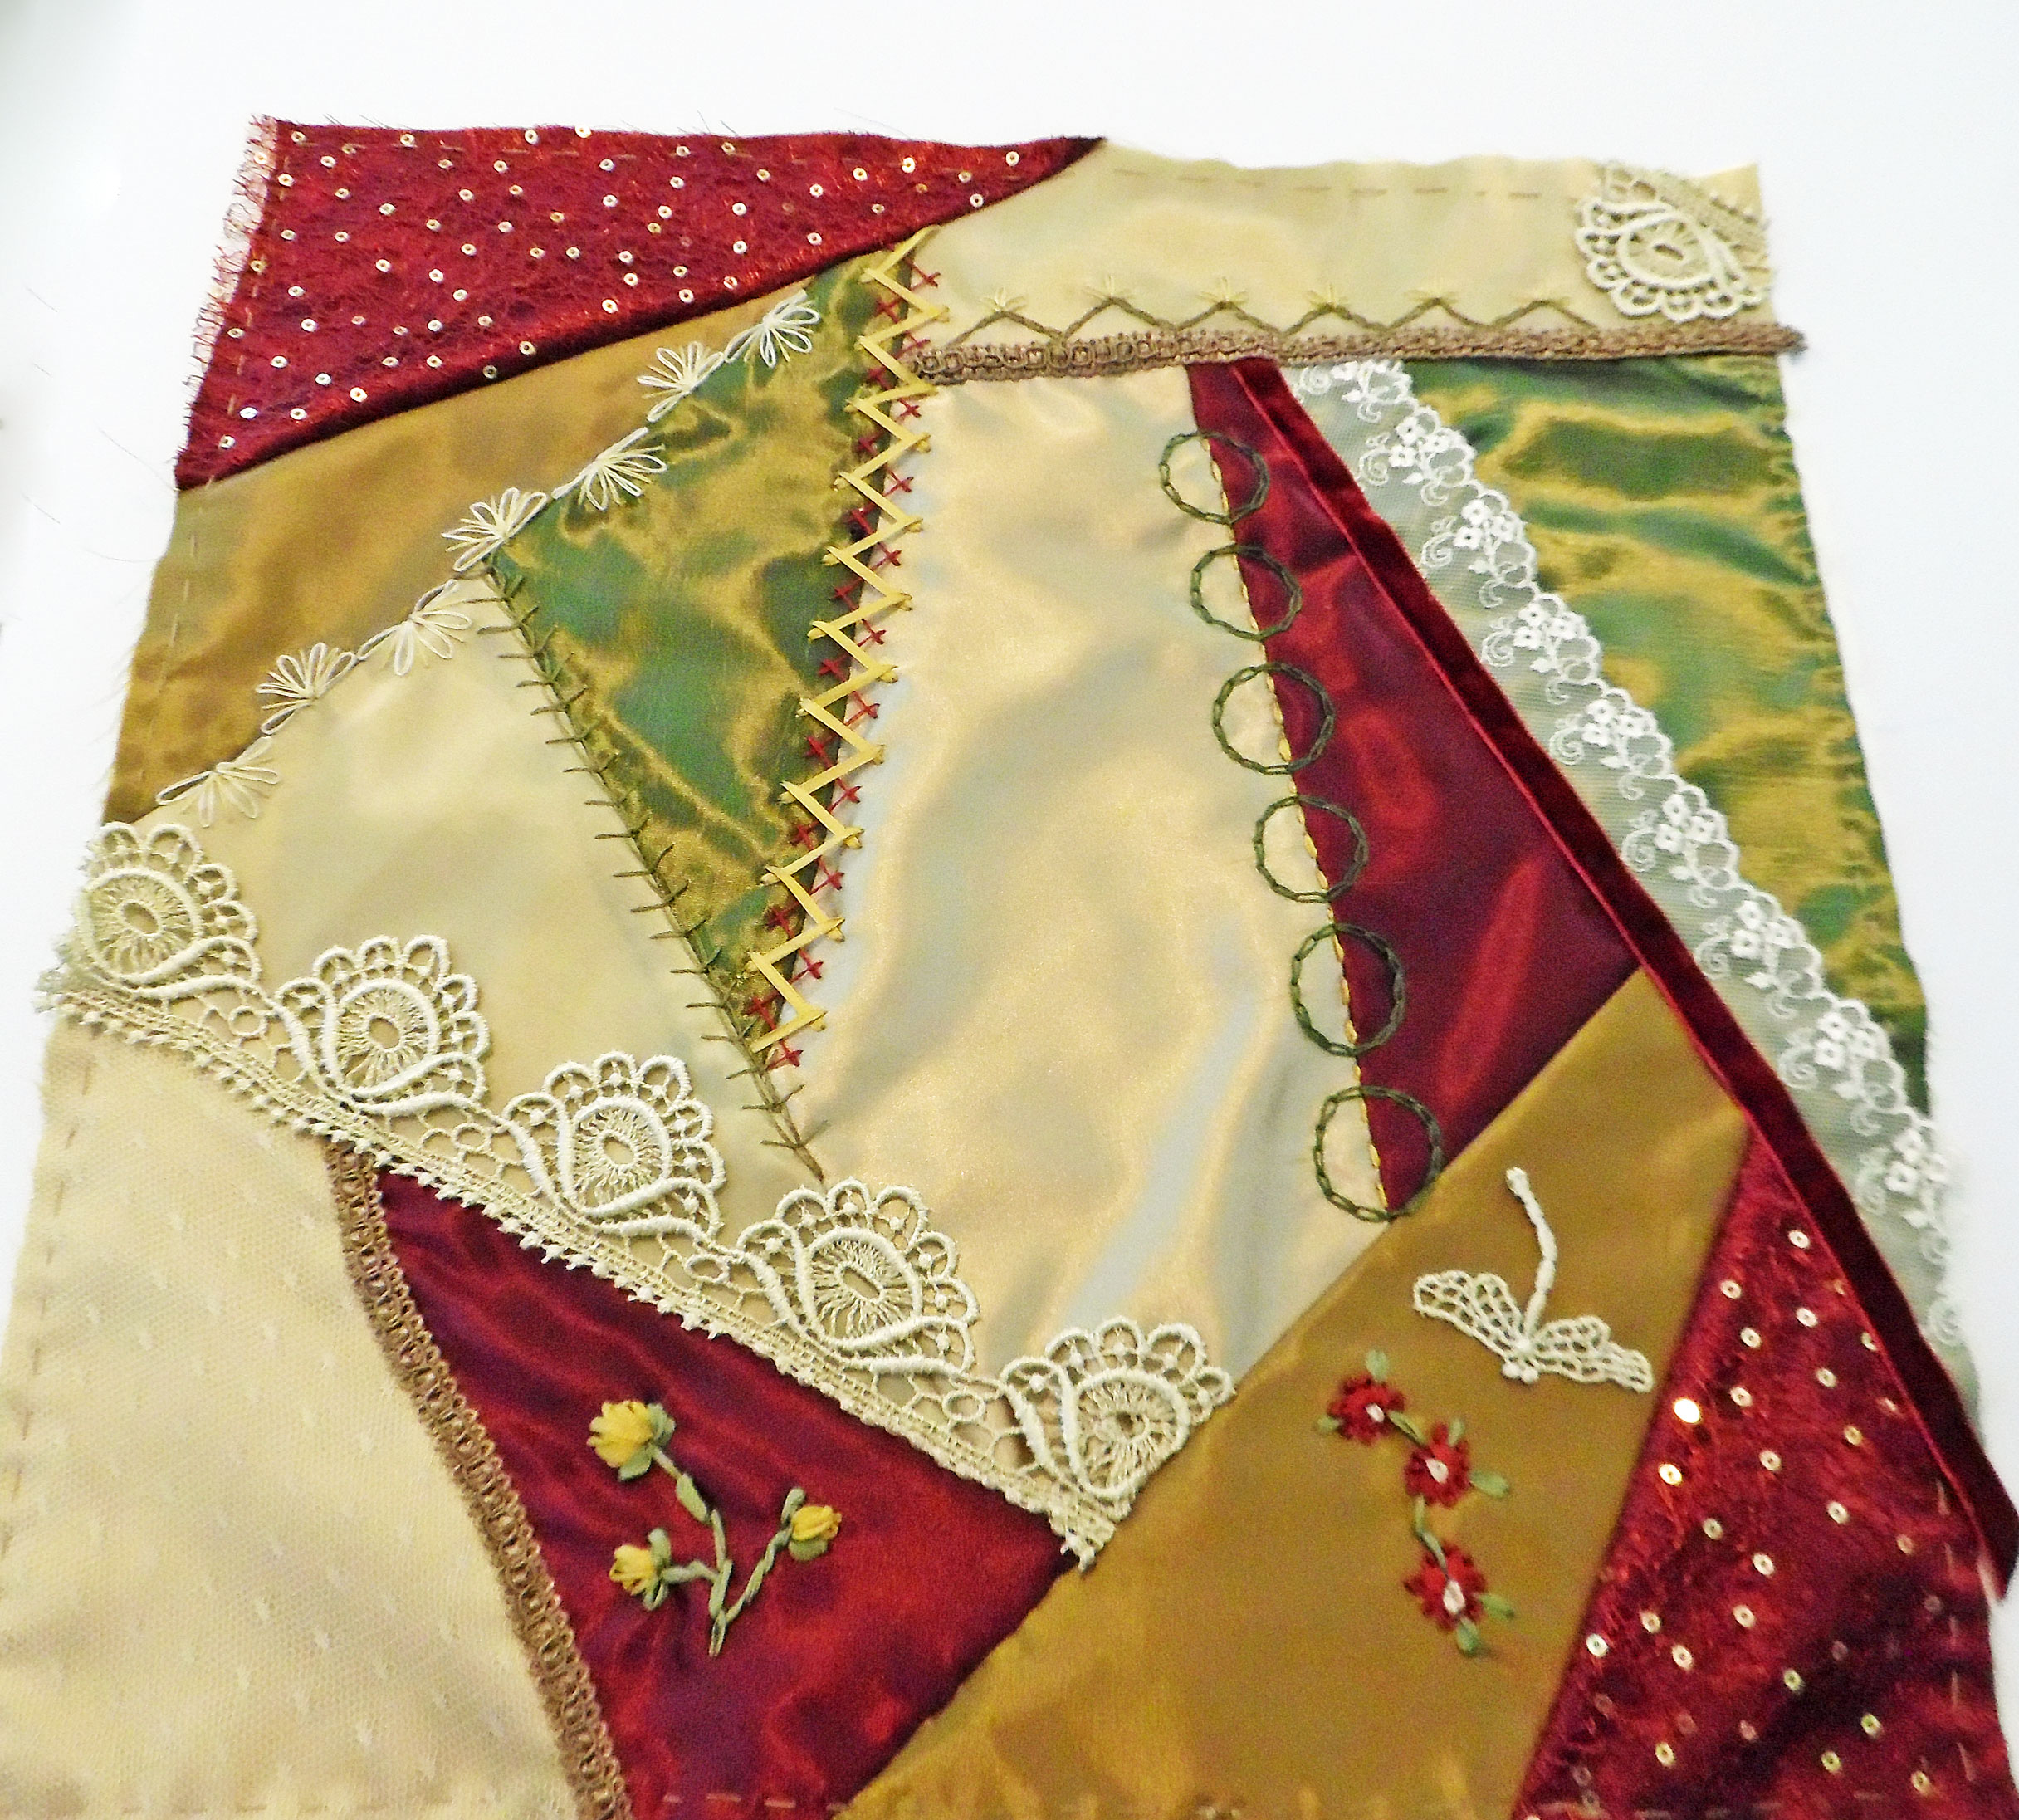
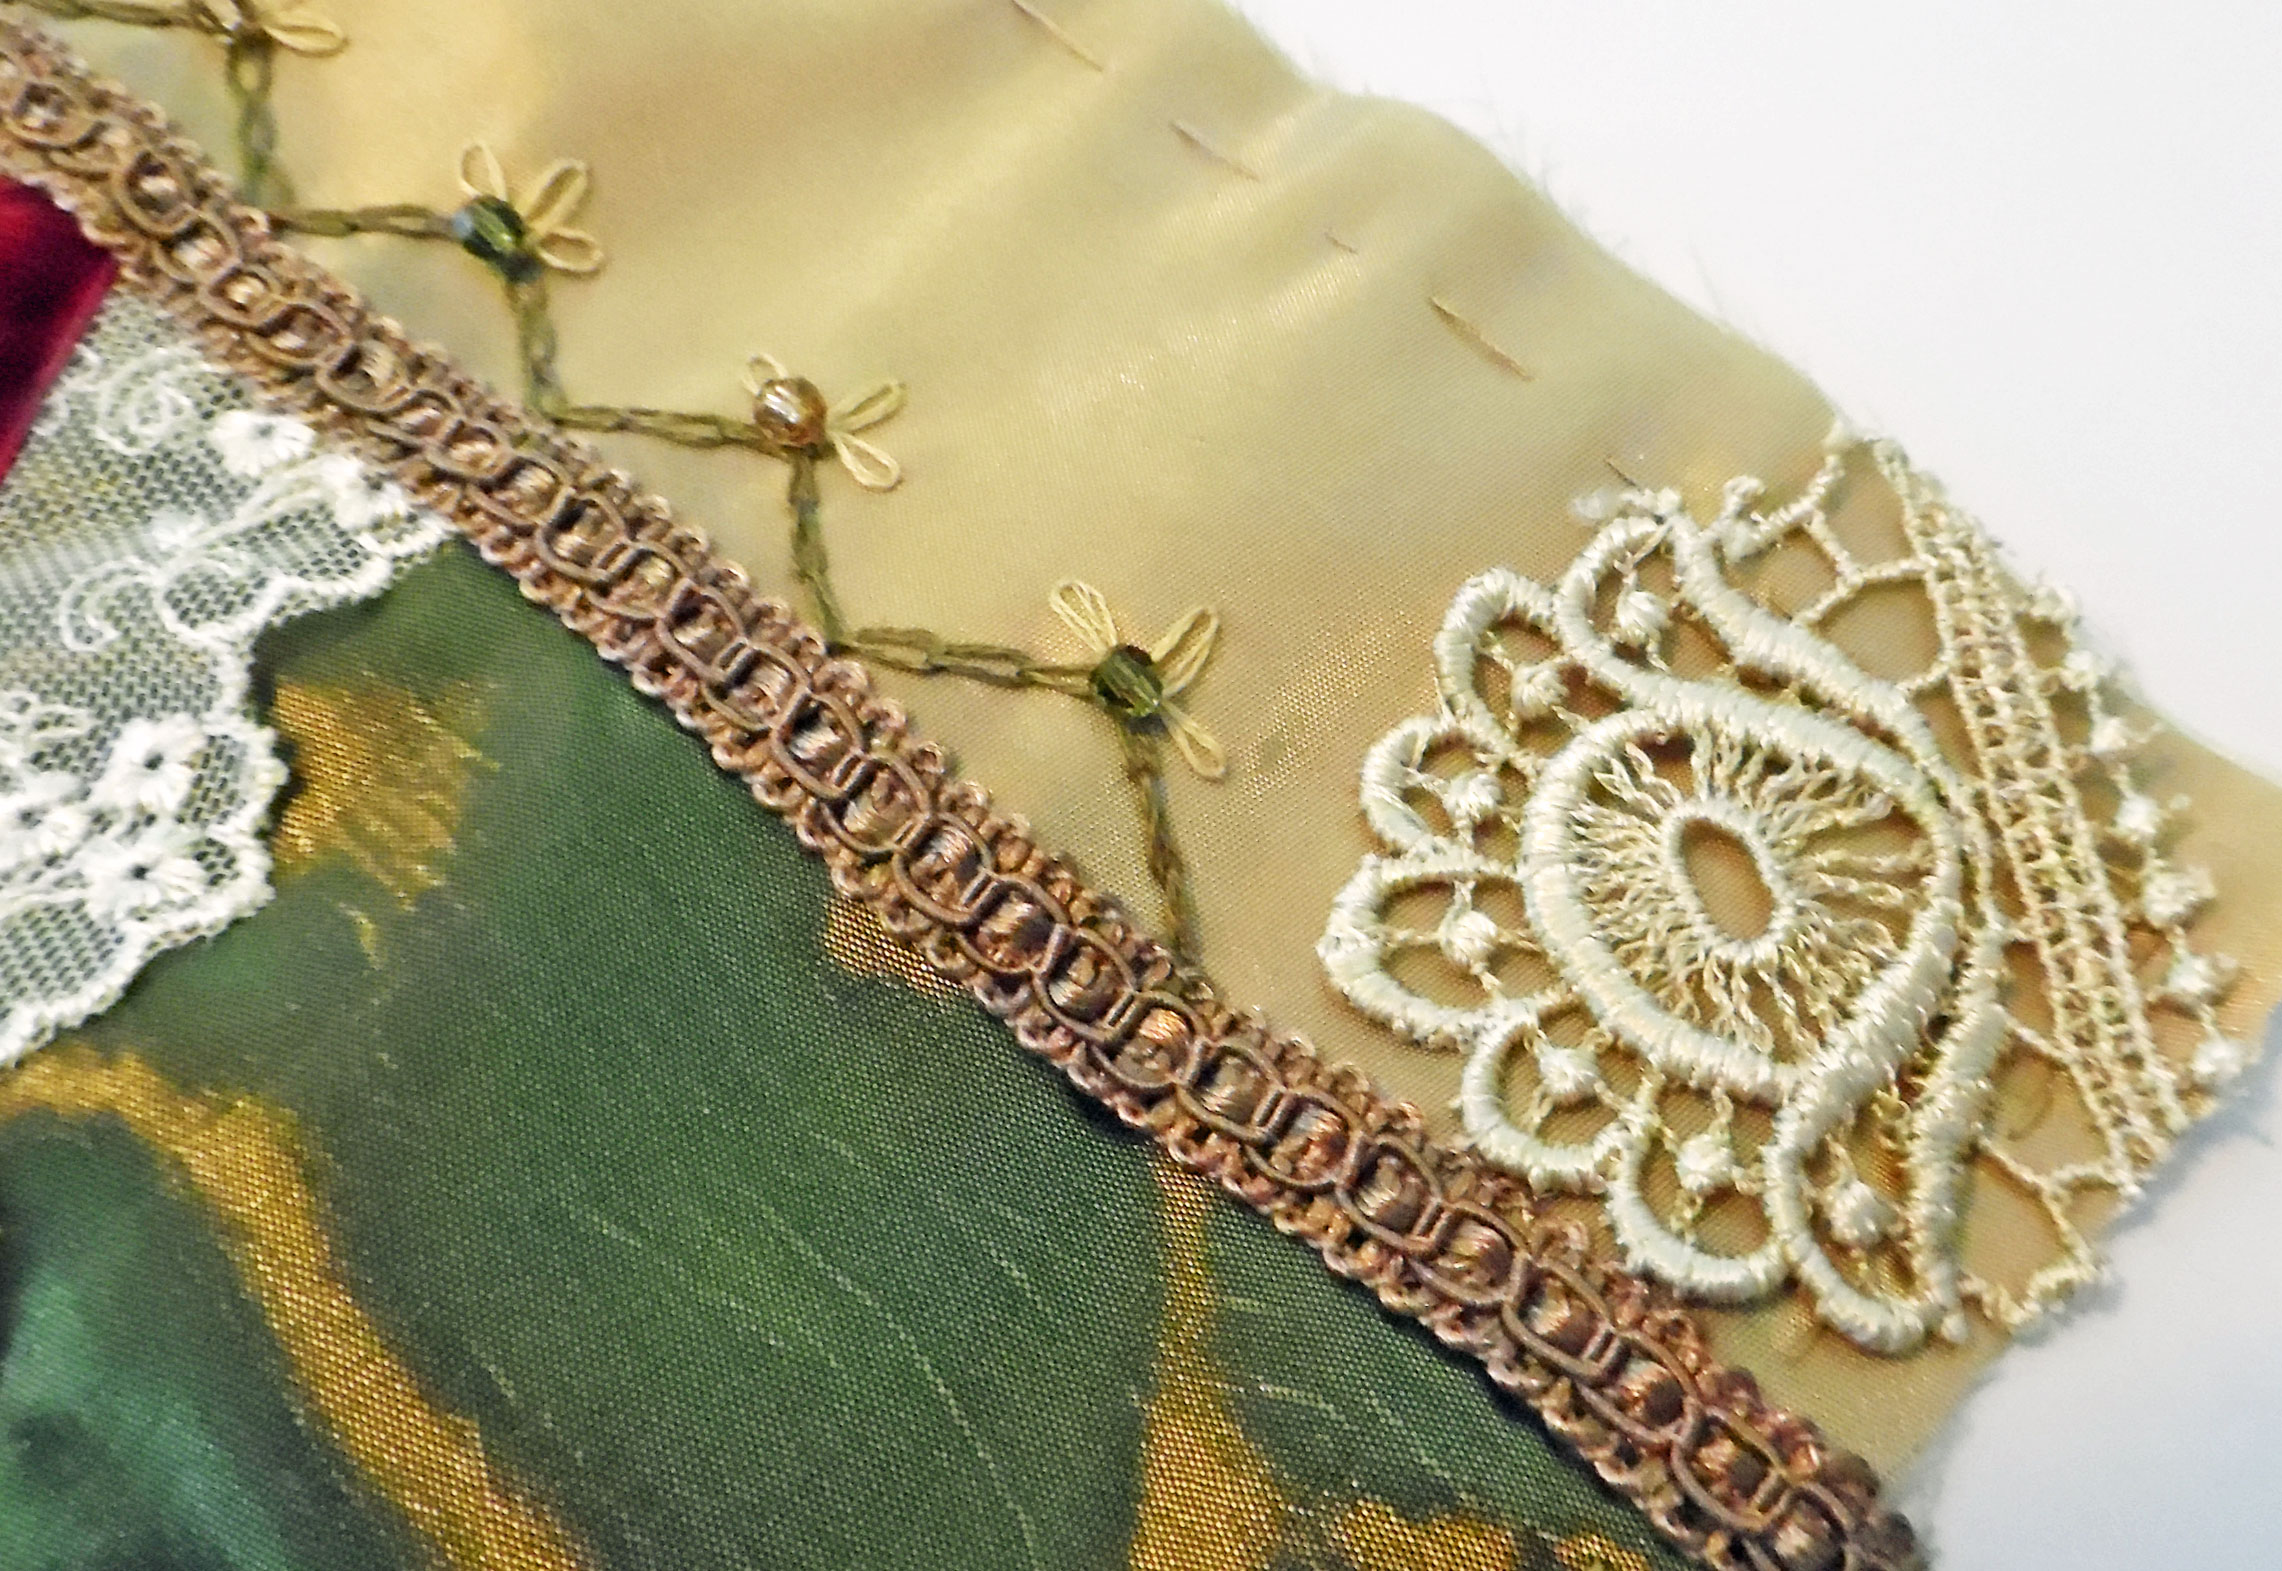
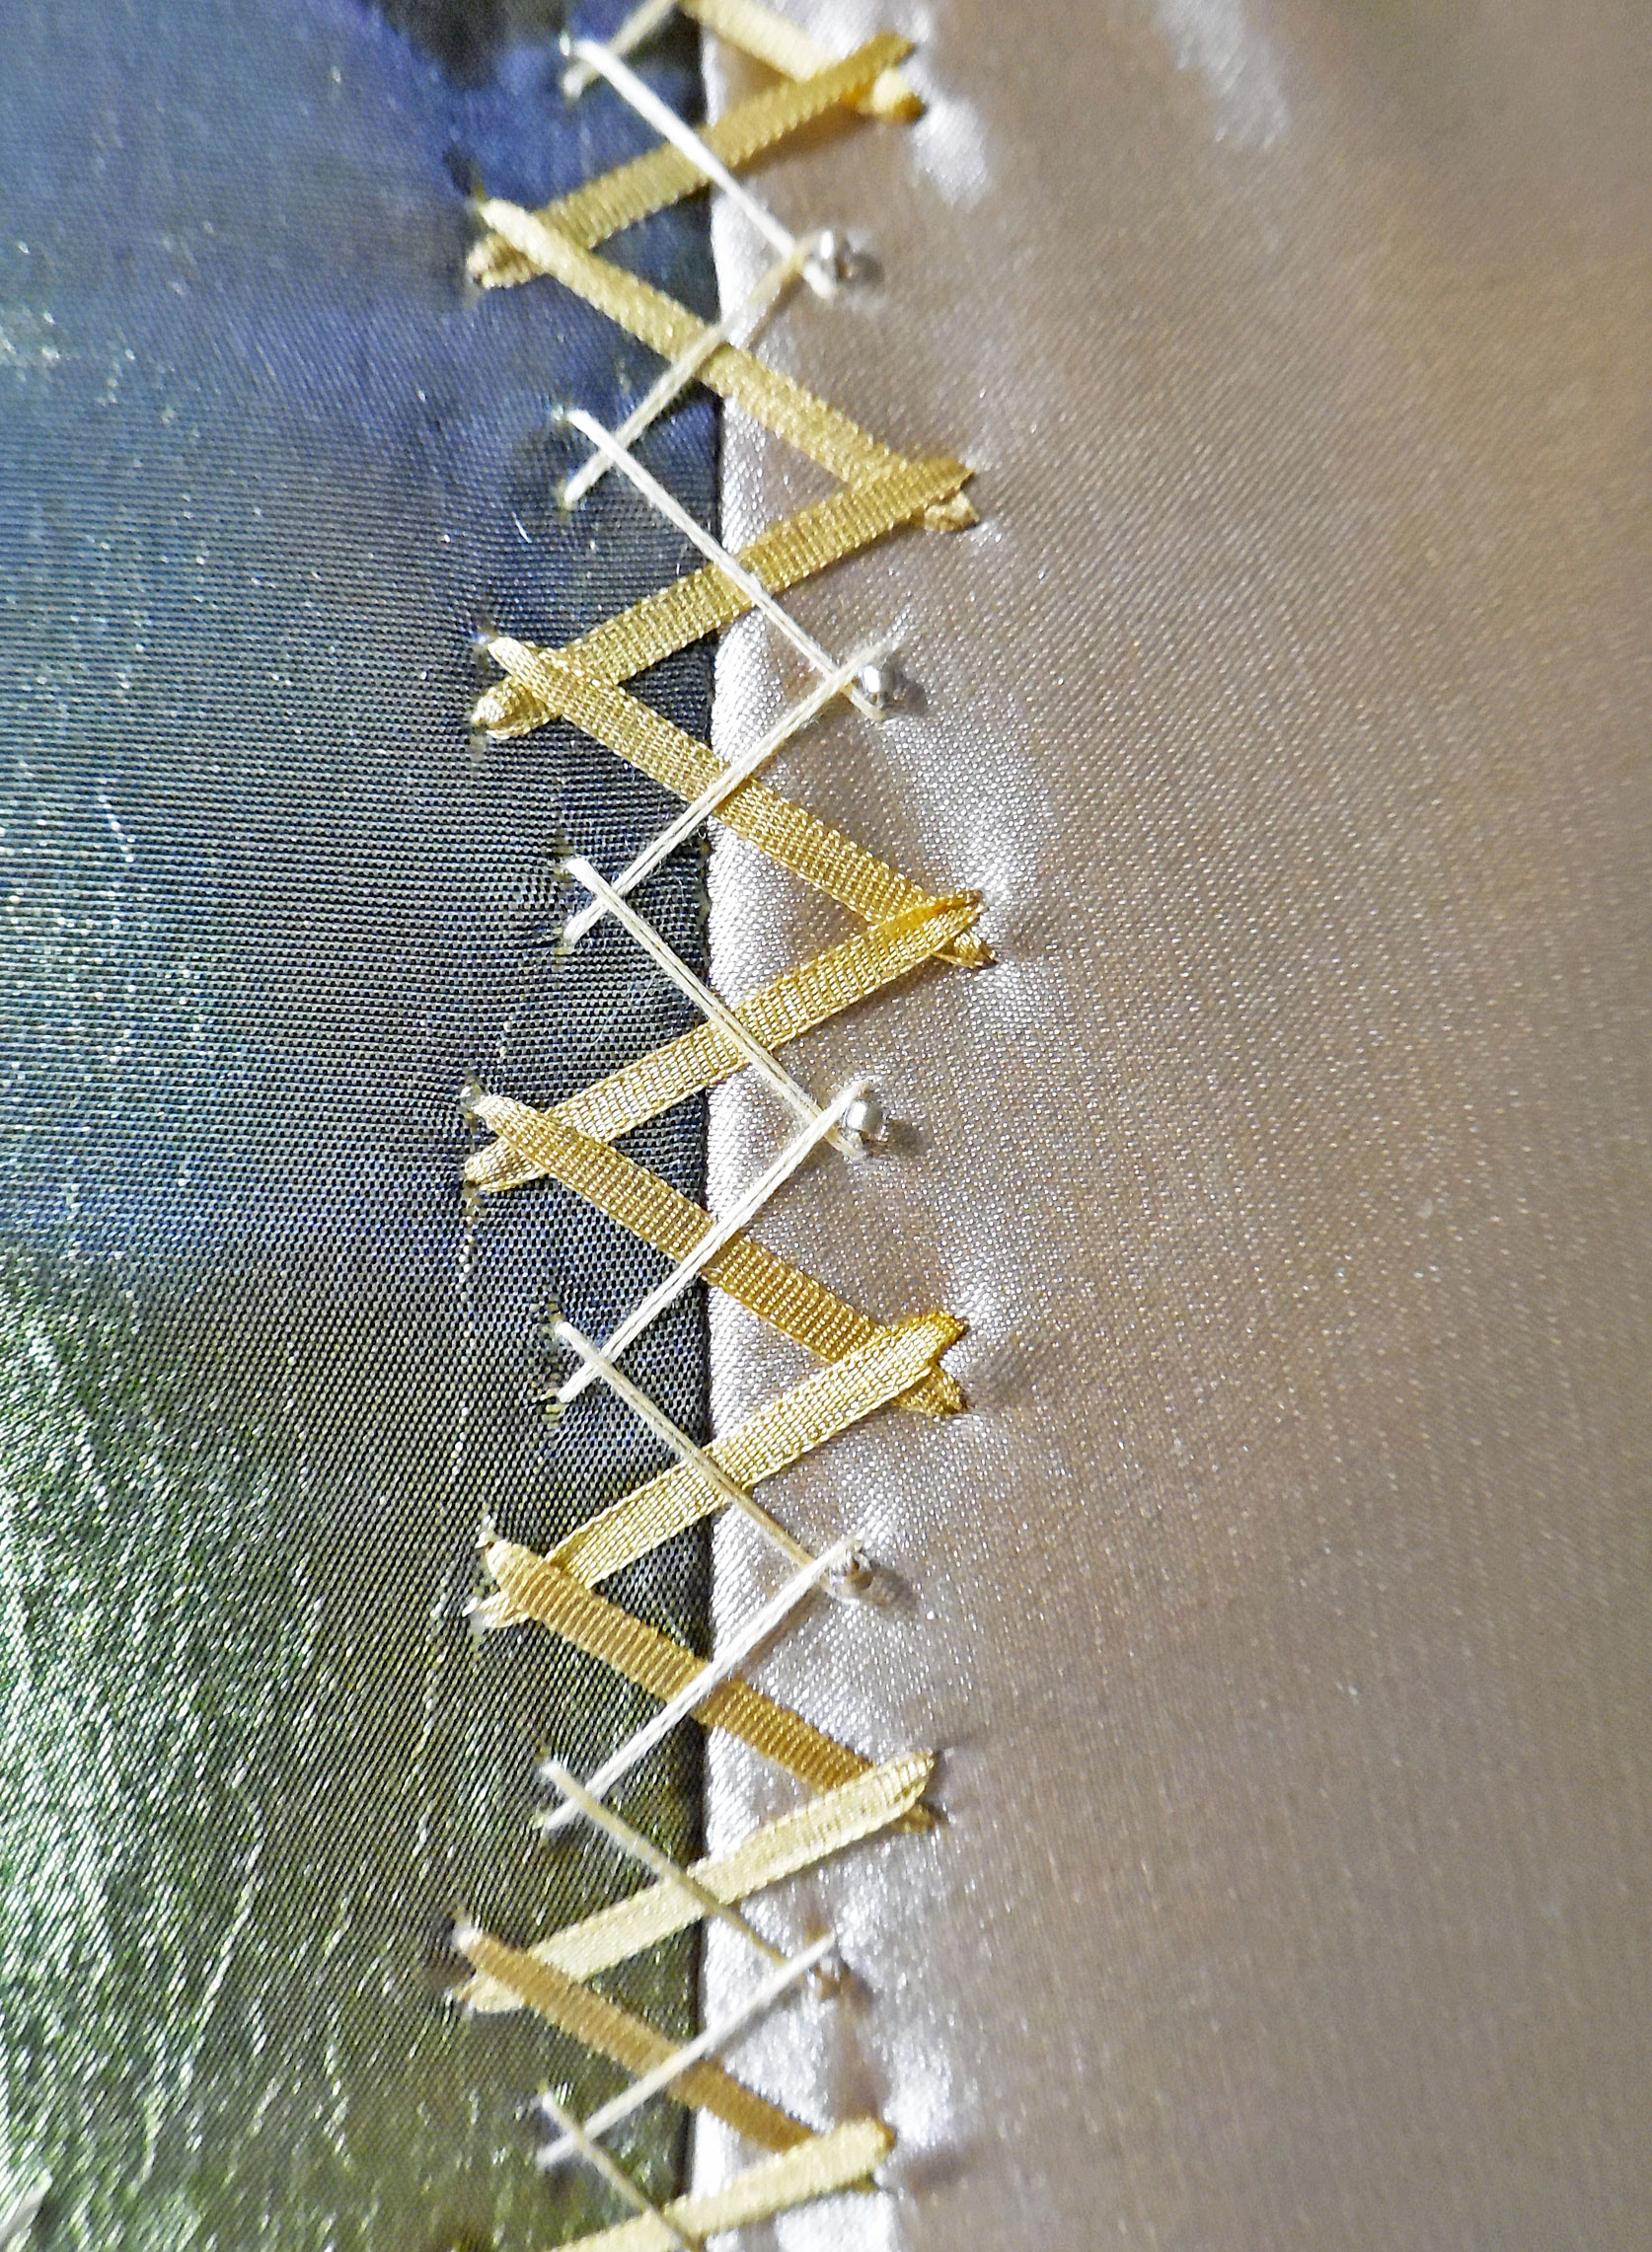
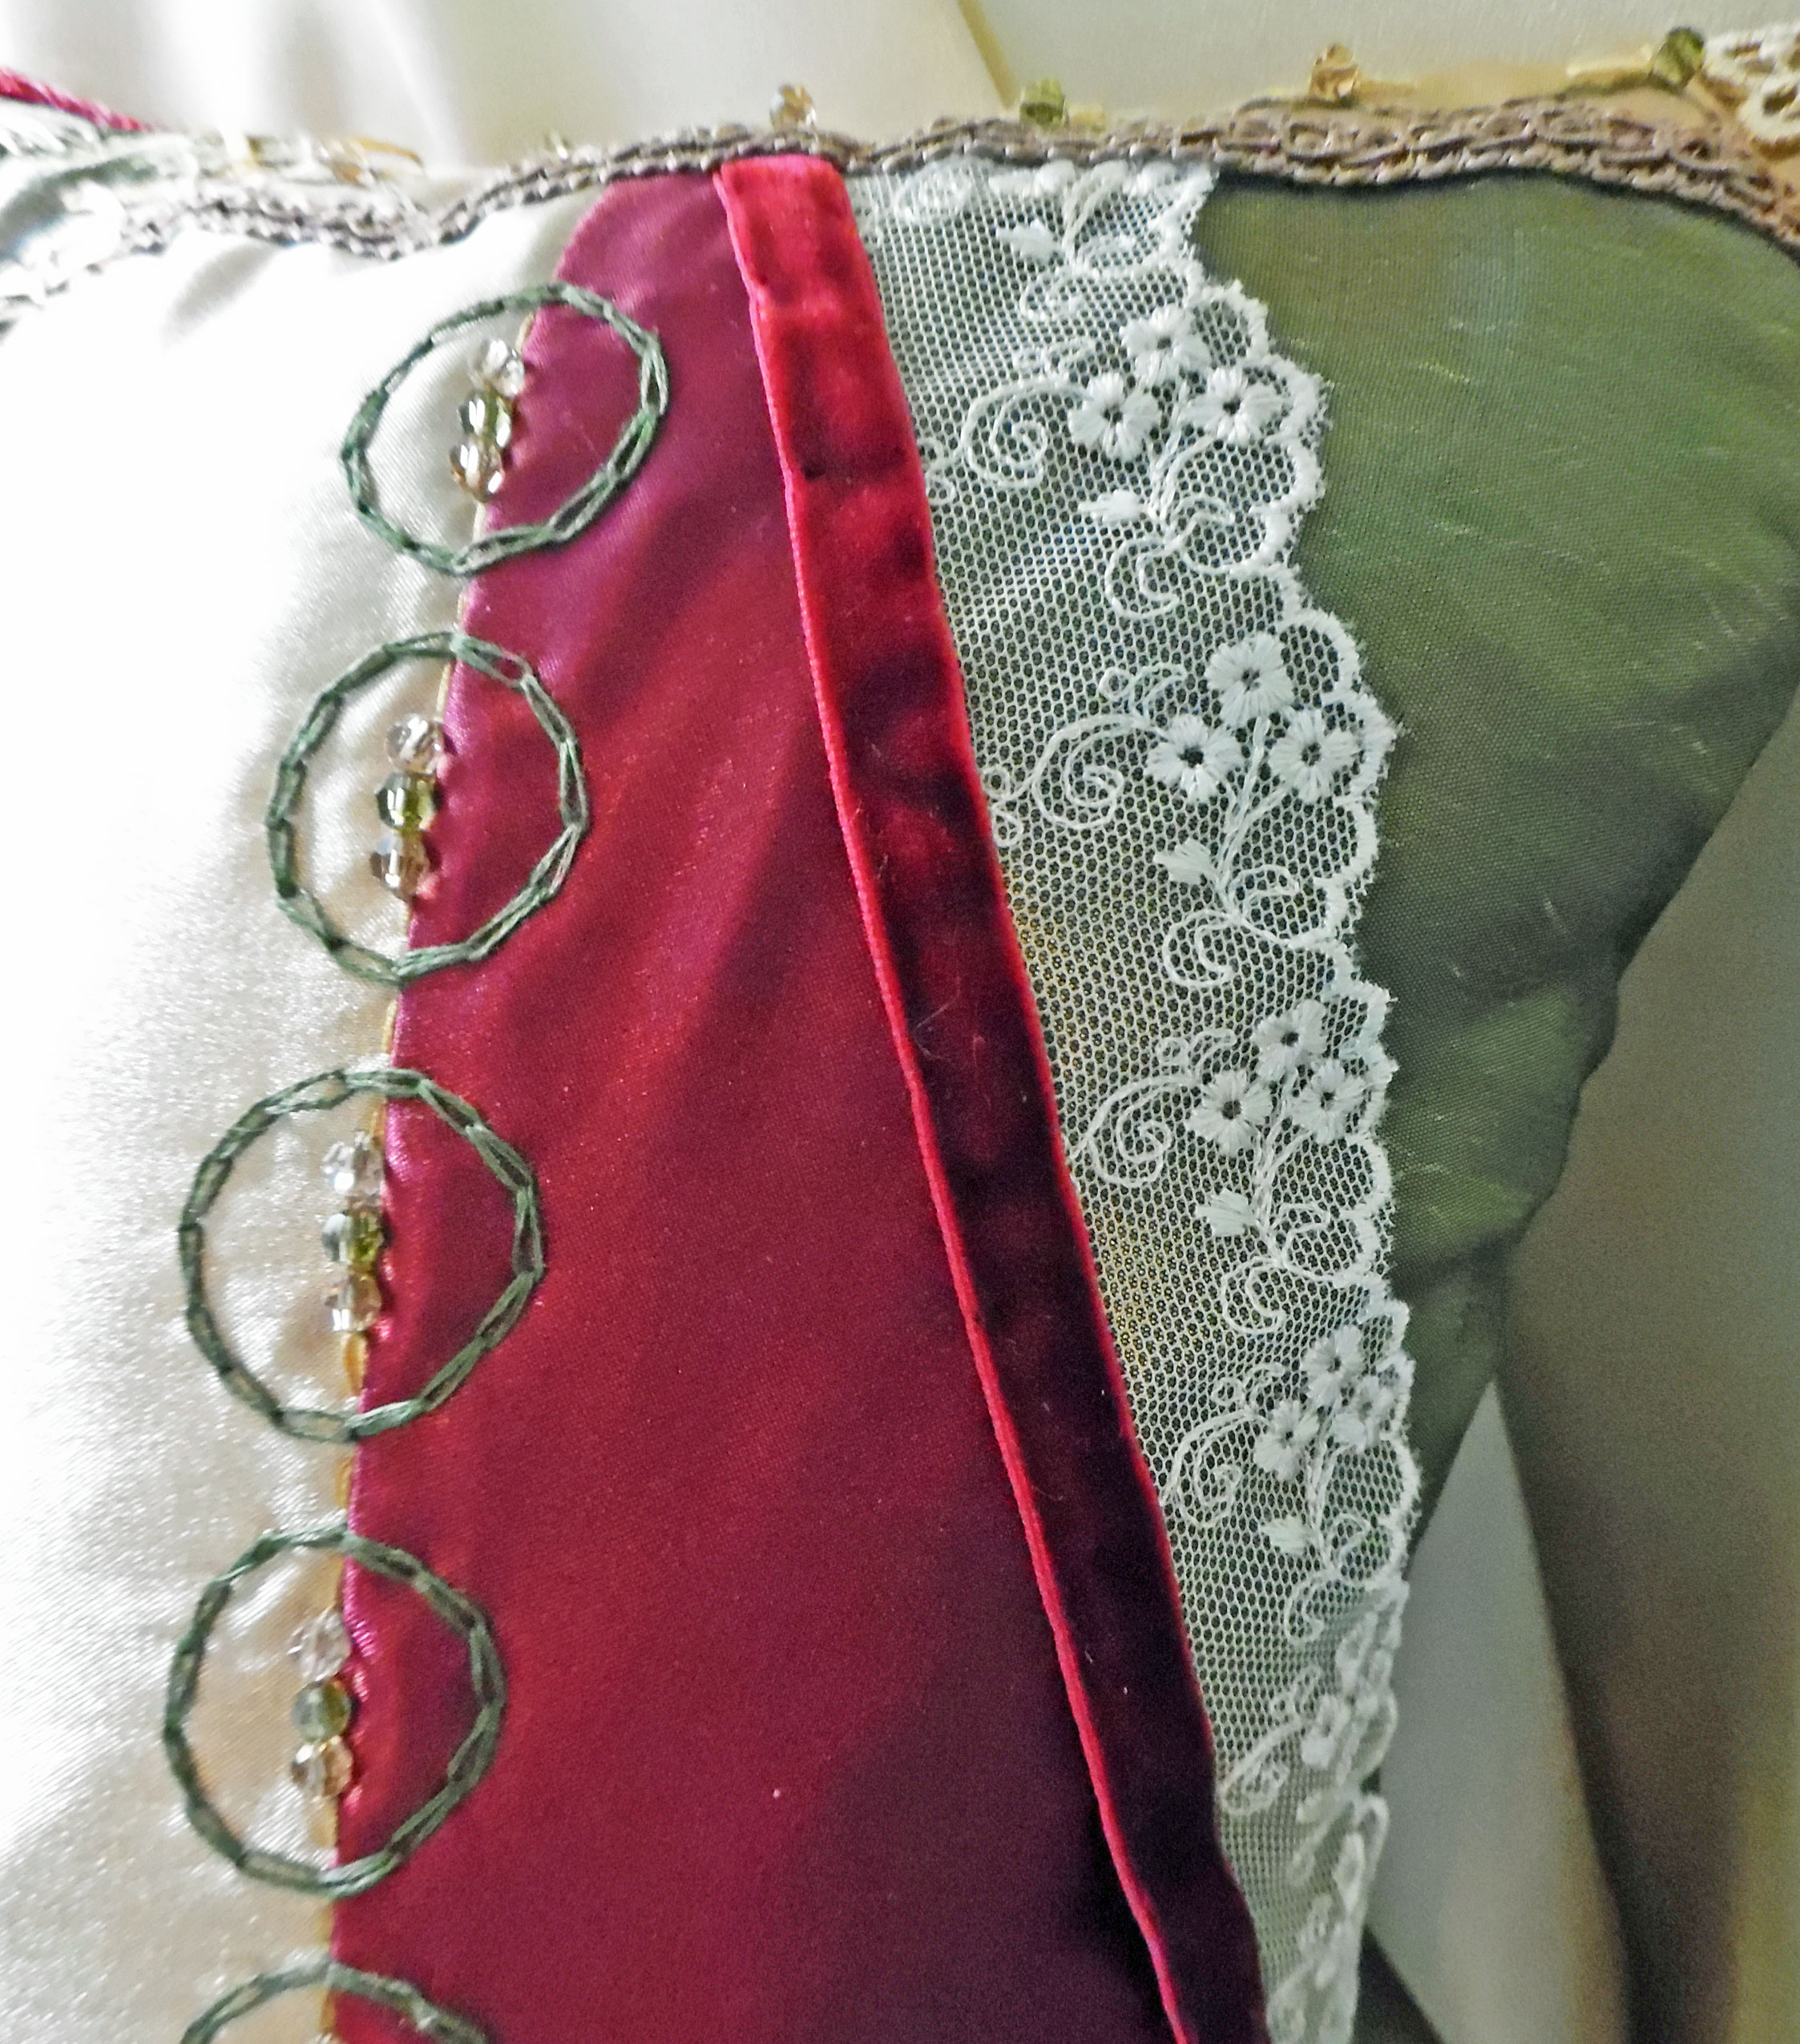
Once the quilt was pieced together, I hand-sewed a piece of golden-ecru Venise lace along one seam, and a length of ivory embroidered lace along another. I stitched wine-red velvet ribbon along the top edge of the ivory lace, then placed a light brown braid along two different diagonal seams.

Trimmed Quilt
Embroidery
Next, I began the embroidery, which is my second-favorite part of crazy-quilting. (My favorite part is beading.)
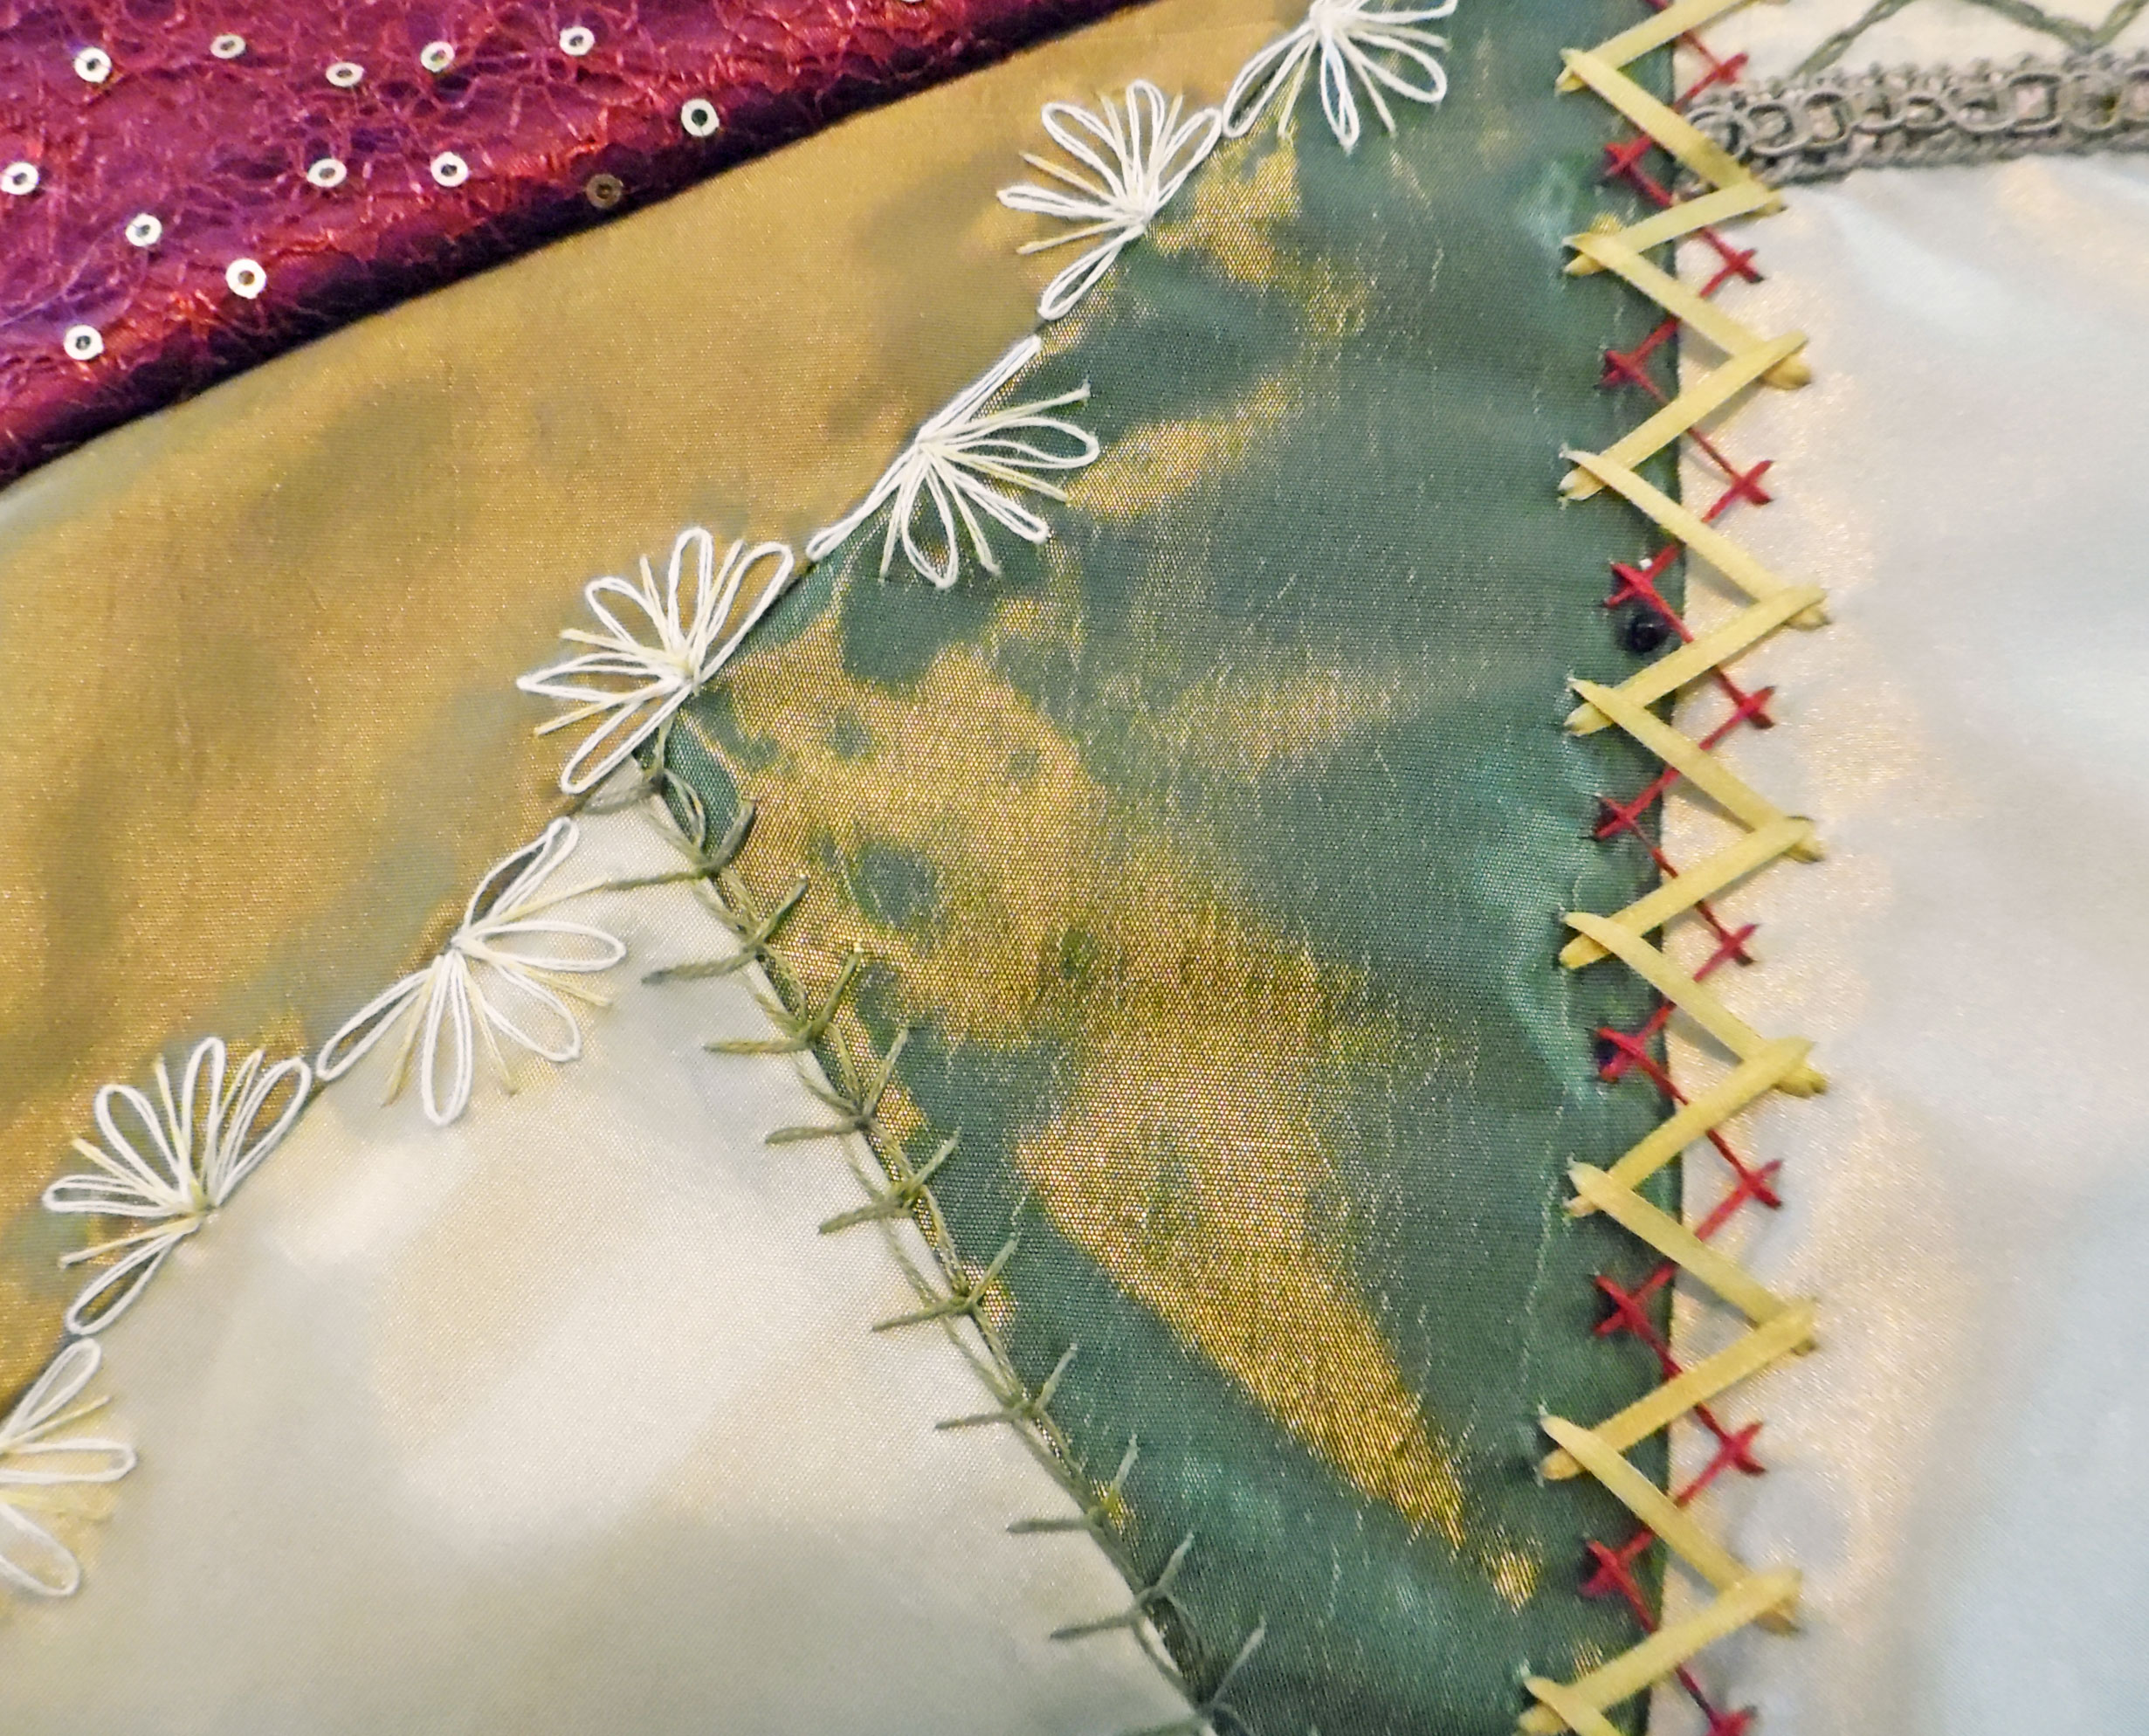
- Wheat-Ear Stitches: I used a dark, muted olive green floss to embroider a series of wheat-ear stitches along one seam.
- Interlocked Herringbone Stitches: I used dark red floss and 2mm gold silk ribbon to create a long row of interlocked herringbone stitches. (Later, however, I removed the red thread, replacing it with pale gold floss.)
- Lazy-Daisy Half-Circles: I used ecru and pale gold floss to make a line of alternating lazy-daisy half-circles.
Wheat-Ear, Interlocked Herringbone, Lazy-Daisy Half-Circles
- Zigzagged Chain Stitches: I used olive green floss to create a zigzag of chain stitches, with pale gold lazy-daisy flowers at the top of each peak.

Zigzagged Chain Stitches
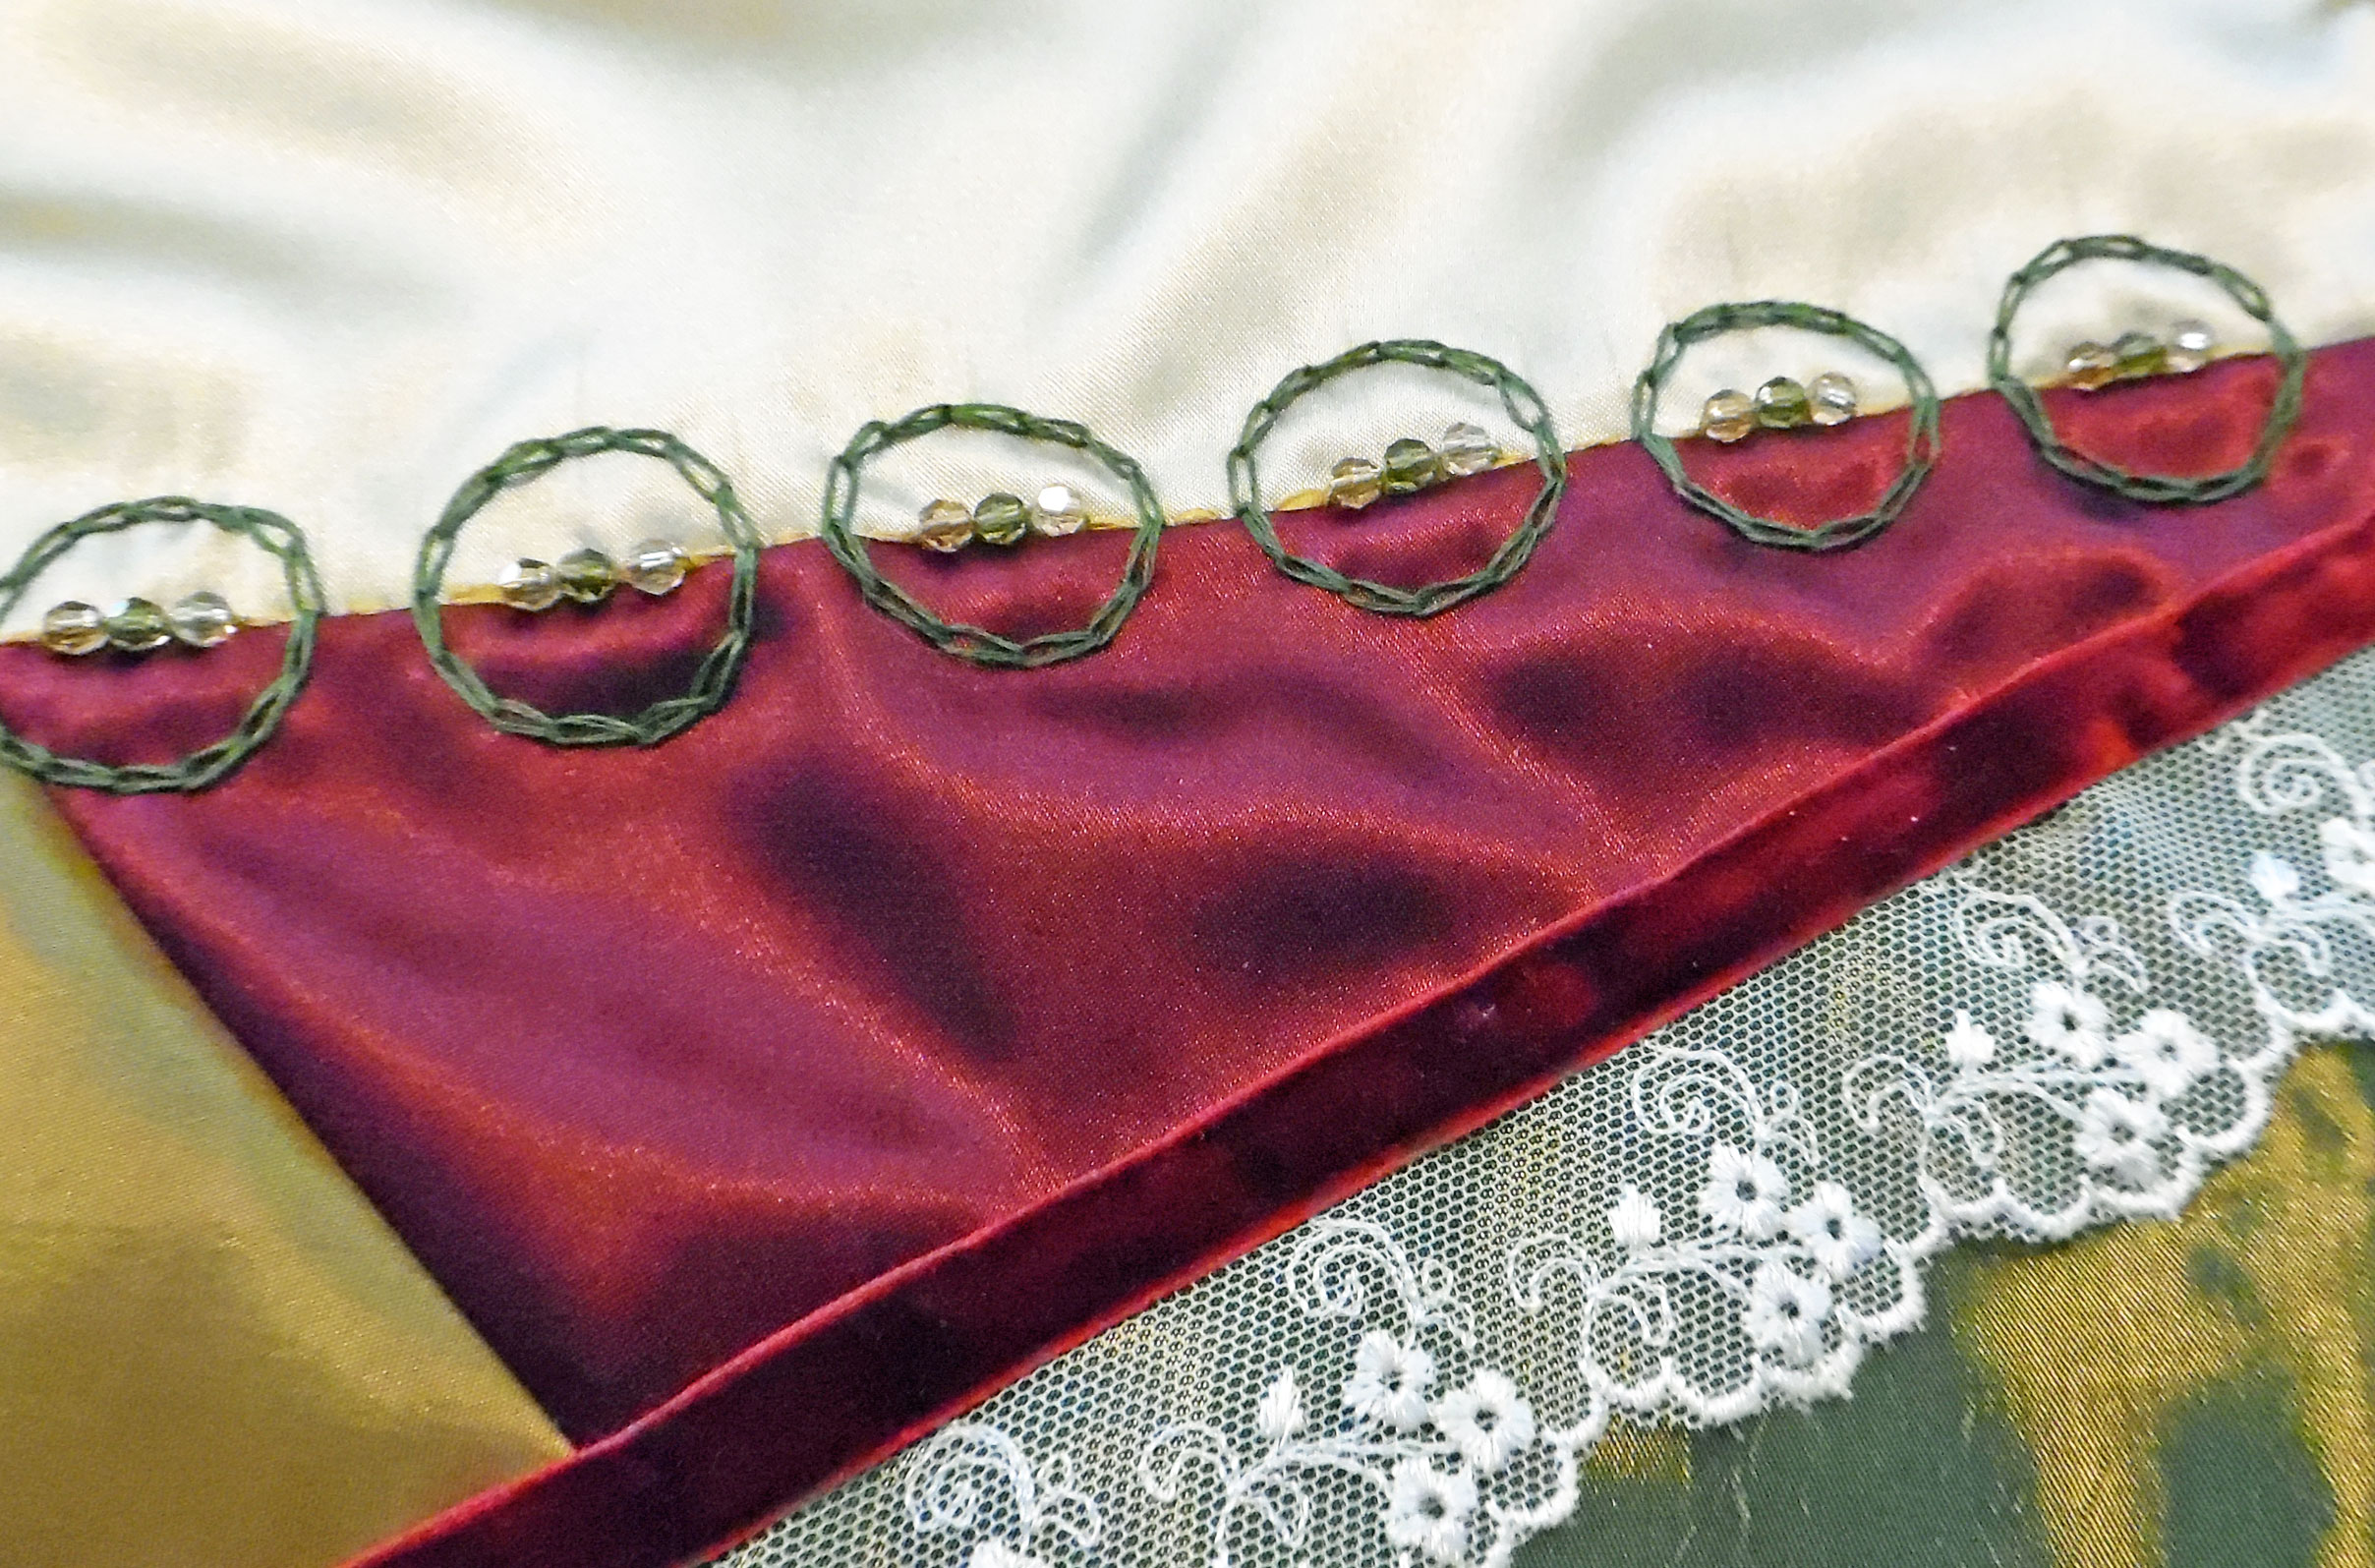
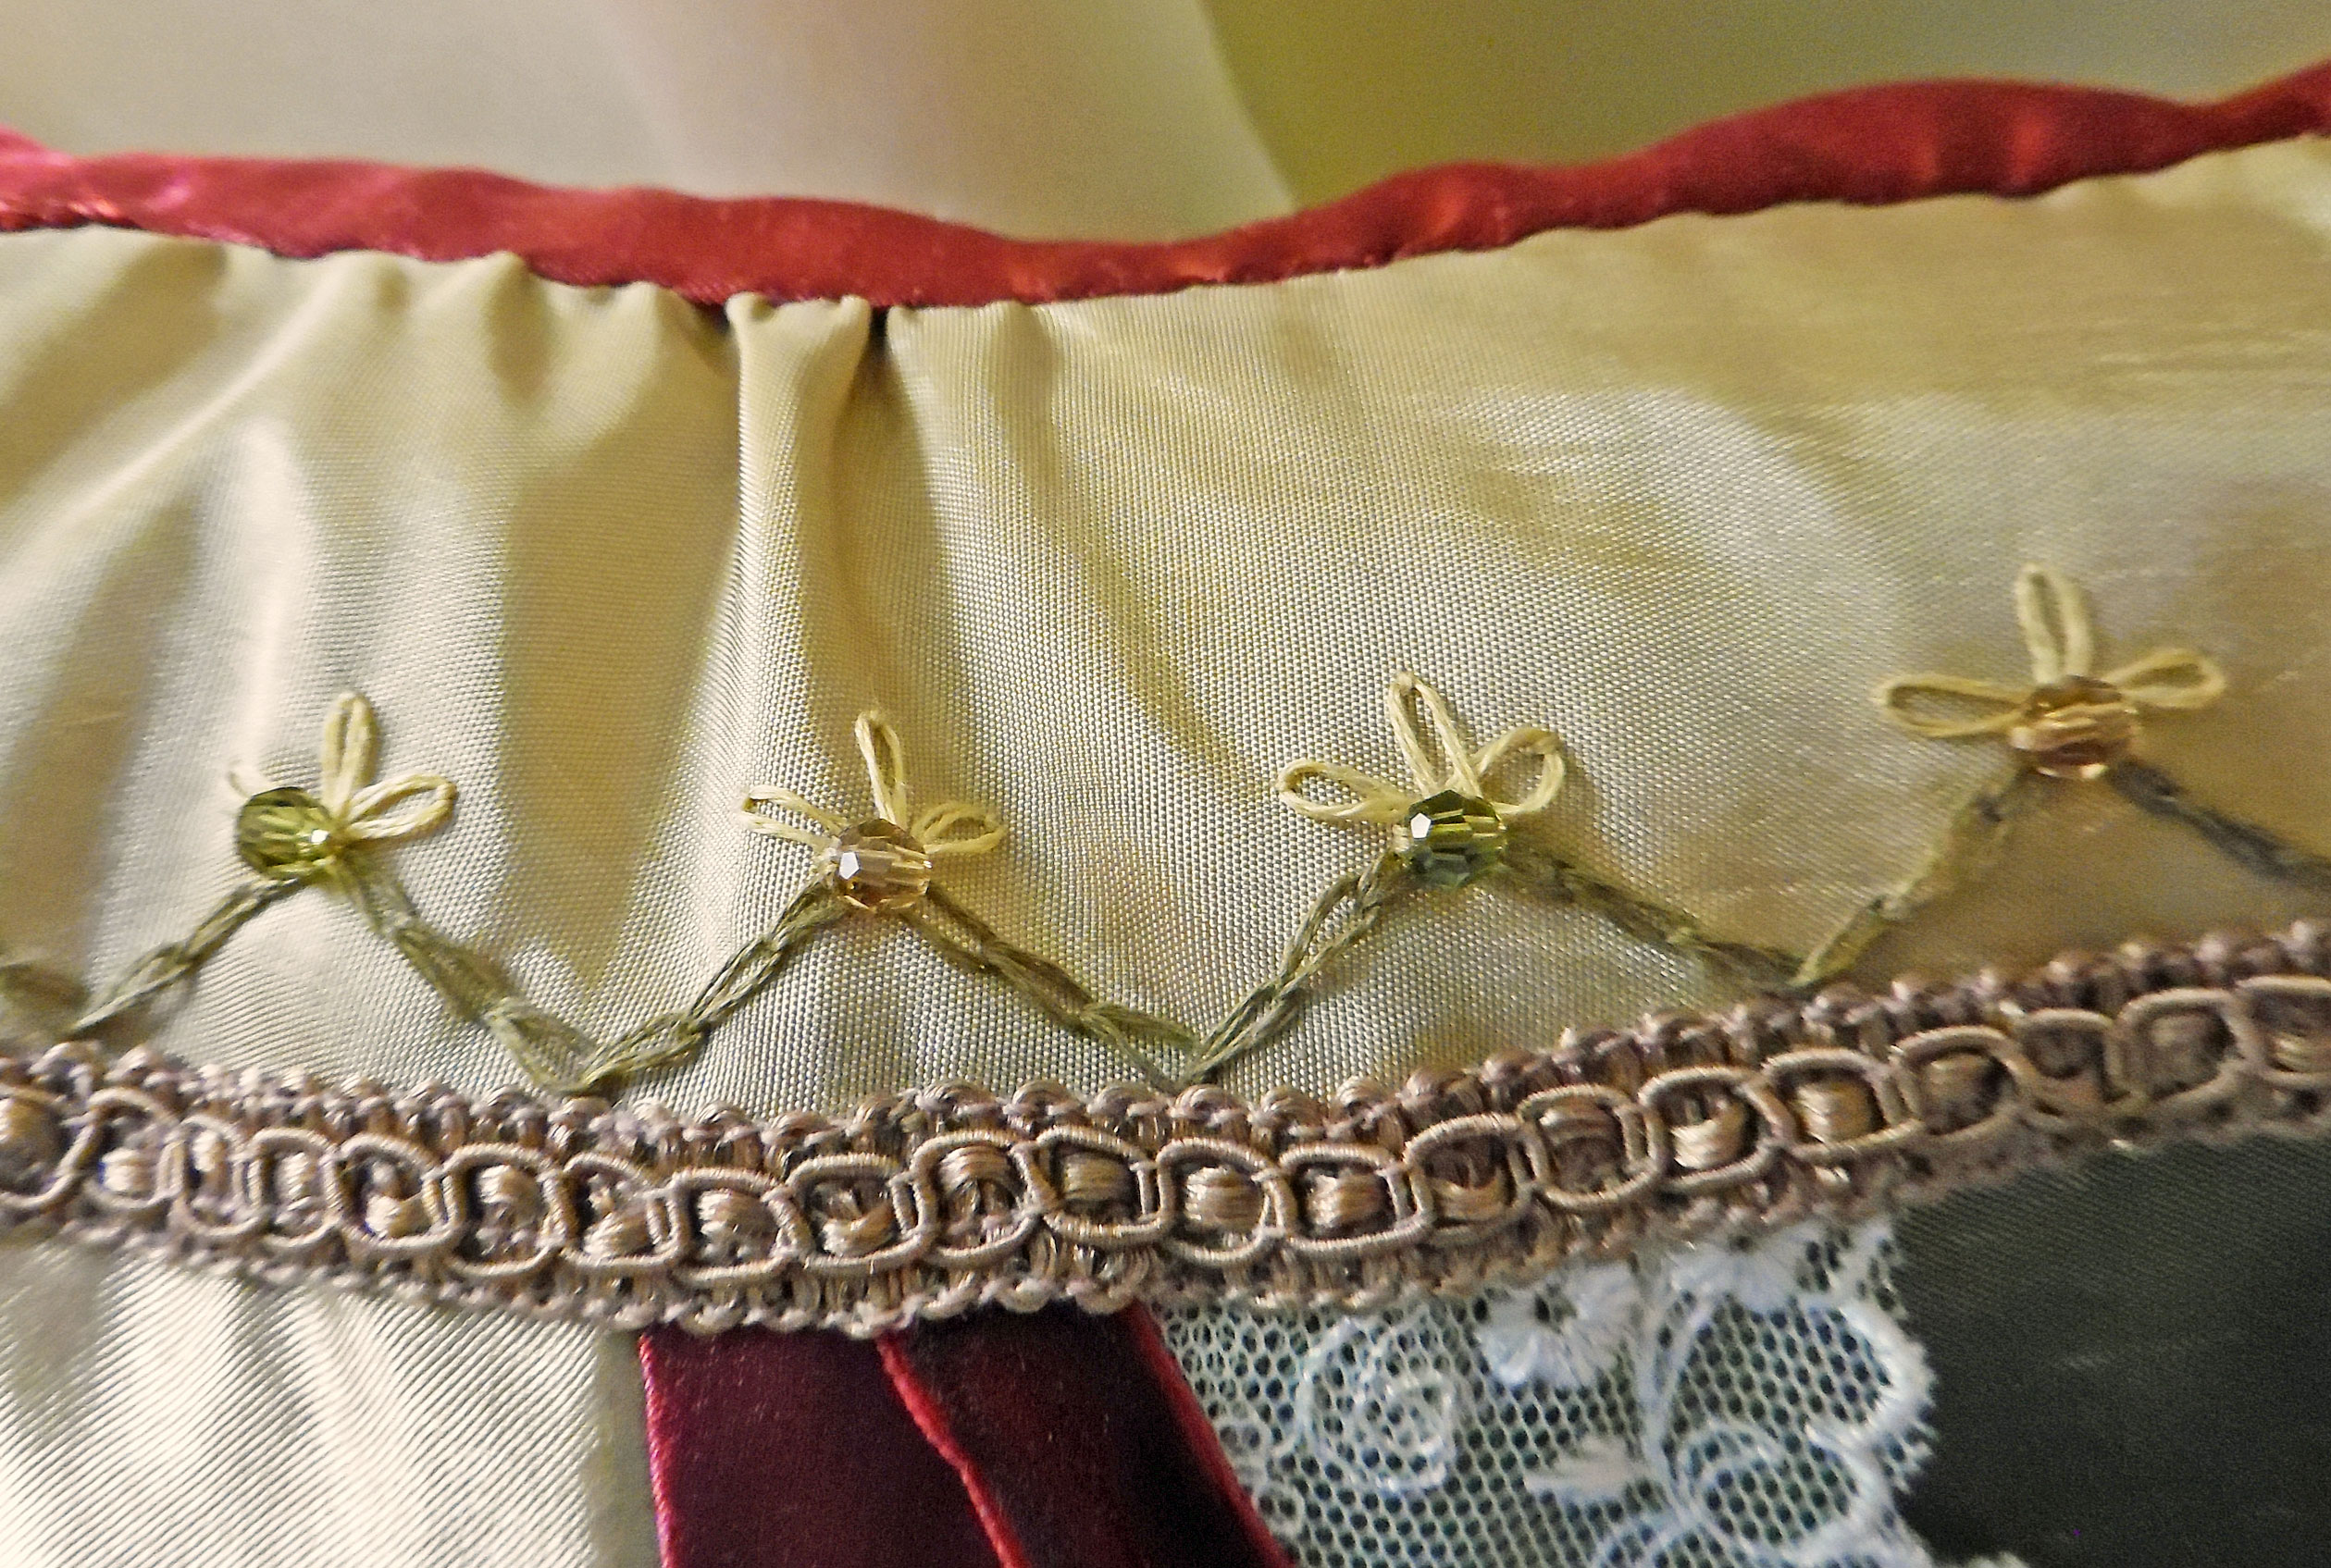
- Chain-Stitched Circles: I used olive green floss to embroider a series of chain-stitched circles. I then used 2mm gold silk ribbon to place a running stitch down the center of the row of circles.
Chain-Stitched Circles
I always save the silk ribbon embroidery for last.
- Lazy-Daisy Blossoms: I used 2mm gold silk ribbon to create lazy-daisy blossoms, along with 2mm olive green silk ribbon for the stems and lazy-daisy leaves.
Lazy-Daisy Blossoms
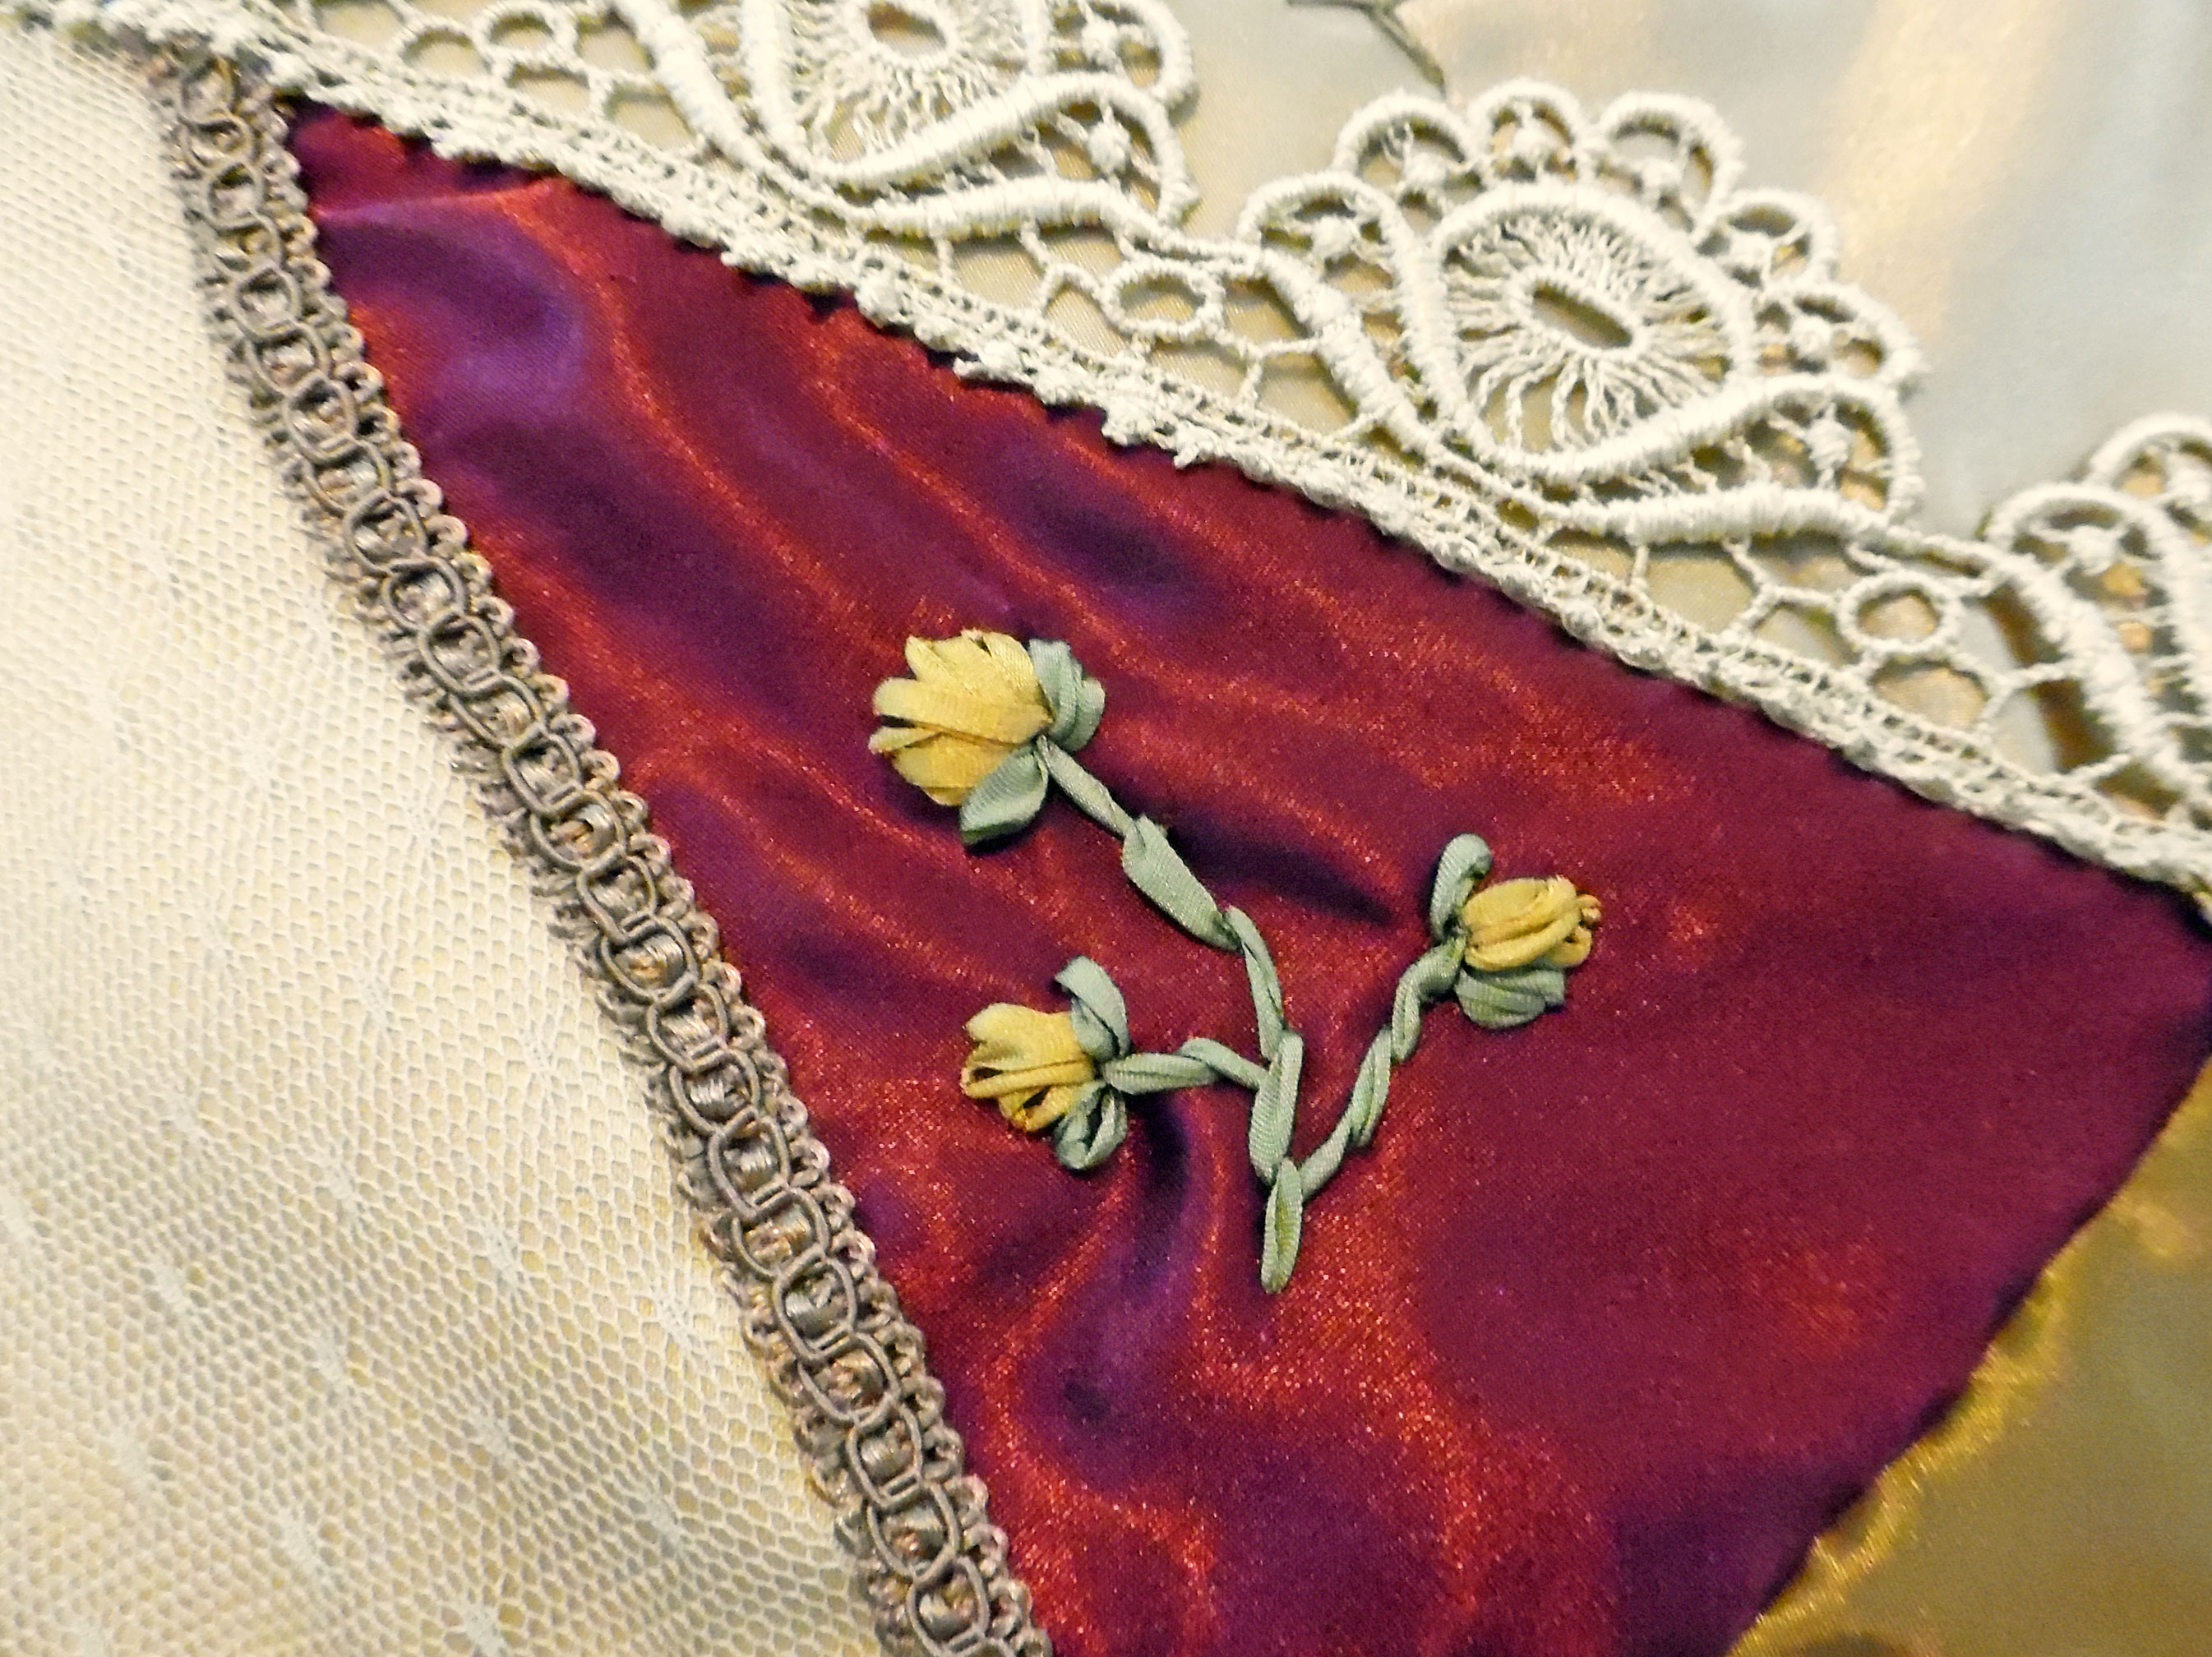
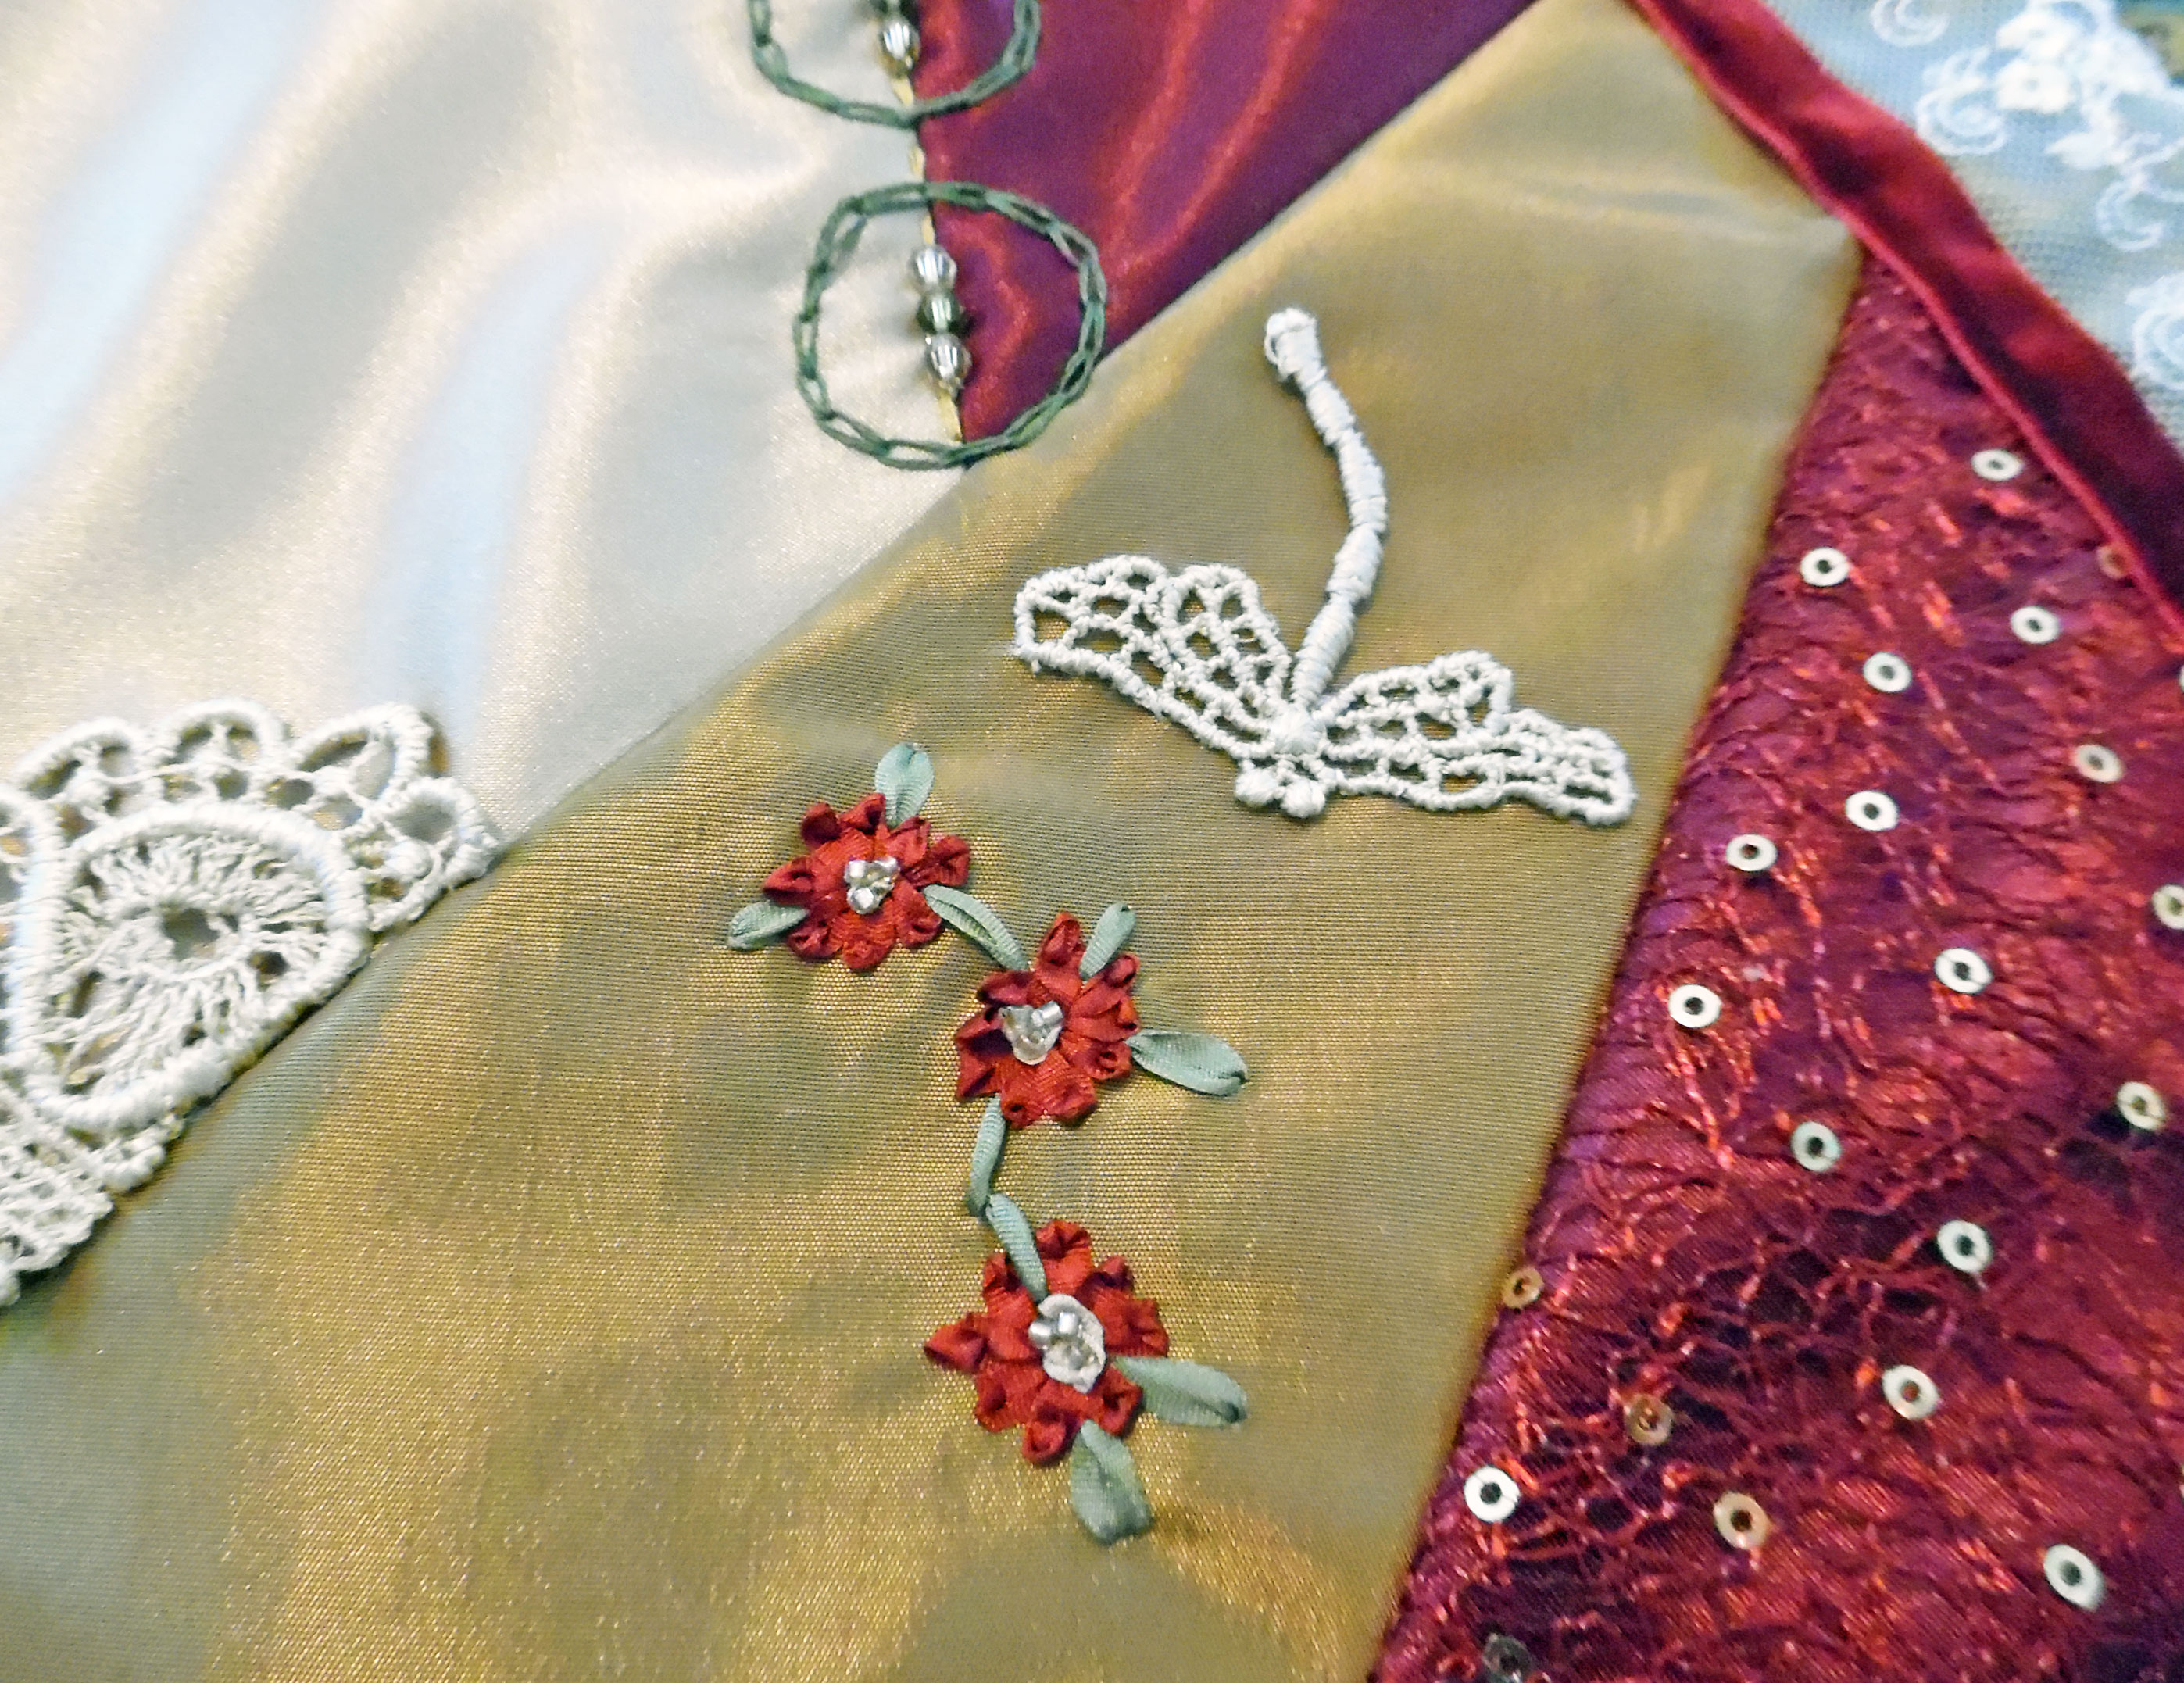
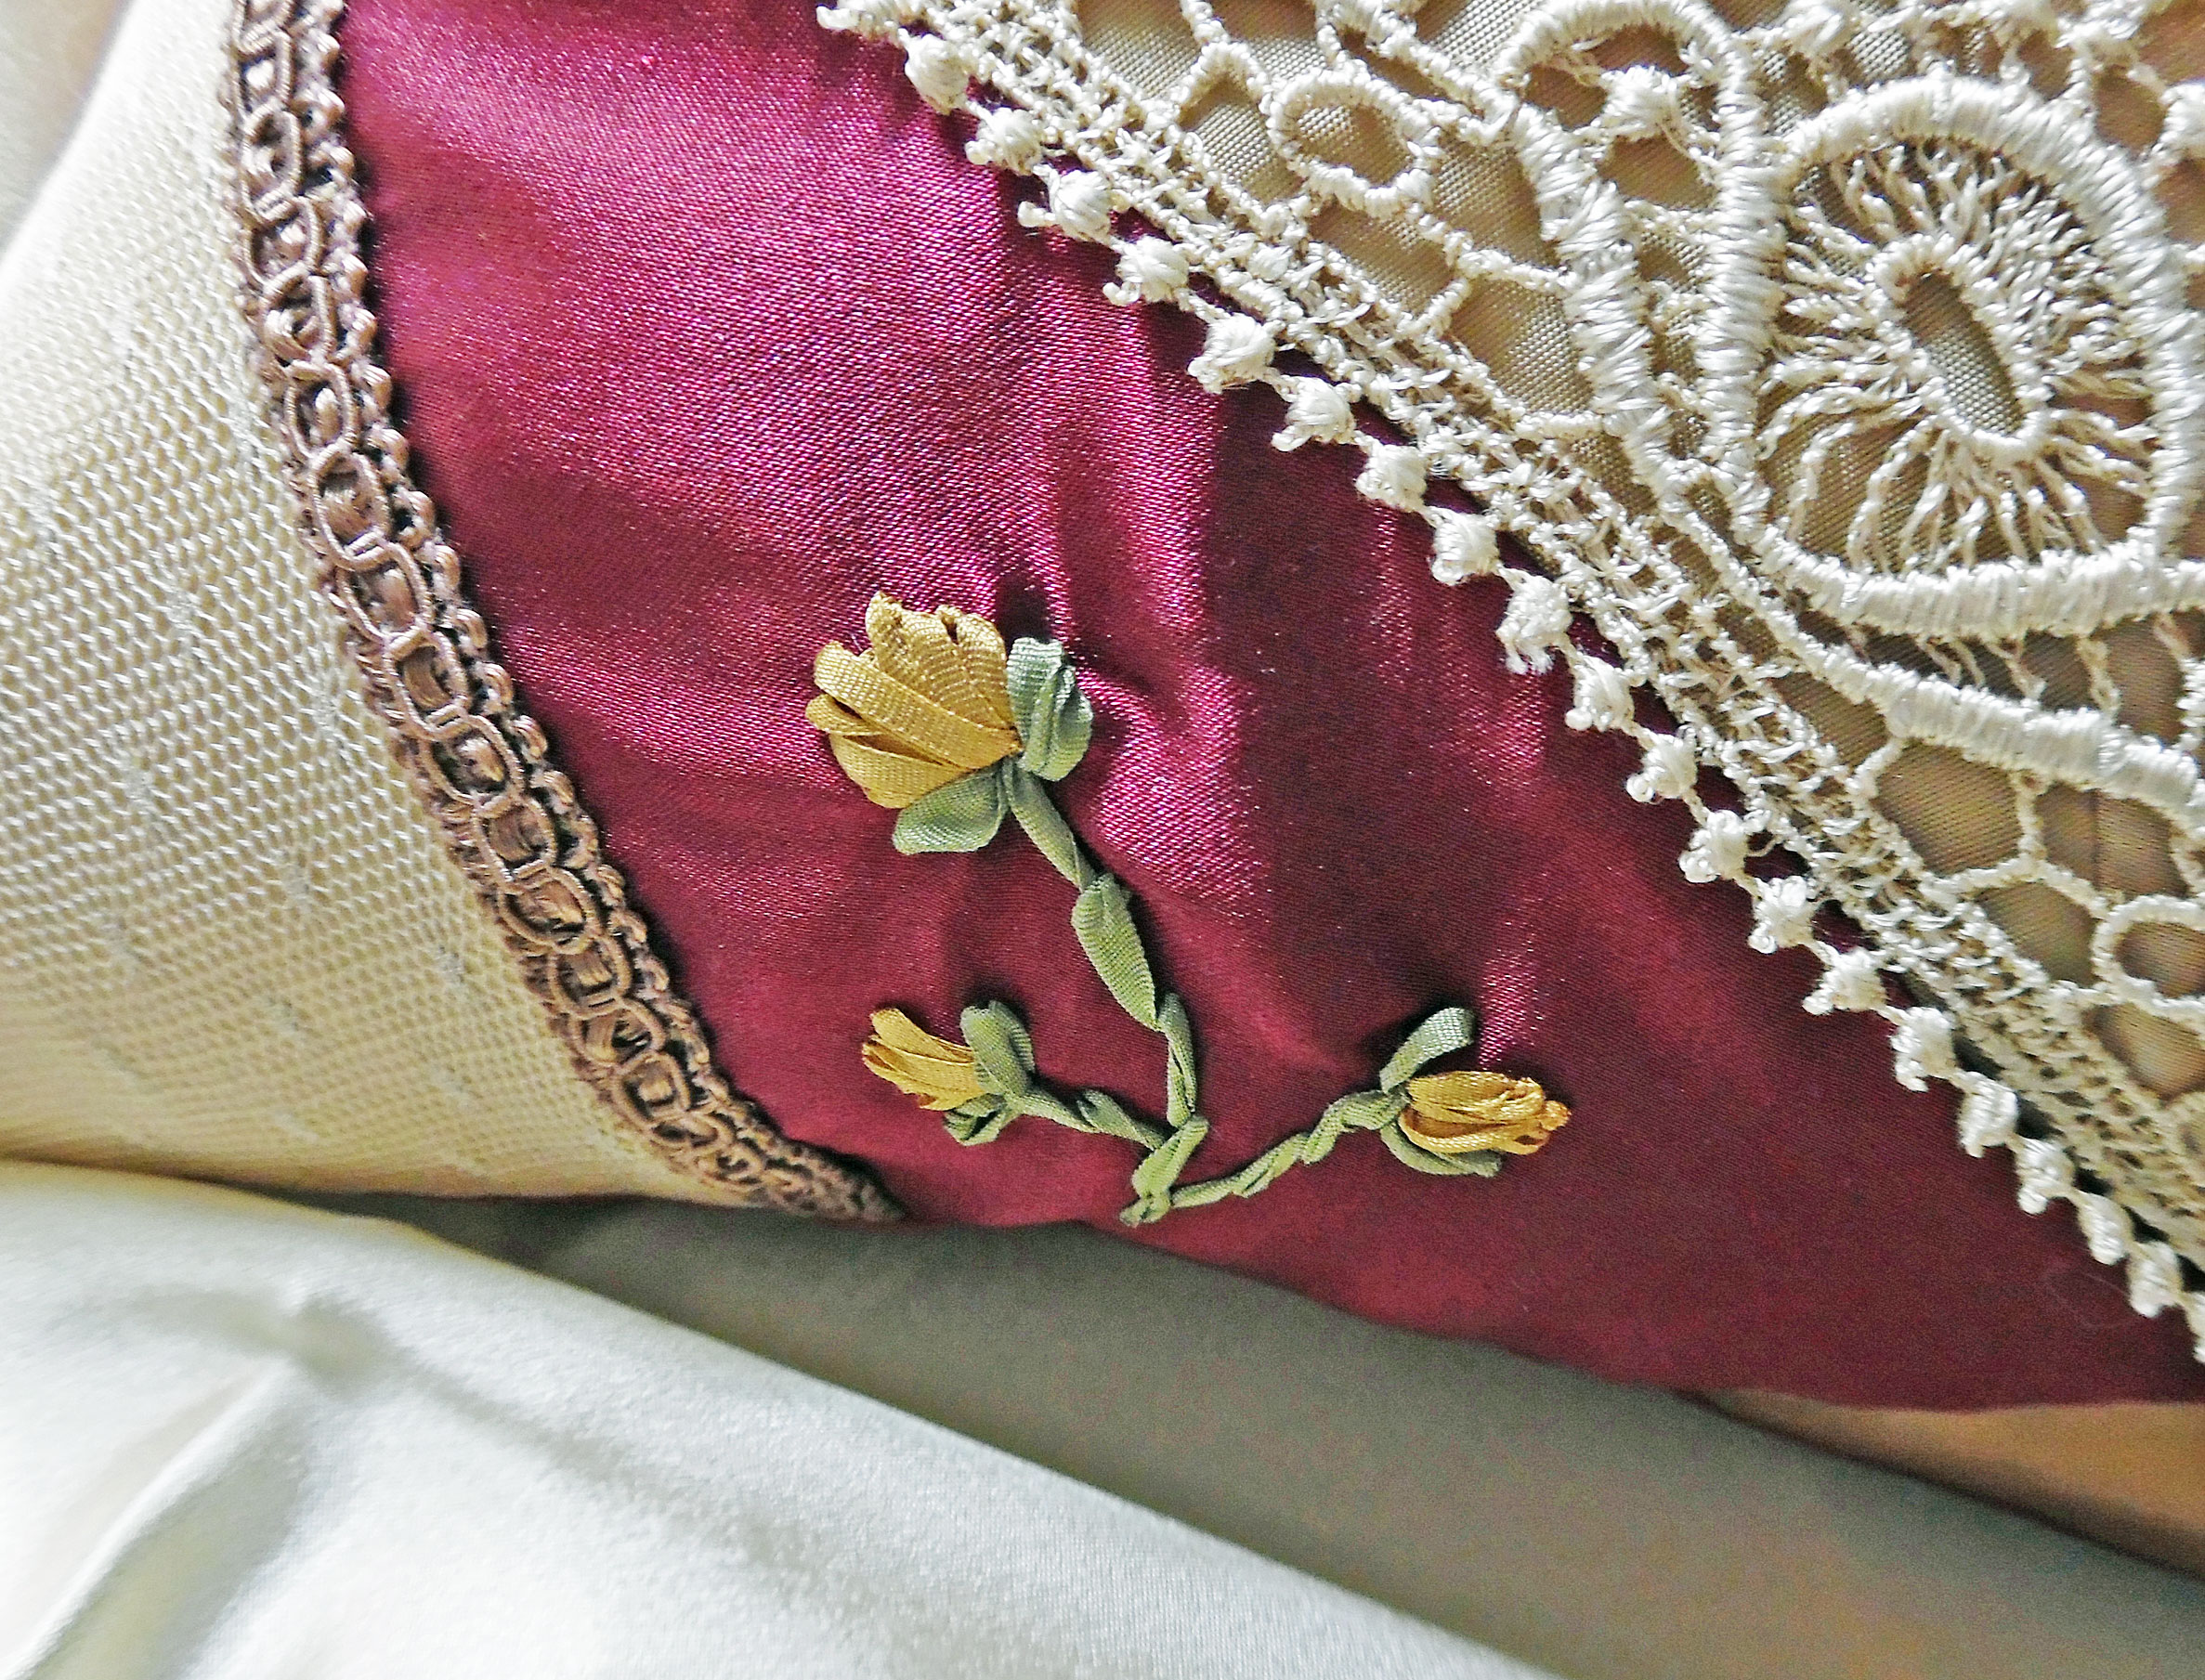
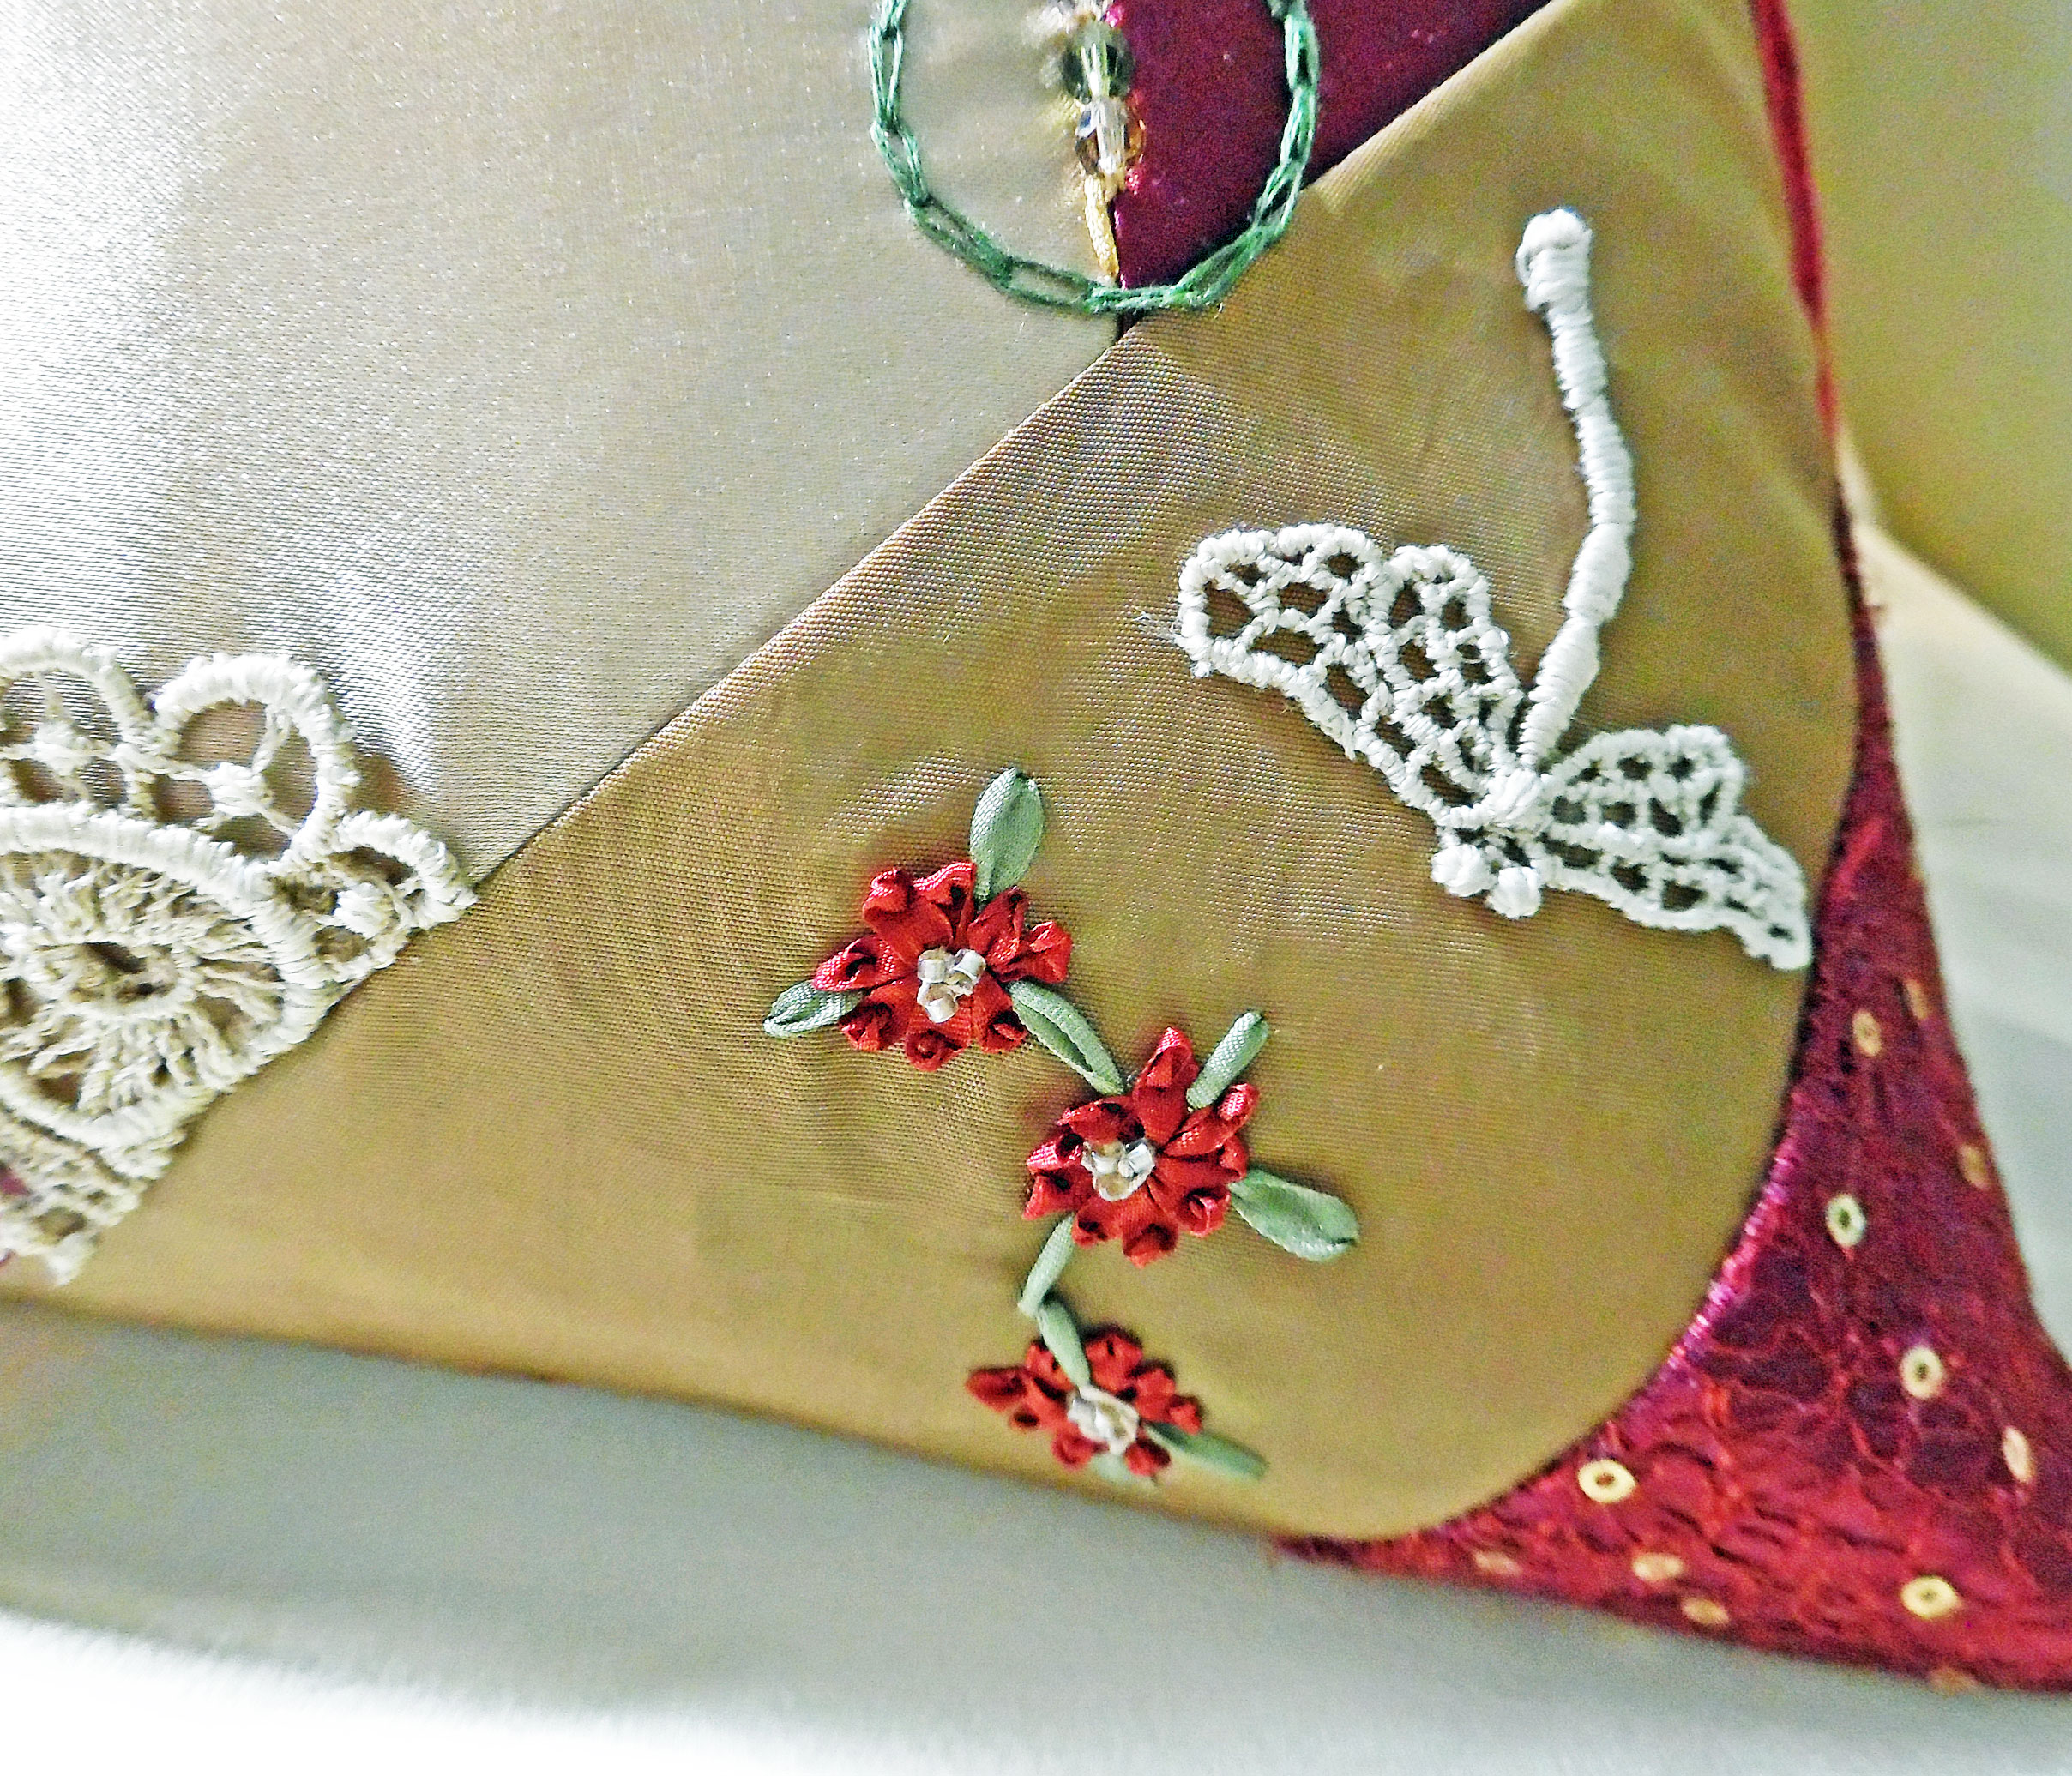
- Ribbon-Stitched Flowers: I used 4mm dark red silk ribbon to add a cluster of three ribbon-stitched flowers. At the center of each flower, I used 2mm ecru silk ribbon to place a French knot. I used 2mm olive green silk ribbon to create lazy-daisy leaves and straight-stitched stems.
- Dragonfly Applique: I also added a pale gold lace applique in the form of a dragonfly, hovering just above the flowers.
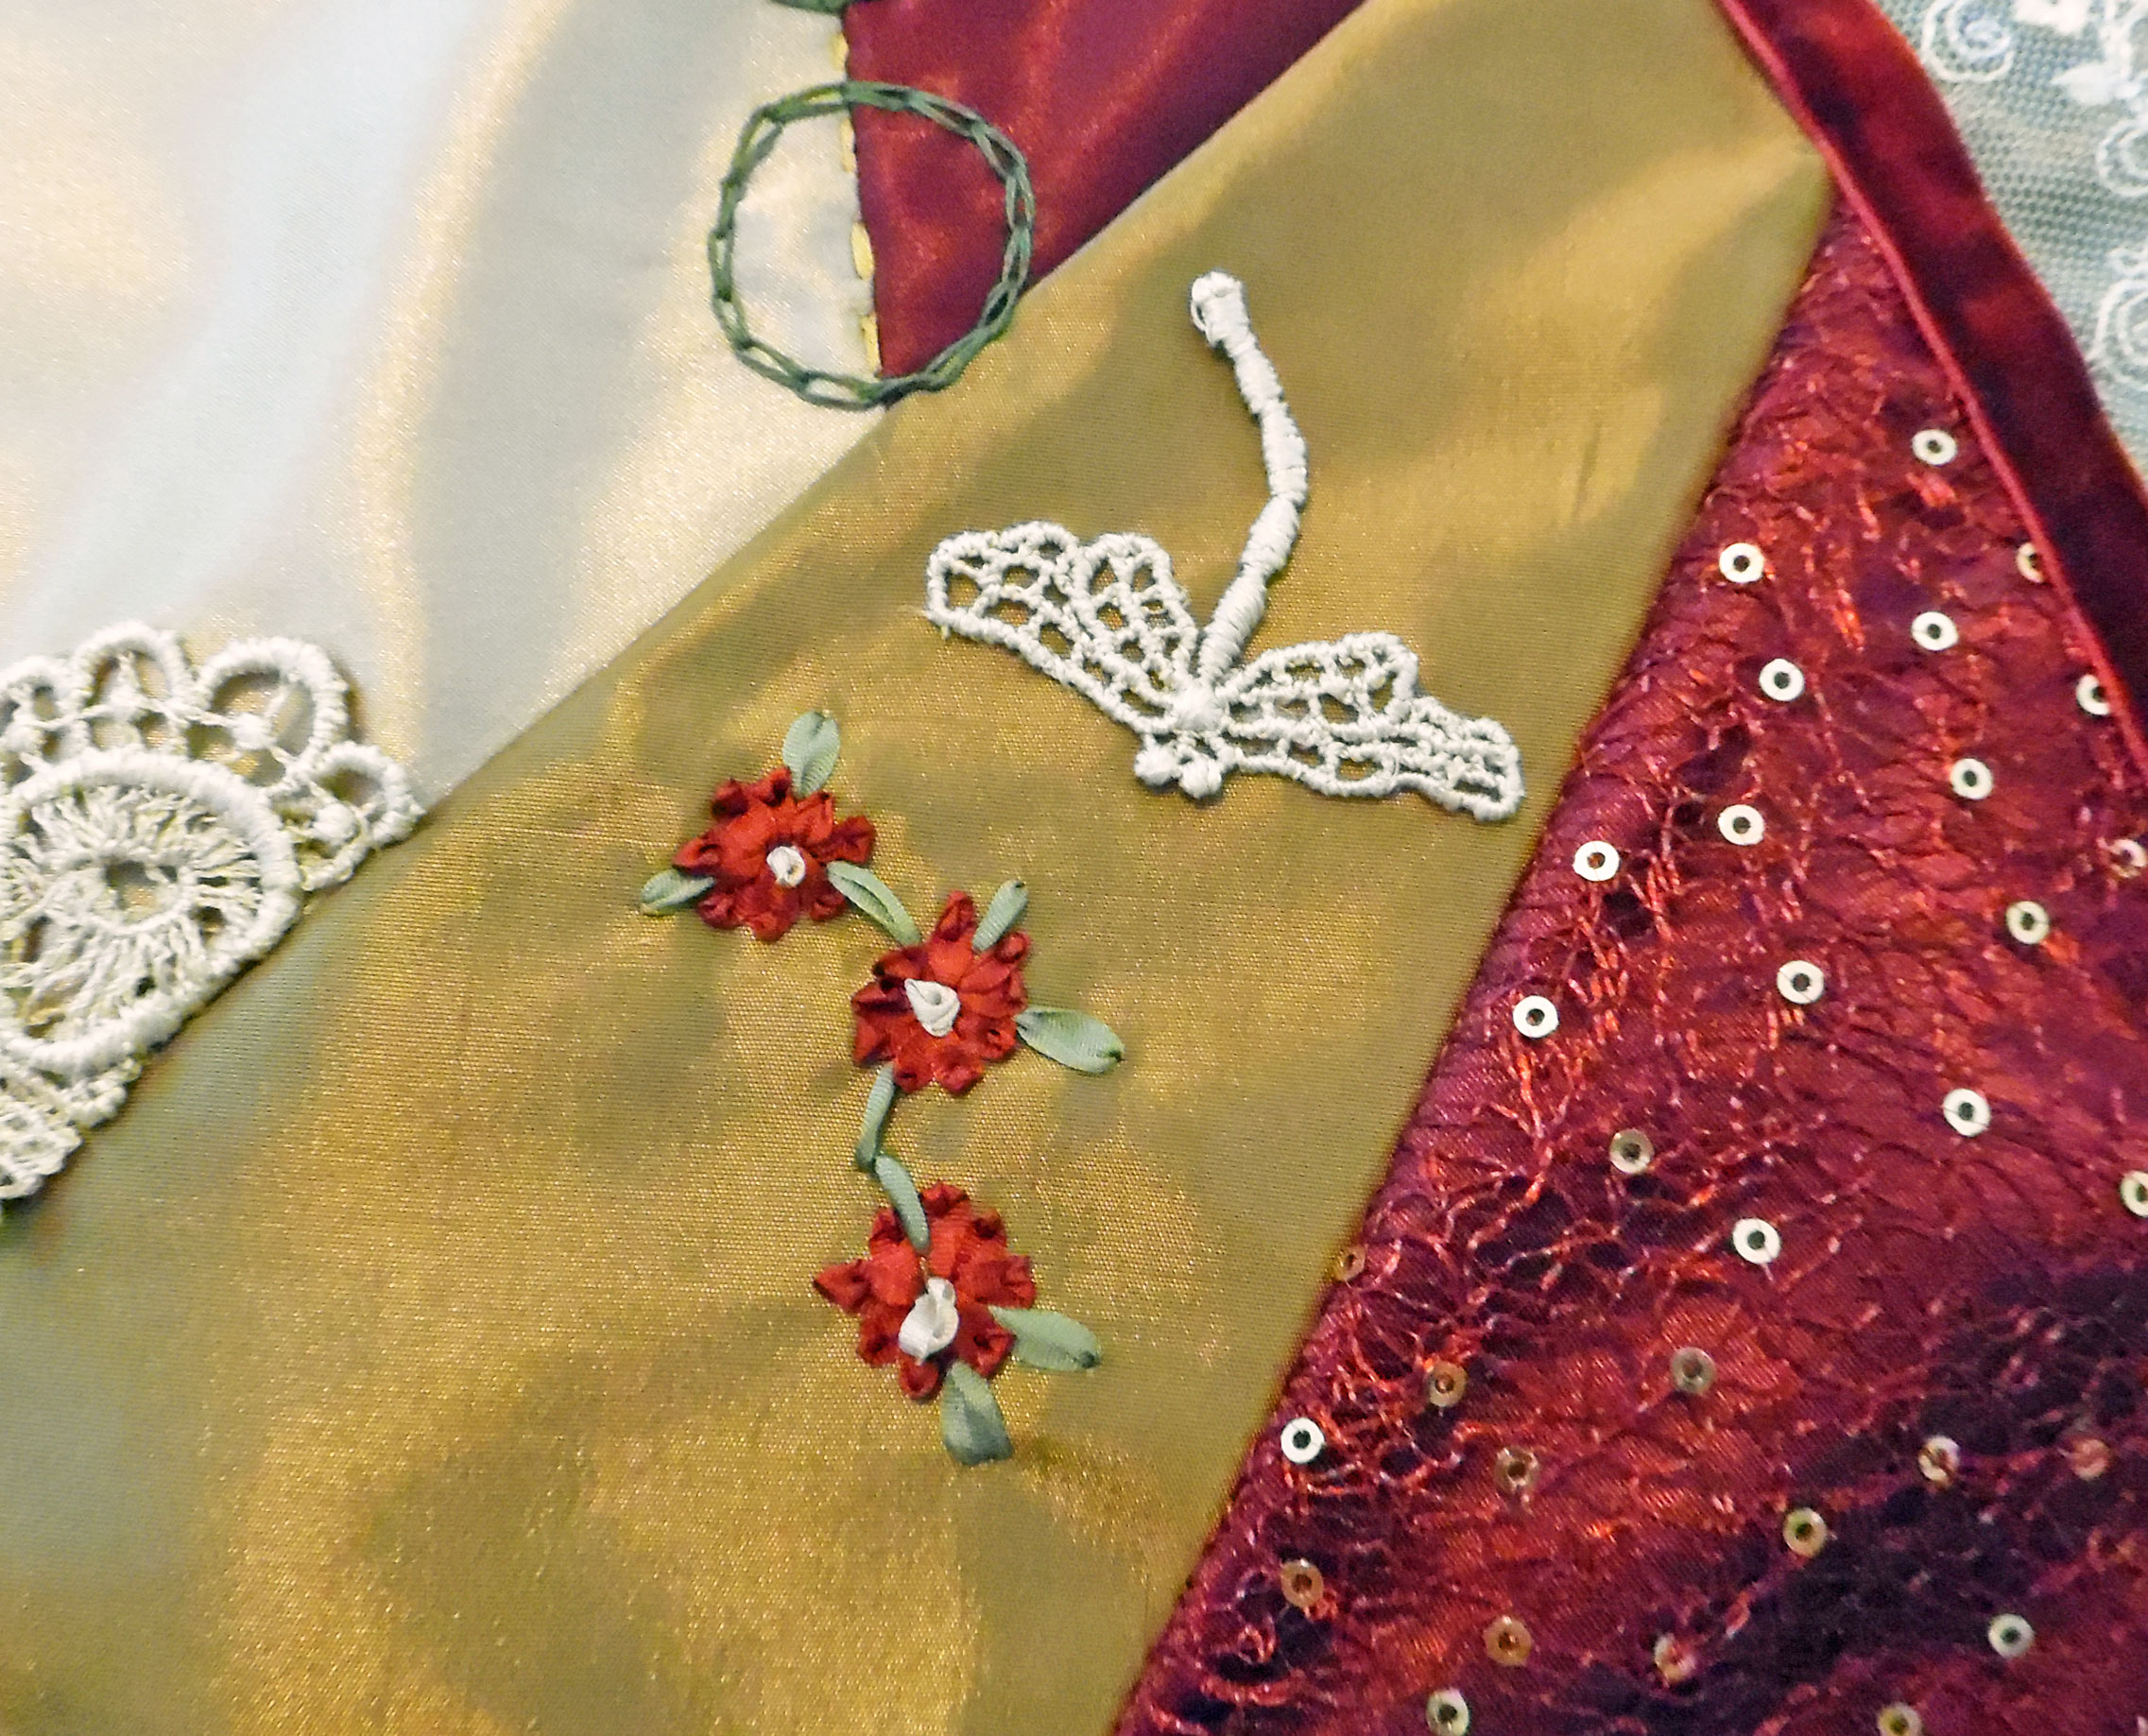
Ribbon-Stitched Flowers & Dragonfly Applique
And that was that, as far as embroidery goes.
Embroidered Quilt
Beading
The final step was to add beads and Swarovski crystal accents to the embroidery work. This is always my favorite part, because it ties all the colors together, adds a bit of sparkle, and provides a finished touch to the crazy quilt.
- Alternating Half-Circles: I attached a 3mm dark red crystal to the center of each half-circle, and I placed a silver-lined champagne seed bead on the tip of each straight stitch that sits between the lazy-daisy spokes.
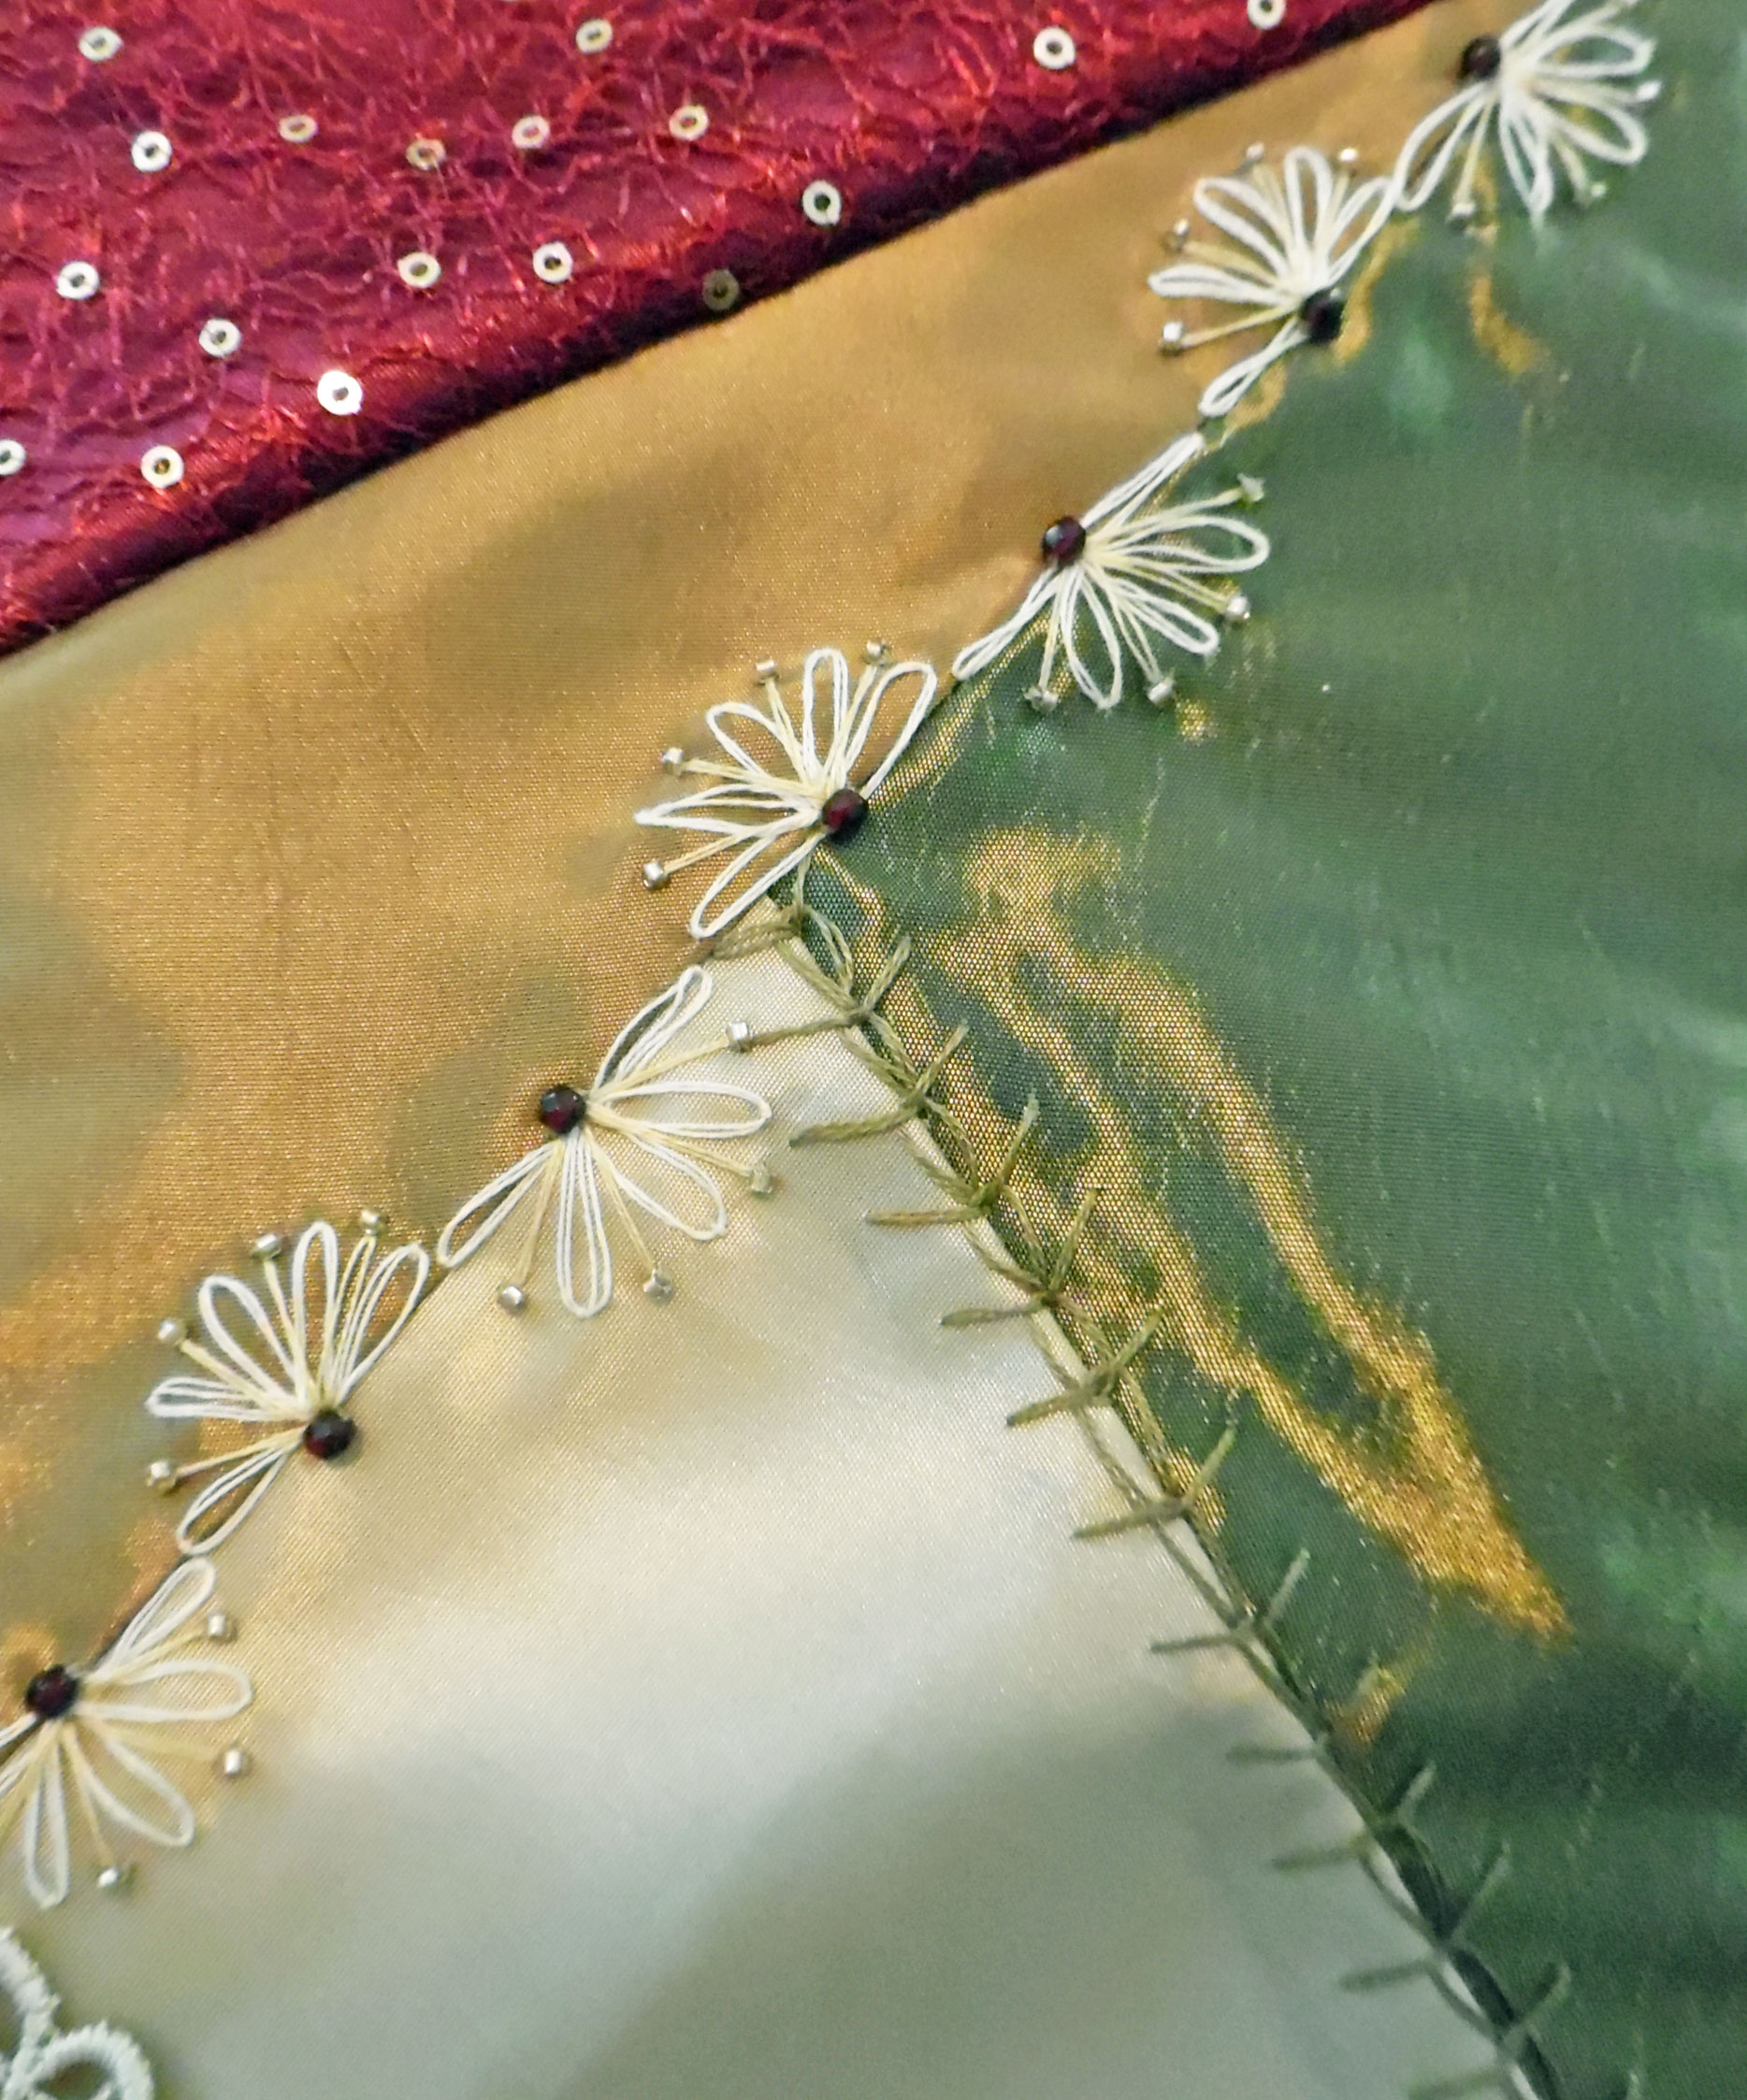
Alternating Half-Circles
- Zigzags: To the center of each lazy-daisy flower (at the peak of each zigzag), I attached alternating 4mm crystals in olive green and tan.
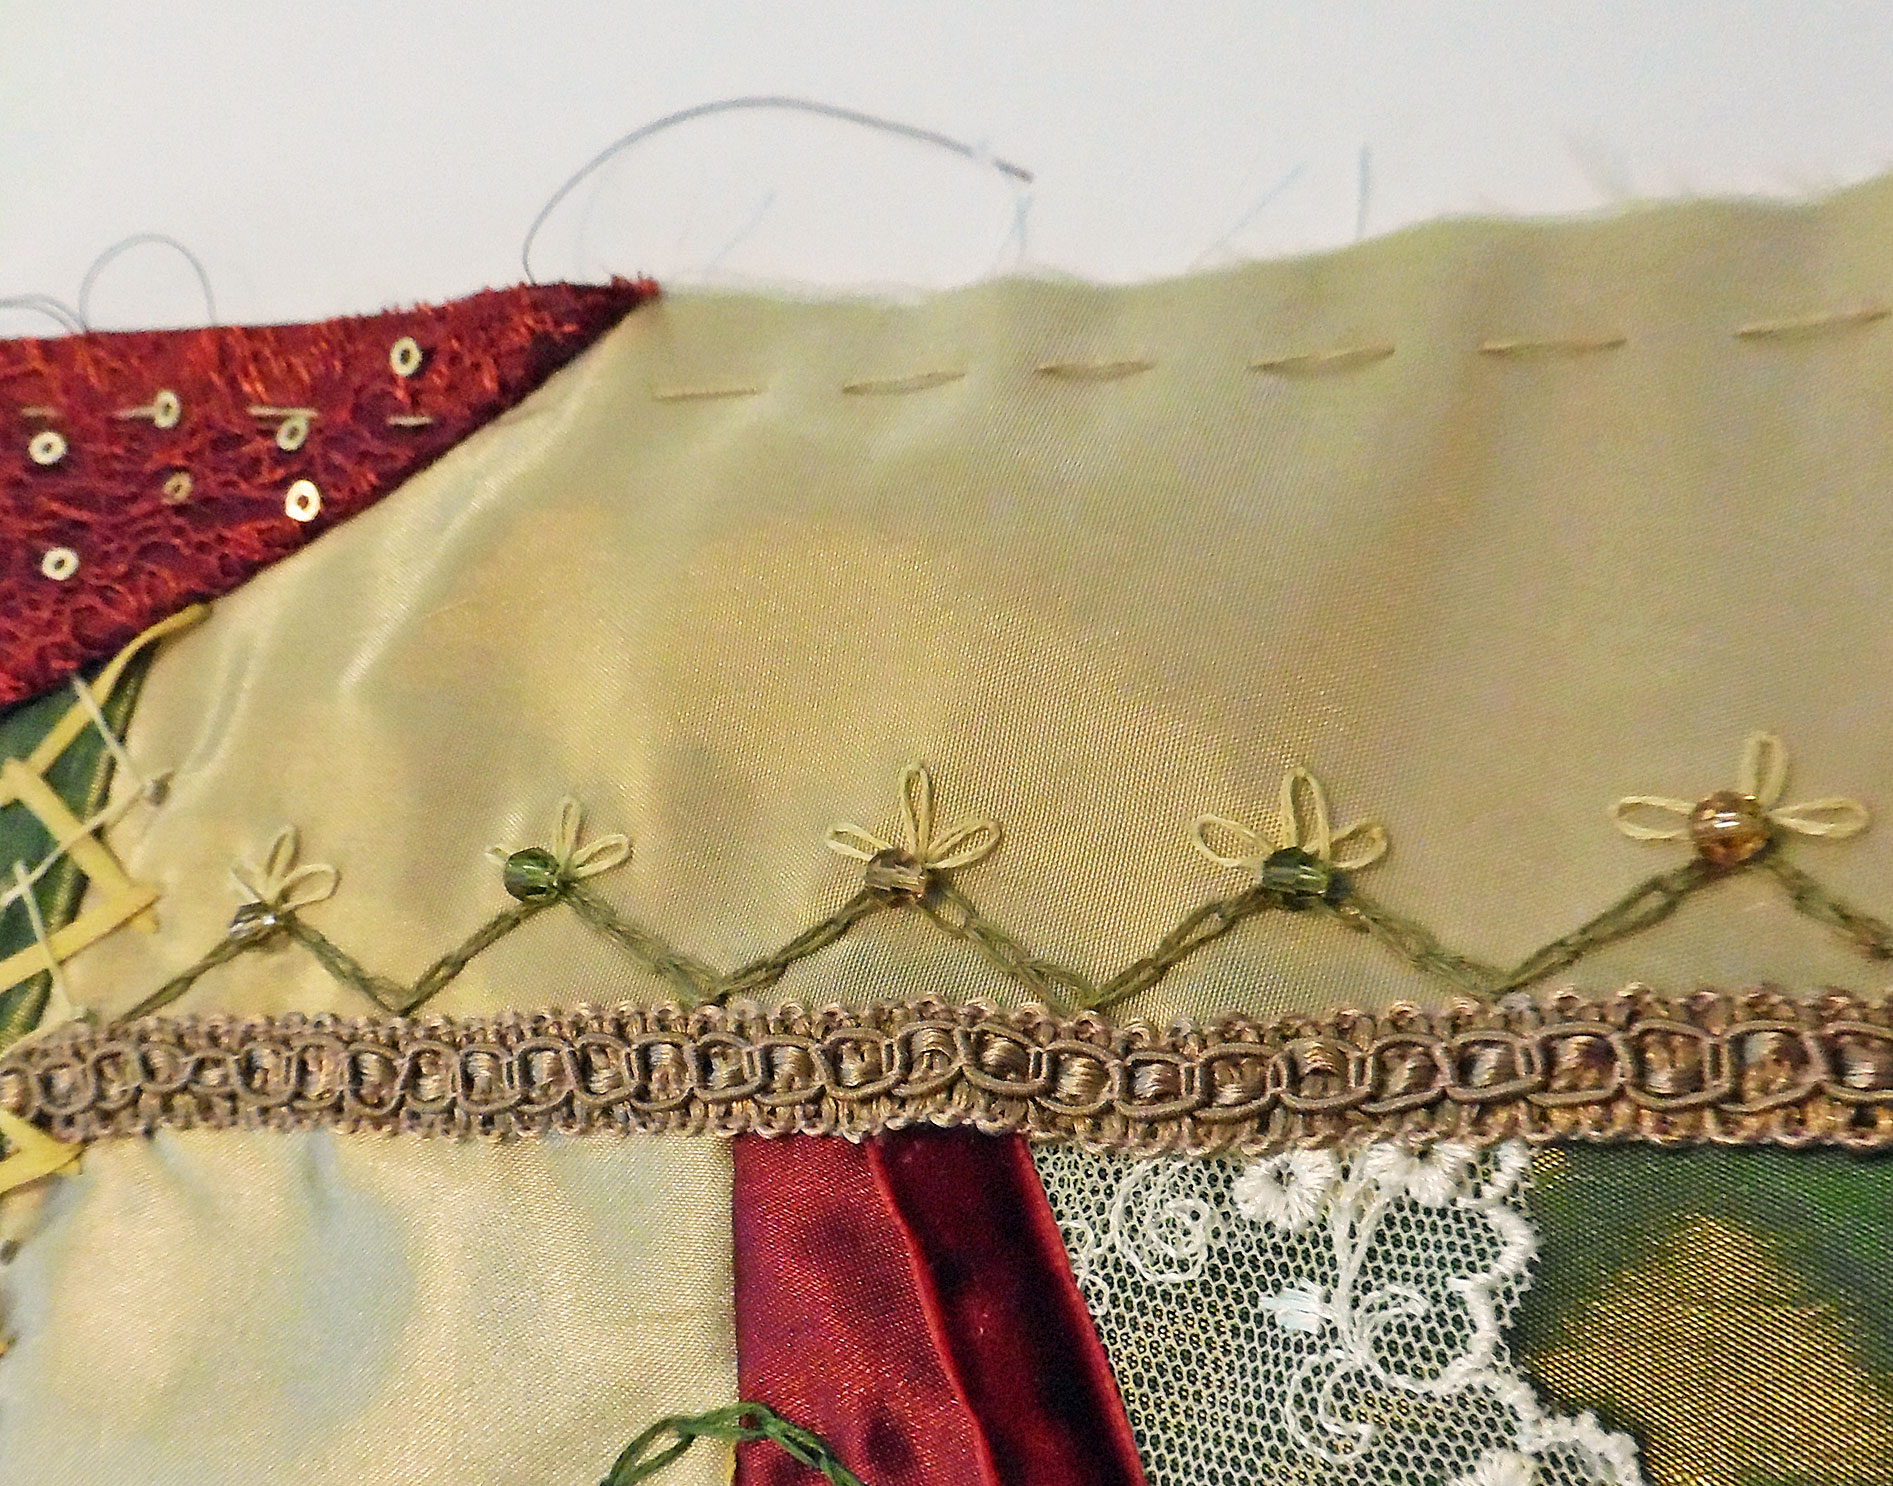
Zigzagged Chain-Stitches
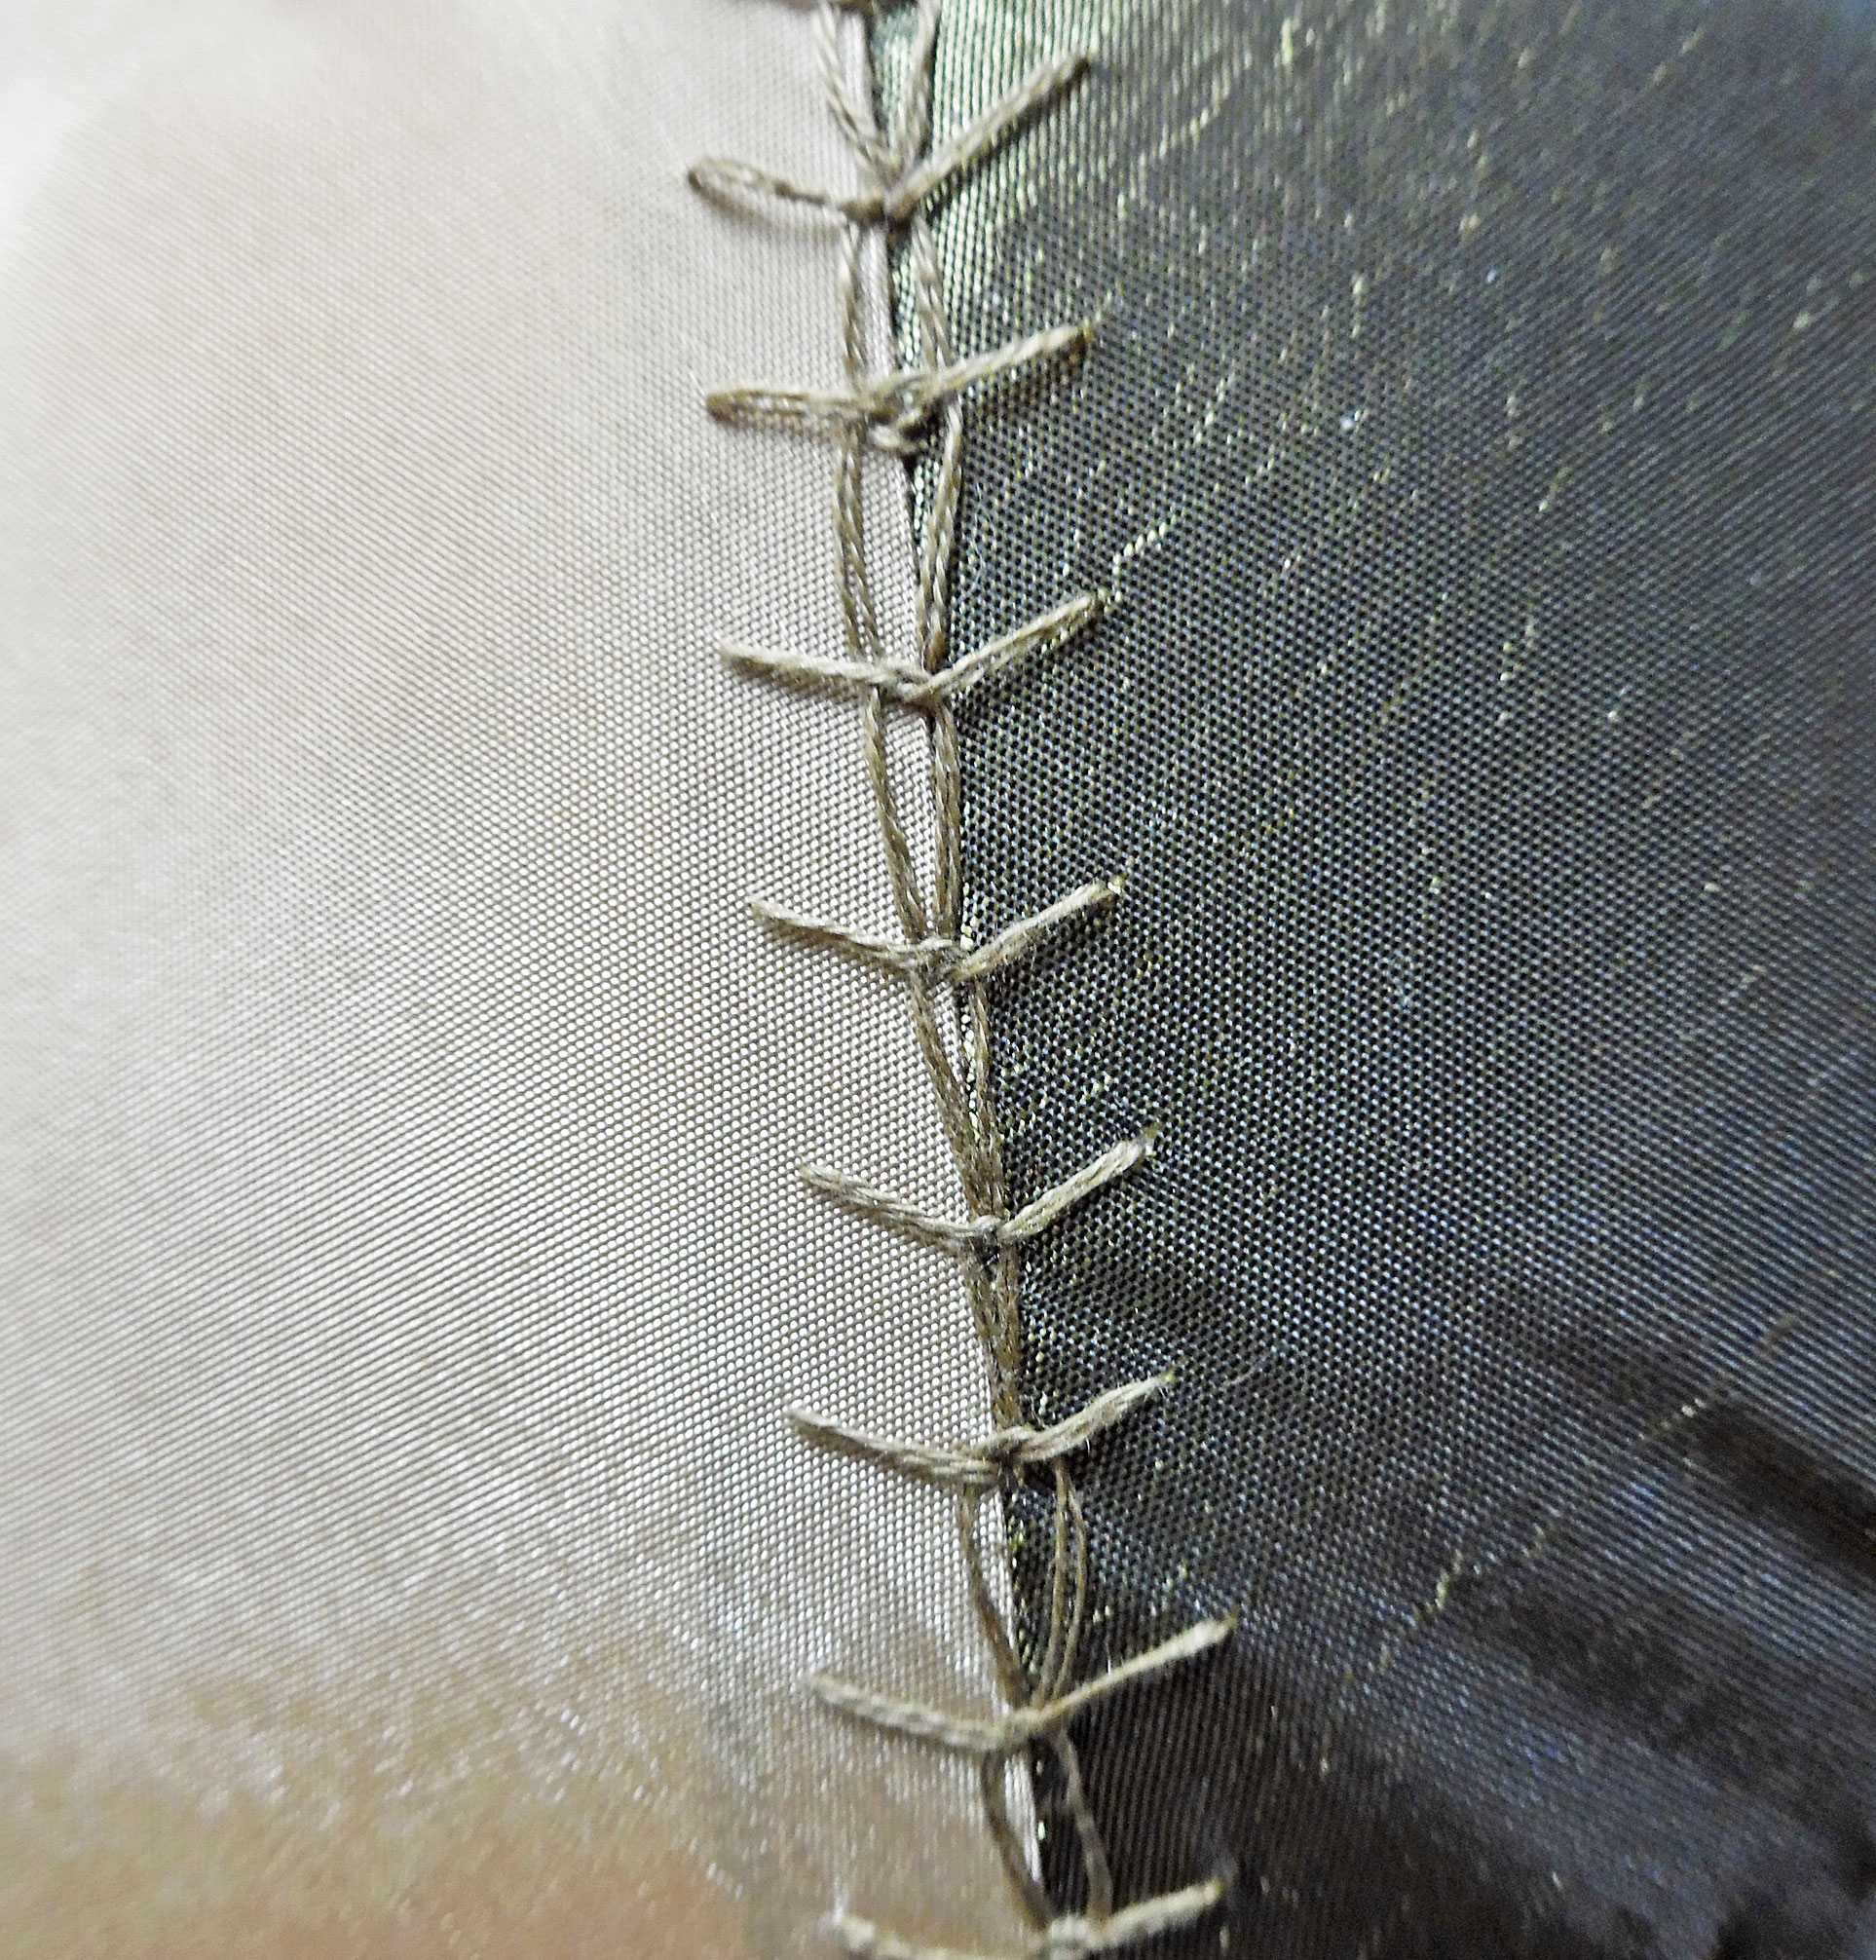
- Herringbone Stitches: To the apex of each of the smaller herringbone stitches, I added a silver-lined champagne seed bead. I was going to add larger crystals to the bigger herringbone stitches, but I didn’t have enough of any suitable color.
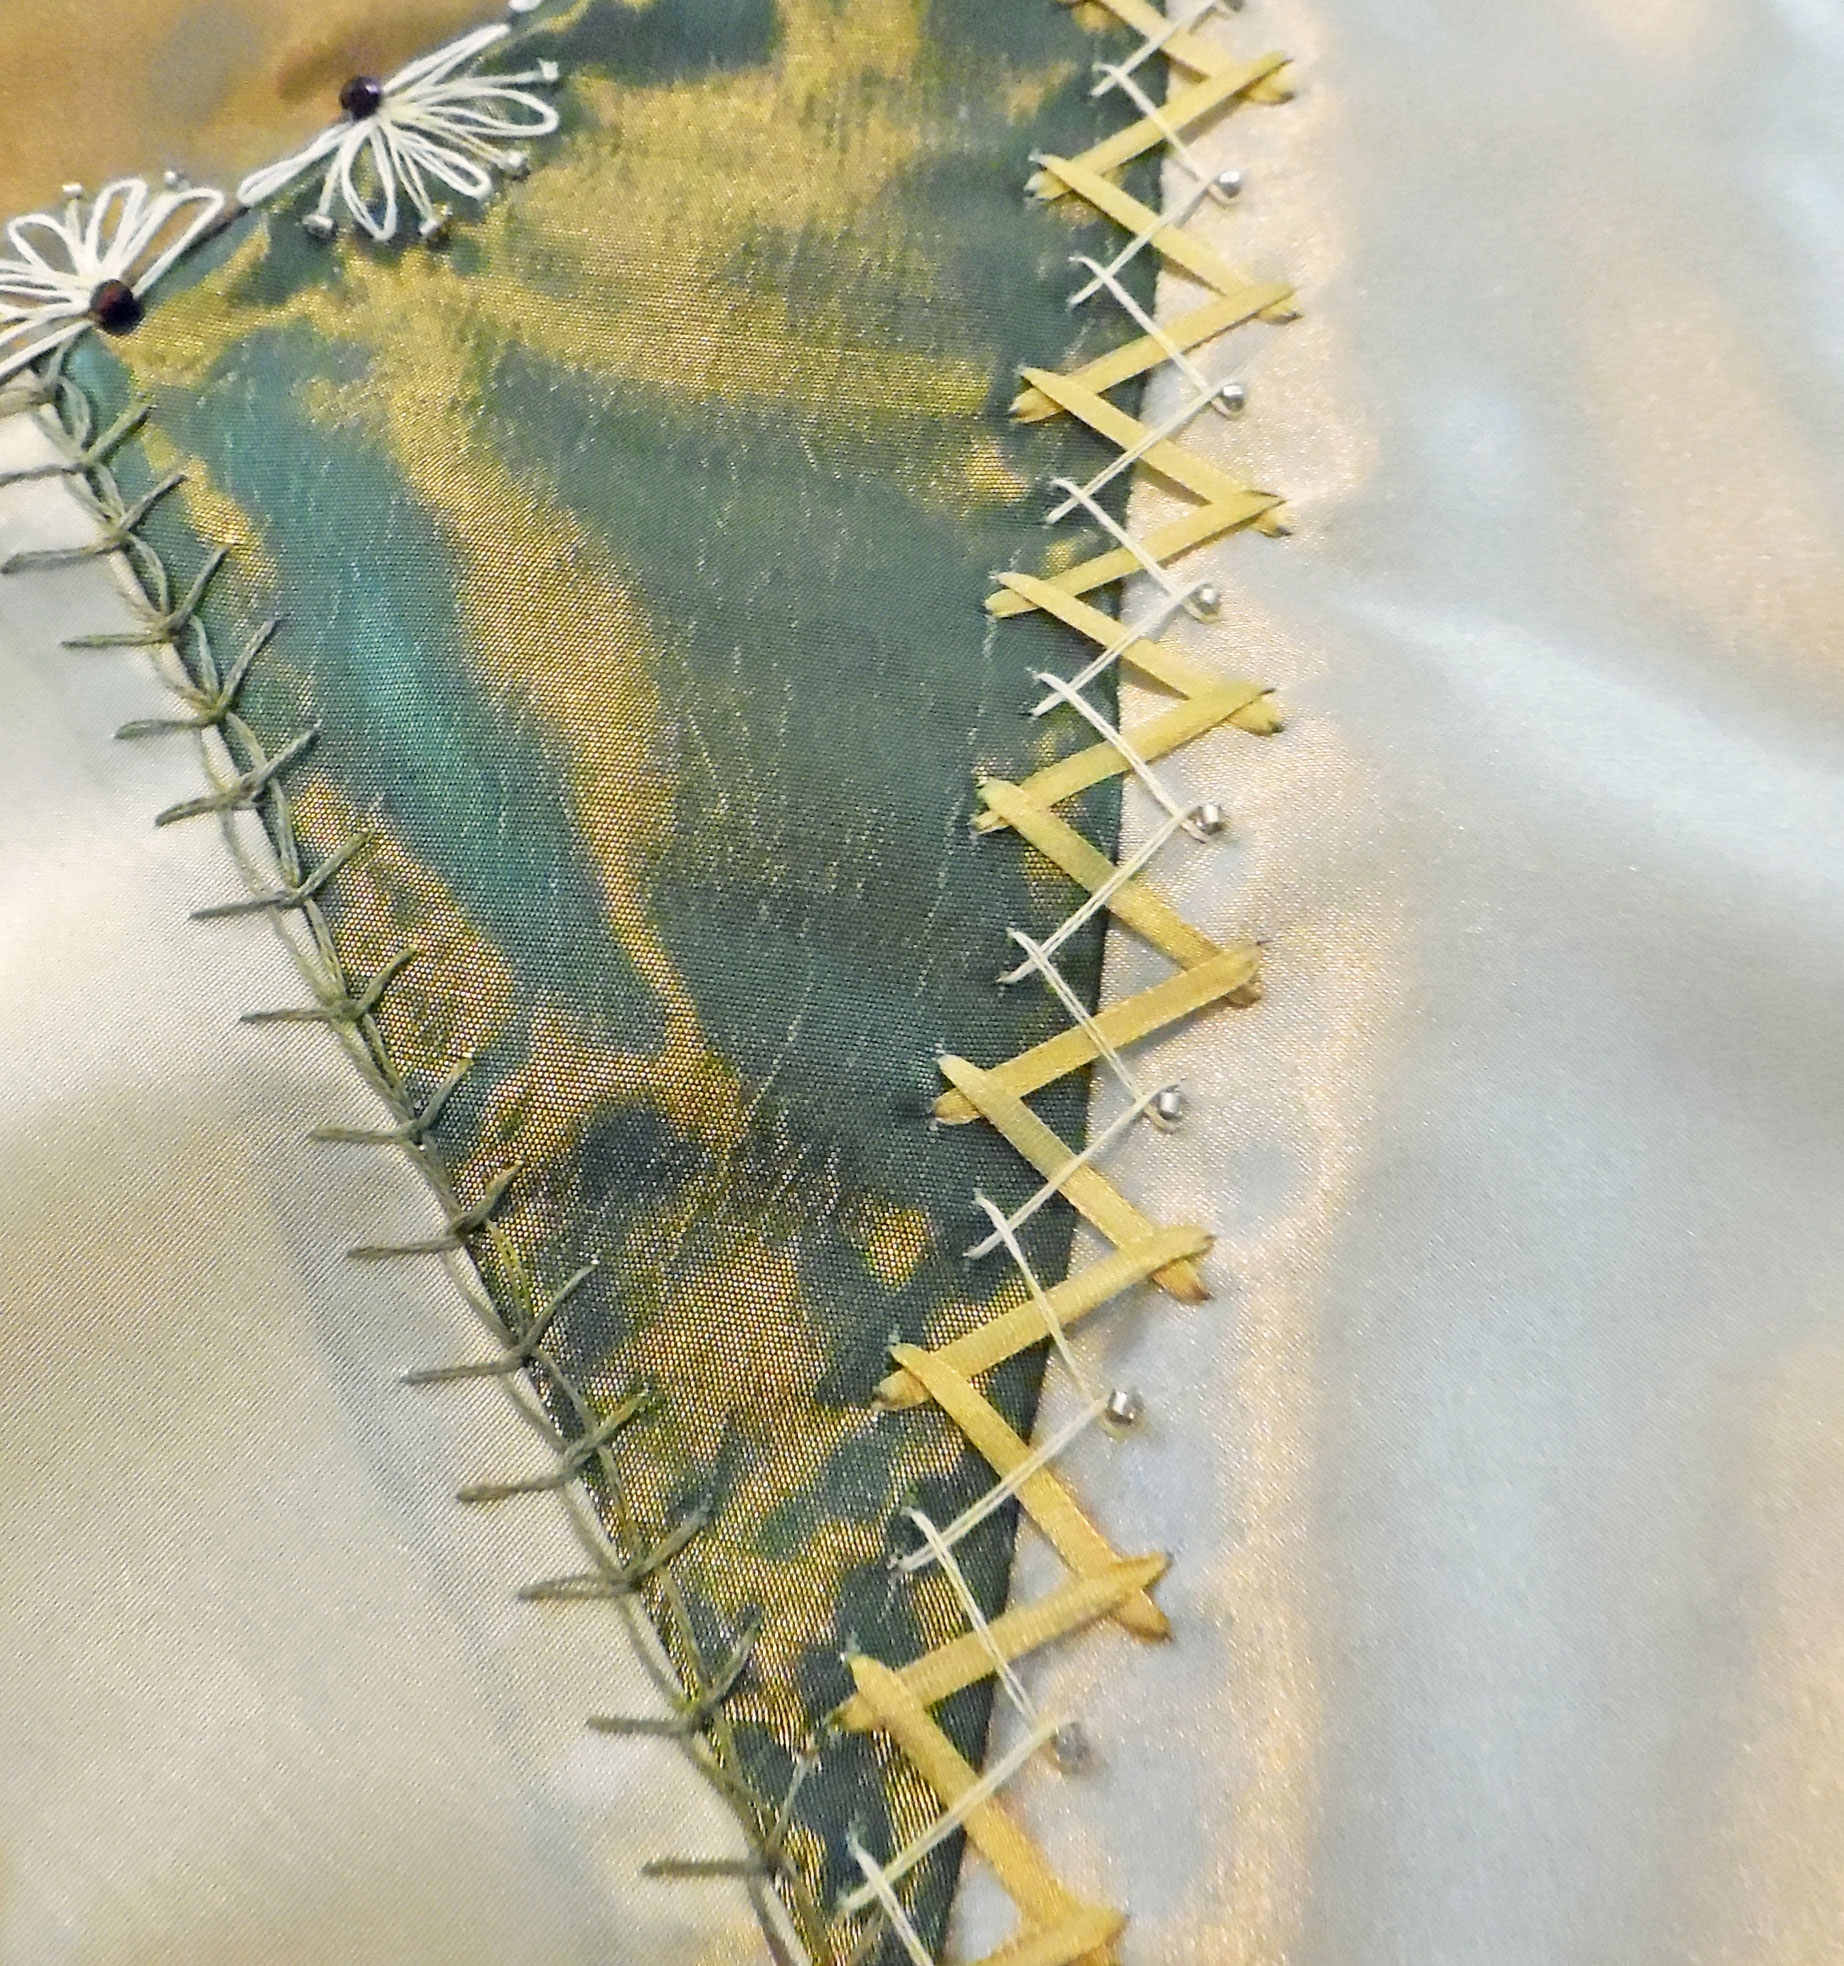
Interlocked Herringbone Stitches
- Chain-Stitch Circles: Along the center of each circle, I attached alternating 4mm crystals in champagne, olive green, and tan.
Chain-Stitched Circles
- Ribbon-Stitched Flowers: To the center of each flower, I added a cluster of three champagne seed beads.
Ribbon-Stitched Flowers
For the final touch, I cut a single floral motif from the pale gold Venise lace and placed it in the upper right corner of the quilt, near the zigzag embroidery.
Venise Lace Motif
And that was it! The embellishing was complete.
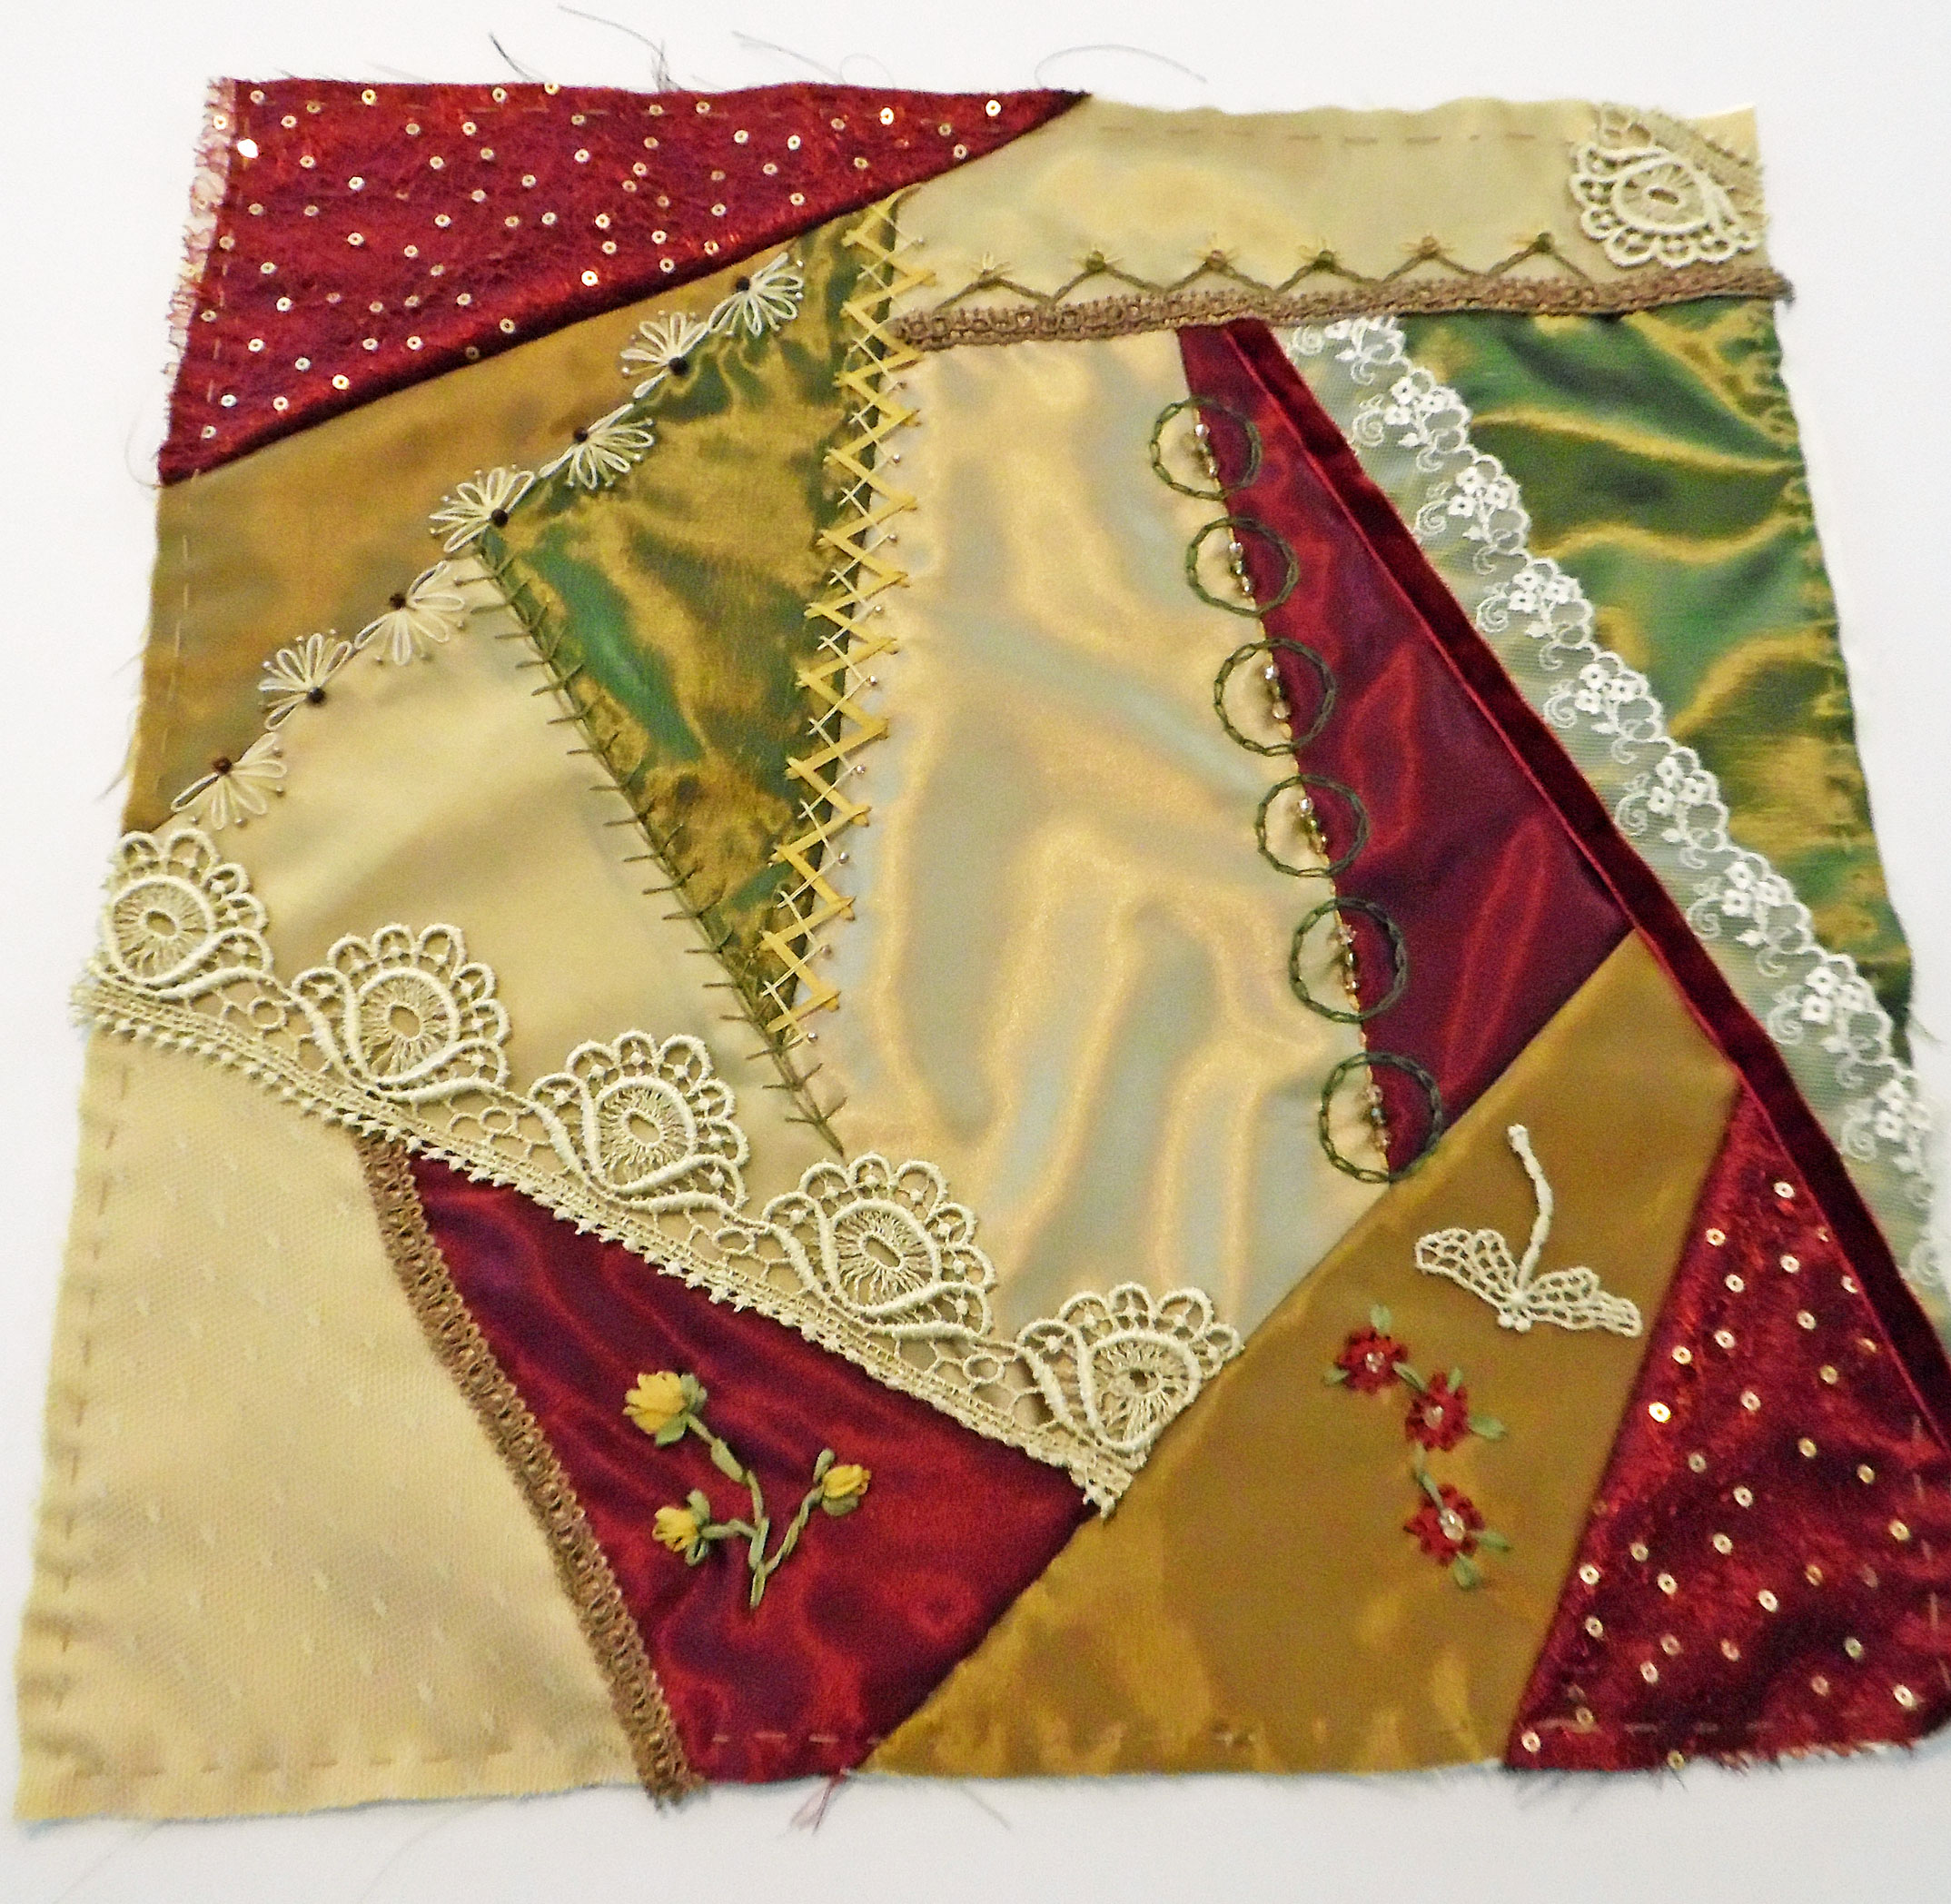
Embroidered & Beaded Crazy Quilt
Putting It All Together
The very last step was to create the pillow. I cut a square from burgundy silk and stitched it, right sides together, to the crazy-quilted piece, leaving a wide gap along one side. I trimmed the corners and flipped it right-side out, then inserted the pillow form. Finally, I hand sewed the gap closed, using a slipstitch.
Conclusion
Every time I make a crazy-quilted item, I fall in love with it! This pillow proved no exception—I adore everything about it, from the color combination to the embellishments. The colors aren’t ones you might naturally pair up, but they work well together! I’m very pleased with how this pillow turned out, and I’m glad it’s going to a good home.
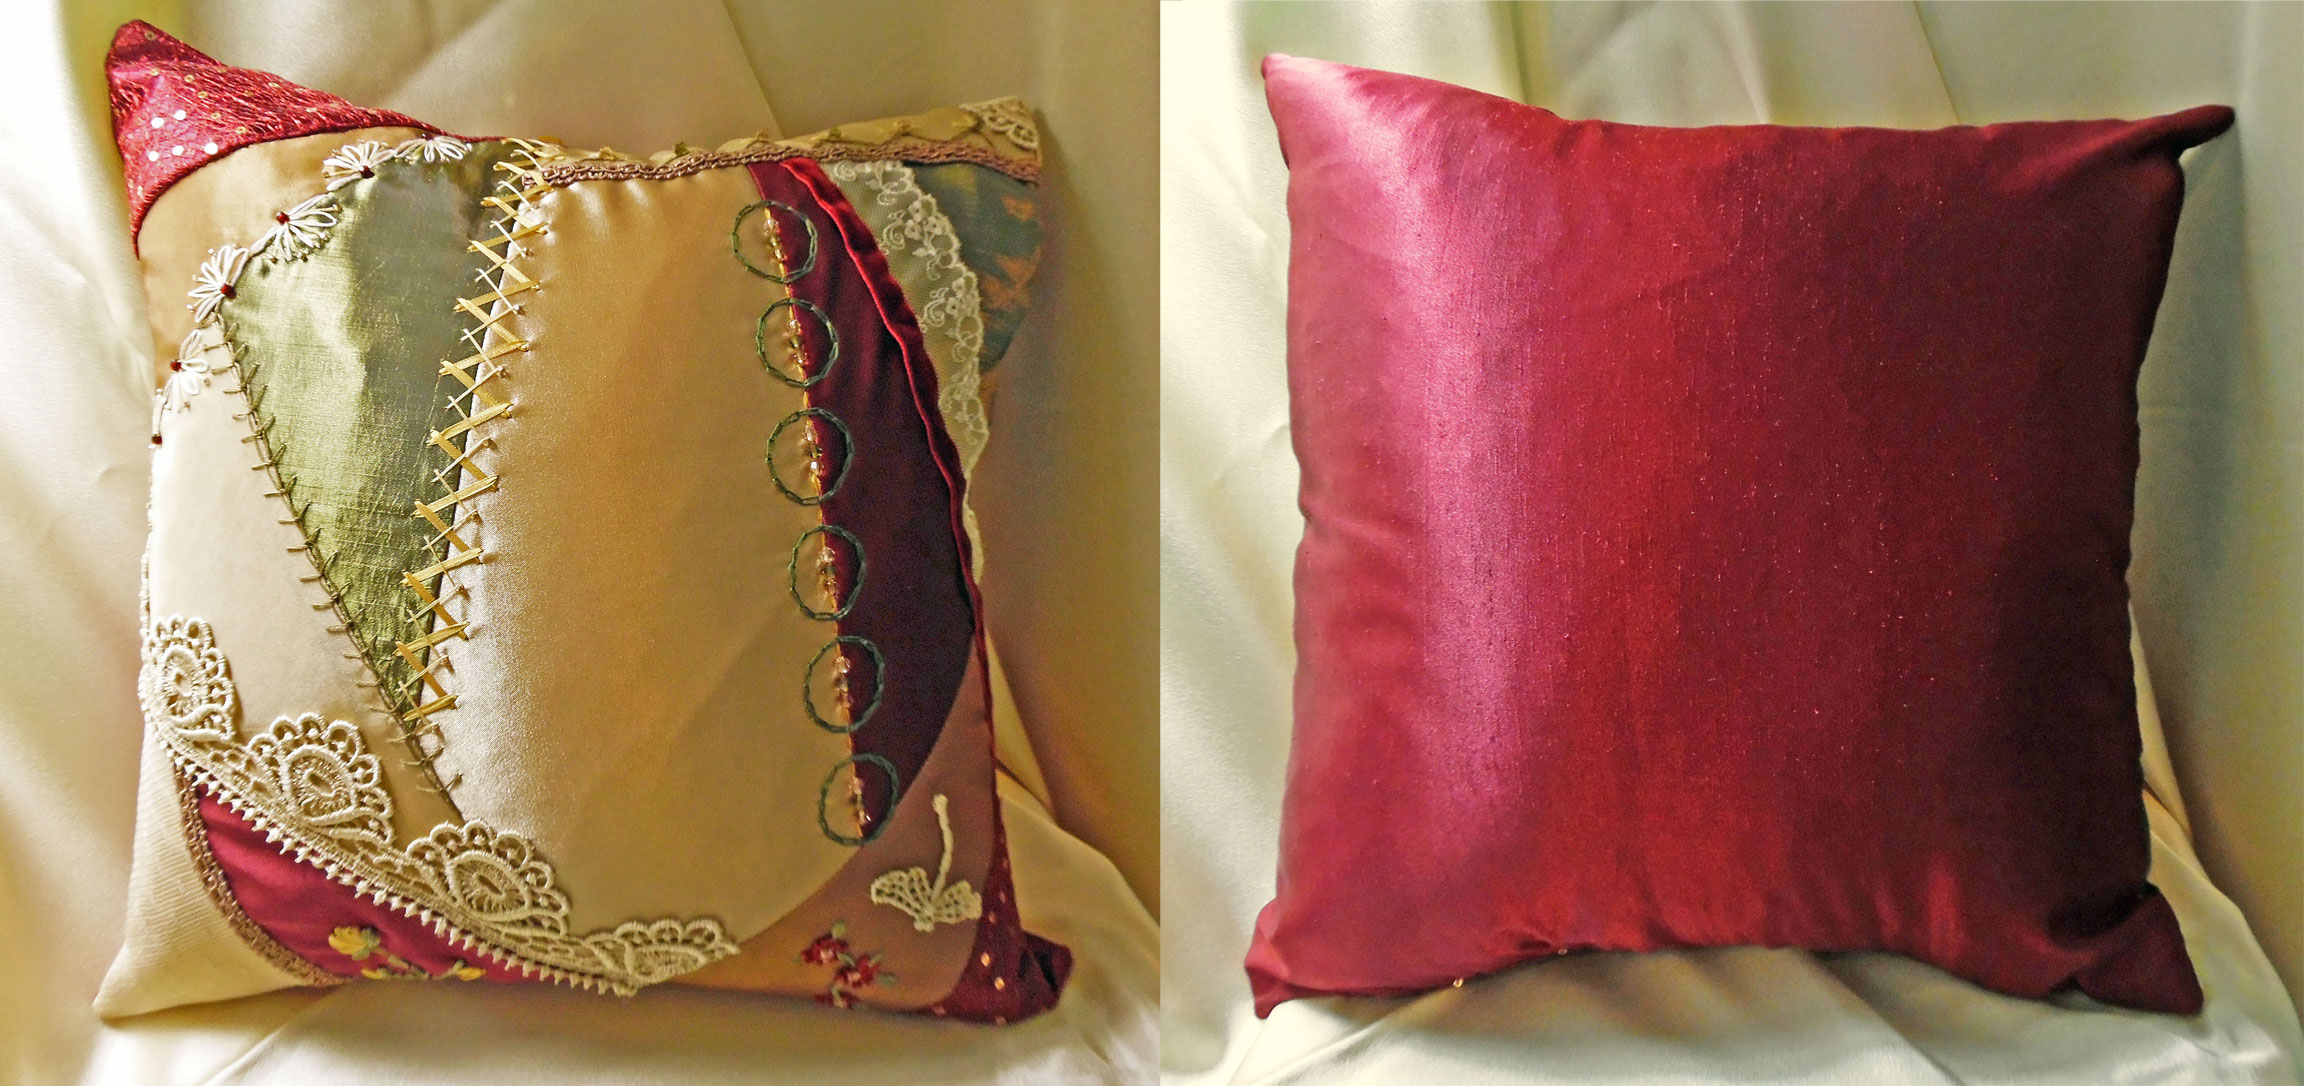
Finished Pillow, Front & Back
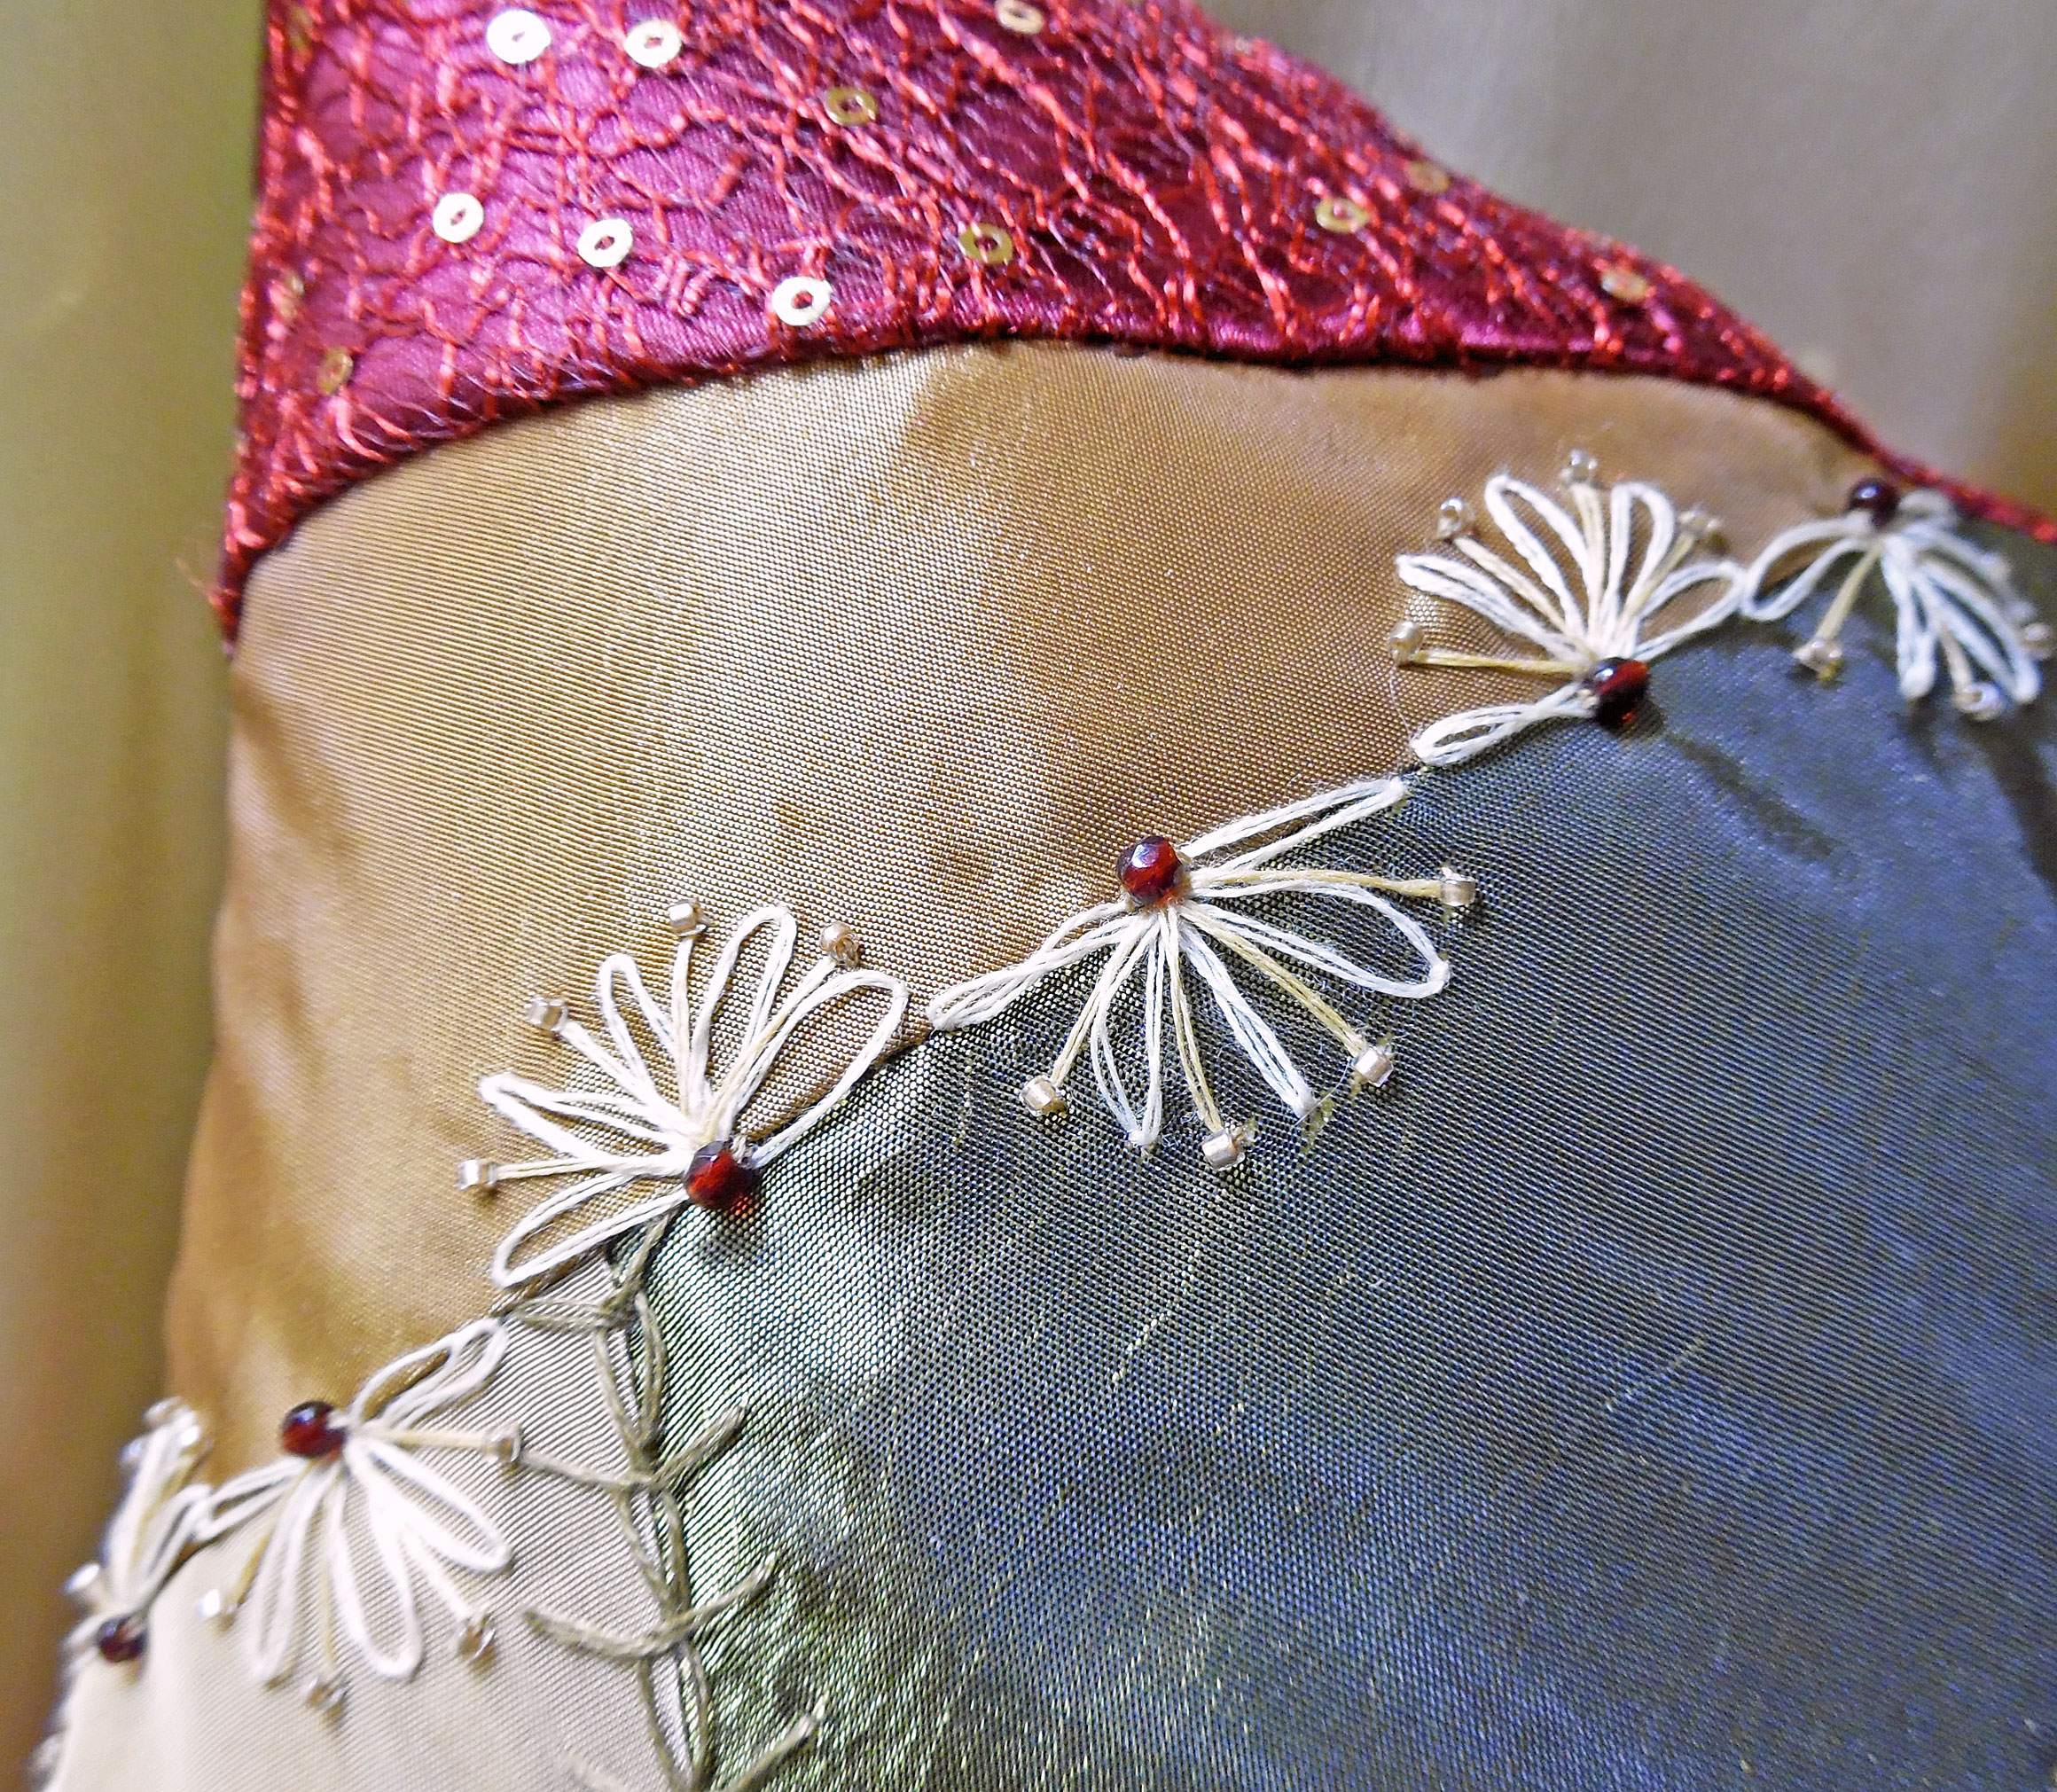
Closeup of Beaded Half-Circles
Closeup of Wheat-Ear Embroidery
Closeup of Herringbone Embroidery
Closeup of Zigzags
Closeup of Lace, Velvet Ribbon, & Chain-Stitch Circles
Closeup of Embroidered Silk Ribbon Blossoms
Closeup of Embroidered Silk Ribbon Flowers
~~*~~
More of my articles and sewing diaries on crazy-quilting: