A Sewing Diary
by Lisha Vidler
(As always, click on any illustration to view it full-sized.)
Some of you have read my tutorial on how to make a quick and easy wrist pincushion. I always recommend using a wrist pincushion while you’re working, because it (literally) keeps your pins at hand and reduces the likelihood of holding a pin with your mouth, which is both dangerous and unsanitary. I wasn’t quite satisfied with my first wrist pincushion, so I set out to make another.
Design
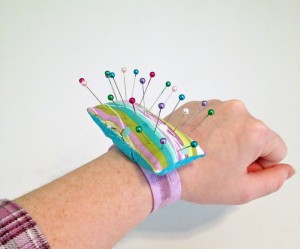
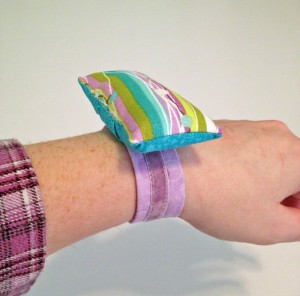
Instead of using elastic like my previous wrist pincushion, this one has a padded strap that fastens with hook & loop tape (Velcro). It’s so much more comfortable to wear! Originally, I was inspired by Tea Rose Home’s Sew Stylish Pincushion, but after making a round cushion, I nixed the idea and decided to go with a rectangular version instead.
Materials
- Fabric #1
- Fabric #2
- Fabric #3
- Fusible Interfacing
- Hook & Loop Tape
- Fiberfill Stuffing
- Thin Cardboard
- Velvet Ribbon
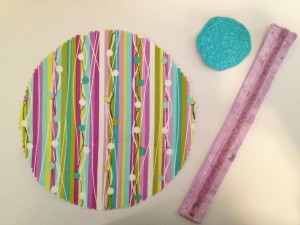
I used three different, yet coordinating fat quarters for this pincushion—two for the pincushion itself and one for the strap—and had plenty of leftover fabric. To strengthen and pad the wrist strap, I used fusible interfacing. For stuffing, I used ordinary fiberfill. A small piece of cardboard was necessary to prevent pins from stabbing through the bottom of the pincushion. And I wanted something pretty this time, so I used narrow velvet ribbon to decorate the wrist strap. Ribbon, or colorful flat lace, such as cluny or narrow galloon, would work just as well, if you’re making your own.
(Please ignore the fact that the photo shows cut circles. Originally, I made a round pincushion. It didn’t work, but I used the same fabrics for the rectangular version.)
Getting Started
For the pincushion itself, I cut two rectangles of different fabrics (lavender/green/aqua stripes for the top half and a bright floral turquoise for the bottom half), approximately 2-3/4″ x 4-1/4″. For the loop that attaches the pincushion to the strap, I used the turquoise fabric to cut a small rectangle, about 1-3/8″ x 2-3/4″.
For the wrist strap, I used two rectangles of a lavender fabric, which matches my ironing board cover. The length equaled my wrist measurement plus 3″, while the width was 2″. I cut a piece of fusible interfacing an inch shorter and an inch narrower than the strap.
Sewing the Strap
To begin, I fused the interfacing to the center of the wrong side of one of the wrist strap rectangles, making sure I had 1/2″ of fabric extending past the interfacing all the way around the edges. This ensured that the interfacing wouldn’t get caught in the seam allowances. I sewed the rectangles with right sides together, leaving a gap at one end so I could flip it. I pressed it, trimmed the corners, flipped it right-side out, and pressed it again.
I cut my velvet ribbon 1/2″ longer than the finished strap and folded the ends under by 1/4″. I slid one folded edge into the gap at the edge of the strap and topstitched it in place. This held the trim secure and closed the gap at the same time. Time saver! I topstitched the sides and bottom edge of the ribbon, attaching it down the center of the strap.
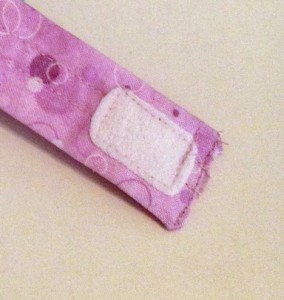
The final step was to sew a square of hook and loop tape (Velcro) to each end of the strap. I rounded the corners so there wouldn’t be any sharp edges, then placed the squares—one on the top of the strap and one on the underside, so it would overlap to fasten. I stitched around the edges of the hook and loop tape to secure it.
Strangely, my sewing machine’s needle fell off during this stage! At first, I thought I’d broken it by trying to stitch through the thick Velcro with a size 9 needle, but when I removed the needle, it was intact. It just came loose and fell off. Very odd!
Sewing the Pincushion
Once the strap was complete, I turned my attention to the pincushion itself. I sewed the two rectangles with right sides together, leaving a gap to flip it, then pressed it, trimmed the corners, flipped it right-side out, and pressed it again.
One reason I disliked my old pincushion was because pins were always stabbing me in the wrist. This time, I cut a thin piece of cardboard and slipped it into the pincushion before adding the stuffing. It’s lightweight enough that it doesn’t weigh the pincushion down, but sturdy enough to stop any pins from penetrating. Once it was in place, I stuffed the pincushion full of fiberfill, using a chopstick to get the stuffing into the corners. After it was as full as I could safely stuff it, I slipstitched the gap closed.
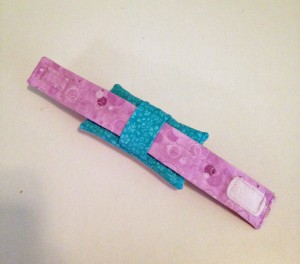
To attach the pincushion to the strap, I used a band of folded fabric, which I wrapped over the strap and hand-sewed the edges to the underside of the pincushion. It’s loose enough that I can adjust the position of the pincushion, yet snug enough that it won’t flop around.
Conclusion
I’m extremely pleased with this wrist pincushion. It fits better and is far more comfortable than the elastic band I used for my first wrist pincushion. It’s bigger, so it holds more pins, while being more stable. It’s a lot prettier, too, since it doesn’t have a bare elastic strap. All in all, it turned out better than I’d hoped. It’s my new best friend in the sewing room!


Beautiful pin cushion, love the colors.,thanks for sharing your revised addition.
Thanks! Glad you like it.
Pingback: Sewing Machine Pincushion | Yesterday's Thimble
I’ve been searching for this exact type of wrist pincushion. My old red one fell apart (it had the hard plastic wrist type strap). Thank you for the great instructions!