From Homemade to Couture: 12 Steps to Improve Your Sewing
by Lisha Vidler
We’ve all seen them: garments that look painfully homemade. What is it about them that makes them so obvious? Sometimes it’s the fabrics used, sometimes it’s the fit. And sometimes it’s a combination of many things that are too discreet to identify, but which affect the final look nonetheless.
Here is a list of things that can seriously affect whether your garment looks homemade—or couture. Follow these suggestions, make them a habit, and the quality of your garments is sure to significantly improve.
#1. Invest in the Right Tools
Always buy the best that you can afford. It will pay off in the long run!
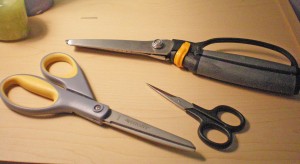
For sewing, a good pair of scissors is critical. Pinking shears are useful for finishing your seams or cutting out fabric that frays easily, while regular shears are obligatory for regular cutting. A tiny—but sharp—pair of scissors (or snips) is handy for clipping seams and threads. Never cut anything but fabric with your sewing scissors, or else they will dull quickly. You can buy both scissors and pinking shears with a spring handle that will automatically open after each cutting stroke. These are a lifesaver for those with arthritis.
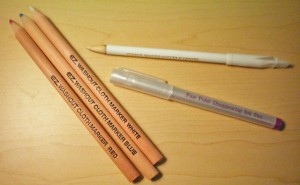
Some method of marking your fabric is necessary. Chalk can be found as a pencil or a small hand-held dispenser. It has the benefit of usually not staining when pressed, and it brushes off easily. Another option is a pen with ink that fades over time or disappears when wet. Ink of this type must be removed before pressing or it will stain. Be sure to rinse with plain water; water mixed with laundry soap will cause the ink to turn brown and leave a permanent stain.
For precise marking, I prefer the pens with a fine tip. The wider-tipped pens are cheaper and easier to find, but less accurate. For marking straight lines, I’ve found a clear 2” wide quilter’s ruler to be quite useful; it’s especially handy when making bias tape.
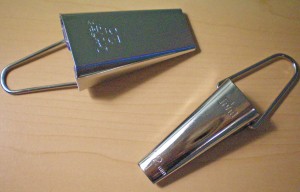
A bias-tape maker is another must-have item. I don’t mean the expensive machine that does all the work for you. What I’m talking about is a small metal device, rather like a flat funnel, that folds the fabric and holds it in place while you press it, saving your fingers from getting burned.
Beeswax is a little more unusual, but absolutely indispensable for hand sewing. Run your thread along the wax, then fold a scrap of fabric over the thread and press it with a warm iron to fuse the wax into the thread. This strengthens the thread and helps prevent knotting and tangling.
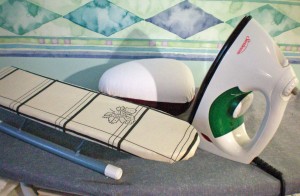
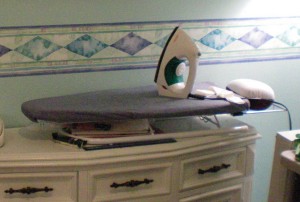
For pressing, a tailor’s ham is vital. This is a firmly stuffed cloth-covered object shaped like a ham. Use it when pressing curves, such as darts and the tops of sleeves. A sleeve board is convenient to have when pressing smaller areas, like sleeves, baby clothes, or doll clothes. A mini iron is likewise useful for those small areas where a full-sized iron might result in creasing the surrounding fabric. They are especially useful in making infant’s or doll’s clothes. You can find miniature irons ranging from around four inches long to one that’s the size of a quarter, and they aren’t expensive. Of course, a good regular iron is essential, as well. It doesn’t have to be fancy, just make sure it has a wide range of temperatures and the option for steam.
-
Tip: Organize your supplies well. Invest in a few inexpensive plastic dressers. Larger ones can hold fabric and interfacing, while small ones can hold thread and notions. Baskets are also useful: they can store patterns, or keep the items you need for your current project together in one handy place.
#2. Take Care of Your Sewing Machine
Each machine is different, with varying requirements. Read the manual. If it says to oil your machine on a daily or weekly basis, then by all means, oil your machine. Failure to do so may ruin your sewing machine. However, some machines are built so as to not require oiling. If it says not to oil it, then don’t.
The oil typically goes where metal rubs against metal, within the machine and bobbin area. The outer section of the machine casing will often come off with the removal of a single screw. The inner workings will be revealed, and with a little examination you will see where to apply the oil. Dribble one or two drops on each place where there is the friction of metal against metal.
Clean and dust your machine frequently, as a small amount of lint can cause a large amount of problems. Use a pipe-cleaner twisted into a loop to clean within the nooks and crannies of the machine. Avoid blowing dust with a spray can, because this can lodge debris deeper within the machine. If a pipe-cleaner is not adequate, use a miniature vacuum, the sort that are marketed for cleaning your computer keyboards. If you go more than a day without sewing, put a dust cover over your machine.
Occasionally, you should take the machine in to the dealer or a mechanic, just for a tune up. They will clean it, oil it, and make sure all the parts are in good working order. A machine that is ill cared for will produce poor results—skipped stitches or uneven stitches are a common symptom of abuse or neglect.
-
Tip: If you’re having difficulty with tangled thread or skipped stitching, try re-threading your machine (both the upper thread and the bobbin). Nine times out of ten, this will solve the problem. If you still have trouble, look online for a solution. If there isn’t one, you’ll have to take the machine to a dealer or mechanic.
#3. Use a Suitable Needle
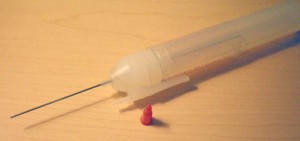
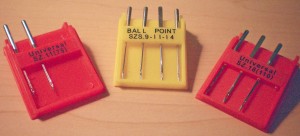
Different fabrics require different needles. Most fabrics will use a universal needle, but choose one of an appropriate weight. The higher the number, the thicker the needle and the heavier the fabric it’s designed for. A ballpoint needle is good for knits or delicate fabrics that snag easily. Then, there are special heavy-duty needles for use with denim and other thick fabrics.
In addition to using the right needle, always put in a new needle when starting a new project. Needles dull quickly; using a fresh, sharp one will make a significant difference in your sewing.
If you hear a slight snapping sound, or a little pop, every time the needle enters the fabric, you must change the needle. Either the needle has a spur on it that’s catching the fabric with each stitch, or the needle has bent enough that it’s nicking the metal throat plate. This can cause damage to both needle and machine, and if the needle strikes hard enough, it will break—so don’t allow it to continue.
-
Tip: If you haven’t used a needle long enough to discard it, place it back in the container backwards or upside down. If it’s facing the opposite direction as the other needles, you’ll know it’s used.
#4. Select the Right Fabric
Quilting fabric (sometimes known as calico) comes in a wide array of colors and prints, but it’s not intended for clothing. It’s generally thin, yet crisp, and will make most garments stand out as obviously homemade. Occasionally there is a use for quilting cotton, but usually you’ll want to look for fabrics that are more appropriate to what you’re making. For example, use denim, twill, or corduroy to make a sturdy pair of pants; for skirts, try sateen, cotton gauze, or fine linen; dresses can be made of charmeuse, chiffon, voile, or rayon challis; for blouses, look for cotton lawn, fine batiste, or silk habotai. These are just a few suggestions, but there are dozens, if not hundreds of fabrics out there, all of which are infinitely more suitable than quilting cotton.
An exception to this rule is with historic costuming. Many middle and lower class dresses can be made from cotton prints or broadcloth. However, keep the fabric’s crispness in mind, for a stiff garment will often look out of place. Find fabrics that are marketed as reproductions, or look for thin cottons that will wash out to be smooth and soft.
-
Tip: Know the difference between fiber content and weave. A lot of people compare satin and silk as though they are equals, when in fact one is a fiber and the other is a weave. Fiber content is what the fabric is made out of. Examples include cotton, linen, silk, rayon, polyester, and wool. Weave is what sort of fabric a fiber is made into, such as satin, twill, velvet, batiste, taffeta, and knit. As such, silk is not a blanket term. You might have a silk charmeuse, a silk satin, silk dupioni, silk taffeta, or silk velvet. Each is made from silk, but they are very different fabrics.
#5. Pre-Wash Your Fabric
Why should you pre-wash your fabric? Because new textiles shrink. That includes trims, ribbon, lace, and fabric, but they don’t all shrink the same amount. How awful would it be if you spent hours making a garment, only to pull it out of the dryer and discover that parts of it had shrunk, causing rippling or puckering! Or you might find that dye from one fabric had bled onto another. This is why it’s essential to pre-wash every fabric and trim that you plan to use; the exception is garments that will be dry-cleaned only.
Follow the directions that accompany the fabric, whether that’s to hand wash, machine wash, or dry clean. If it can be washed, do so as soon as possible, so that you don’t have to worry about taking the time to wash your fabrics when you get in the mood to sew. Write the directions down and keep them with your fabric if you’re not going to sew it right away. That way, you’ll know how to care for your fabric down the road.
If you have the time and patience, wash most fabrics a second time, just to make sure they’re as settled as they’re going to get. However, if you’re using a loosely woven fabric such as flannel or denim, wash and dry it at least three times before sewing! Denim, especially, will continue to bleed dye after several washings, and flannel shrinks drastically, so those fabrics should be washed a minimum of three times before sewing.
-
Tip: Don’t wash lace or ribbons and then press them dry. This will cause them to shrink more than they ordinarily would. Lay your delicate trims flat after hand washing, and only press them once they’ve completely dried.
#6. Ensure a Good Fit
Before you cut your good fabric, always make a mock-up of the garment using inexpensive fabric of a similar weight. You want to use a similar fabric, so that it will behave the same way. Otherwise the fit may be off. Second-hand sheets are an inexpensive option, but you can also use unbleached muslin or broadcloth for lightweight mock-ups. Look for heavier mock-up fabrics in the clearance aisle of your local fabric store.
Once your mock-up is made, check that the size is good, and that the garment is comfortable. Be sure it fits well—it should look as though it were made for you! If you must make any significant changes, sew a second mock-up to be sure the changes will work as planned. Otherwise, you risk having a beautiful garment that doesn’t quite fit.
-
Tip: Invest in a good fitting book, such as Fit For Real People by Palmer & Pletch and use it to figure out what changes you’ll need to make to your pattern. Learn what shapes and lengths will best flatter your figure, and customize your garment to suit you. (Try Flatter Your Figure by Jan Larkey for a guide to dressing your body type.)
#7. Pay Attention to Grainlines
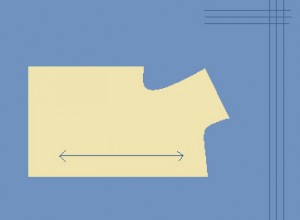
This is a step that’s easy to ignore when you’re first starting out, yet absolutely vital to a finely sewn garment. You see that long arrow that shows up on all your pattern pieces? That must be lined up with the woven grain of your fabric. Check against the selvedge to ensure a straight line. If you cut the pattern pieces off-grain, or crooked, your garment will be difficult to sew and won’t look right when worn.
Straighten the grain of your fabric before laying your pattern pieces out. First, use a needle or pin to pull a single thread from the fabric, near the cut edge. Pull it the entire width of the fabric. This creates a perfectly straight edge. Cut along that line and you’re ensured one edge is aligned. Fold the fabric so that the selvedges meet and the edges of the line you just cut are straight. Smooth the fabric toward the fold. If wrinkles appear that won’t be smoothed away, you’ll need to take an additional step to straighten the grain. Do this by grasping the corners of the fabric and pulling diagonally. Check the grain again, and repeat if necessary.
Place your pattern pieces so that the grainline arrows all point the same direction. Until you develop an eye for keeping them straight, take a moment to measure the top and bottom of the arrow, to make sure they’re an equal distance from the fabric’s edge. They must be straight or your garment will suffer.
#8. Sew Straight Lines
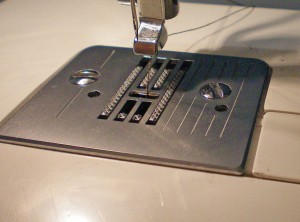
You would be surprised at how many people don’t know how to sew a straight line. Look at your sewing machine, underneath the presser foot. There is a metal plate there, and most of the time this plate has grooves cut into it or lines painted on. These grooves or lines are there to help you sew straight. Each one represents a different seam allowance, so measure from the needle to the line to find out which one to use. Most seams are 5/8”, but occasionally you’ll need to sew 1/2” or 1/4”.
Keep your fabric edge aligned with the groove as you sew and your seams will be straight. Go slowly around curves to maintain an even seam. If you have difficulty seeing the short line, take a piece of blue painter’s tape, or regular masking tape, and stick it to your sewing machine along the groove. This will make it easier to see, and give you a longer line to follow.
-
Tip: If your sewing machine doesn’t have the seam allowances marked, do so yourself. Measure out from the needle to the right and place a short piece of masking tape so that it’s parallel to the line you want to sew. Use a pen and ruler to make straight lines on the tape, marking 5/8”, 1/2”, and 1/4”.
#9. Press As You Sew
Pressing each seam after it is sewn is another vital step to getting a polished and well-made piece of clothing. Unpressed garments can look sloppy and homemade. You don’t need to press immediately after you’ve sewn the seam, but do so as often as is practical—certainly before enclosing any seams, or crossing two seams. A good guideline is to press after each “group” of sewing. For instance, you might sew the back pieces together first, then press them; move on to the front pieces, then press them; sew the front to the back, and press those seams.
To properly press a seam, first check that you’re using the proper temperature. Too-hot irons will melt or create shiny patches on synthetic fabrics, and may burn natural fabrics. Ordinary cotton will tolerate a higher temperature than silk or synthetics, but use the lowest temperature that will get the job done. If you’re not 100% sure, press a scrap of fabric first. For some fabrics, you may want to use a pressing cloth. This is a thin piece of fabric, such as silk organza or a fine muslin, that you place on top of your fabric before pressing it. The pressing cloth disperses the heat and helps protect the delicate fabric from turning shiny or burning.
Once you’re satisfied with your iron’s temperature, lay the garment flat and press along the stitching on both sides of the seam. This sets the stitching and melds the thread to the fabric, making the seam flatter and smoother. Use your fingernail to open the seam, then press it open with your iron. Certain seams then need to be pressed to one side, so follow the directions given with your pattern.
-
Tip: Ironing is different than pressing. Ironing uses a side-to-side or sliding motion, while pressing is done by lifting the iron up and setting it down. During a garment’s construction, you always want to press, not iron. Ironing can distort the fabric, stretching it out of shape. With time, you’ll learn how to barely lift the iron, so that it appears that you’re ironing in the traditional fashion, but in fact you are lifting the iron from the fabric before moving it.
#10. Reduce Bulk
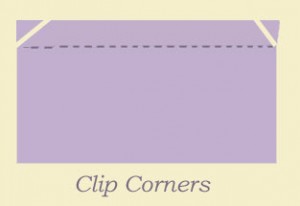
Pattern instructions often instruct you to clip corners and curves, but they ignore the other parts that also need clipping. It’s extremely beneficial to remove as much bulk as possible. So, clip the ends of your seams diagonally across the seam allowance. Clip your corners before turning them. Trim and grade seam allowances. Avoid back-stitching.
If your fabric is bulky, it’s essential to trim and grade your seam allowances. Trim the material while holding your shears at an angle, so that one edge will be shorter than the other. If necessary, trim the shorter edge a second time to ensure the two edges are of unequal length. This will keep the seam allowance from showing on the right side of the garment.
Instead of back-stitching, begin and finish each seam with very small stitches. Go about an inch with the tiniest stitches your machine will produce, and it will keep your seam almost as secure as with back-stitching, but with much less bulk. If you must back-stitch to feel safe, only reverse one or two stitches. This alleviates the bulk caused by three layers of stitching at the ends of every seam. When you’re done, clip threads close to the fabric, leaving none hanging.
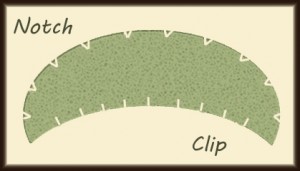
Always clip or notch the seam allowance of any curved edges. This allows the fabric to lie smooth and flat. A notch is a small triangle cut from the fabric, which allows the edge to overlap as it curves, instead of buckling and creating wrinkles. Notch all outer curves, such as the outer edge of a collar. A clip is simply a shallow cut in the fabric, which allows the fabric to spread open and lie flat. Clip all inner curves, such as the inner edge of a neckline.
#11. Finish Your Seams
A garment with finished seams will look a thousand times better than one with raw seams. Seam finishing takes a little extra time, but it’s well worth the effort. It will make your garment look professional and well-made, and it will help prevent the seams from raveling when the garment is worn.
There are several ways of finishing your seams, some more complicated than others. A quick and easy way is to simply use pinking shears to trim your seam allowance, or to zig-zag along the edges. If you’d like something more professional-looking, try French seams, mock-French seams, flat felling, or Hong Kong seams. If you prefer a hand-bound seam, you can hand sew a blanket-stitch or overcast along the raw edges.
Not only will finished seams make your clothes look fantastic, but they will improve the quality of the garment, helping it to last longer.
#12. Hand Sew
The importance of hand sewing is often underestimated by novice sewers. Couture garments contain a great deal of hand sewing, and while it’s not necessary to sew your entire garment by hand, some things simply look better when you take the time to finish them by hand instead of machine.
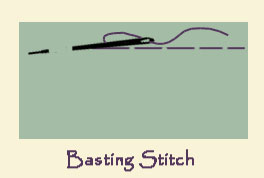
Basting is one such important step. Taking the time to hand sew your layers of fabric together will make your machine sewing more precise. It’s not always necessary, however. Baste curved seams, or tricky seams, or when working with slippery fabric—anywhere that regular pinning isn’t quite enough to hold the fabric secure. Your finished garments will be more accurate, and you’ll have an easier time constructing them. When basting, you needn’t sew small, neat stitches. Use a long running stitch—in and out of the fabric—and the job will go by quickly and easily.
Sometimes you can get better results when installing a zipper if you do it by hand. There is a special stitch for this purpose, called a pick or prick stitch. Basically, you take tiny stitches in the fabric, spaced about half an inch apart. It’s surprisingly secure and nearly invisible.
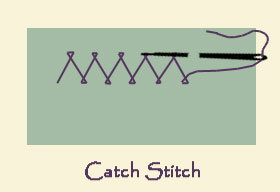
Hemming can often benefit from hand stitching. Use a catch-stitch or a blind hem stitch, making sure that you only catch a few threads on the side that will show. Keep your stitches close together to prevent the wearer from catching a high-heel through the hem.
Bias edging always looks neater when it’s hand sewn. First, use your machine to stitch the bias tape to the edge of your fabric. Fold it over and press the raw edge under. Sew it down using small slip-stitching.
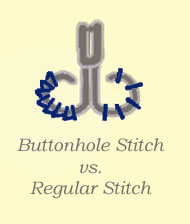
Fasteners, like snaps and hooks, must of course be hand sewn. But take your time to do a proper job of it and your finished garment will look much neater. When sewing buttons, make sure you use the same technique for every button, whether it’s stitching a cross or parallel bars. For hooks and eyes, use a buttonhole or blanket stitch. This looks much more refined than simply looping your thread over the metal edges.
Always hide the tail of your thread between layers, if possible, and do the same when you’ve finished and tied off your thread. No one wants to see loose threads dangling! Keep your stitches small and even, not haphazard and all over the place. The more you practice, the nicer your hand sewing will look—and as a result, the more polished your garments will look.
Conclusion
There are many tricks and techniques you can use to improve your sewing. Practice these techniques, make them a habit, and your finished garments will look their best!
~~*~~
What tips have you discovered that make your sewing look its best? How have your techniques changed since you first began sewing?

Oh my gosh!!! THANK YOU!!!! I have been looking for “charmeuse” fabric (Never knew what it was called) Thank you!
Glad I could help! Charmeuse can be a pain to work with, but if you know what you’re doing, you end up with spectacular results.