Tuesday’s Tips & Tricks: Directional Stitching
There are lots of tricks you can use in making a high-quality garment. Surprisingly, many of these aren’t mentioned in pattern directions or taught in sewing classes—or if they are, their importance is glossed over. One such tip is directional stitching.
Never heard of it? You’re not alone. It’s mentioned in vintage sewing manuals, but sometime during the past few decades, the concept vanished. Today, it’s a method used mostly in couture sewing, but there’s no reason you can’t use it for everyday dressmaking.
So, what is directional stitching? It’s when you deliberately sew in a specific direction, following the grain of the fabric. Doing so reduces distortion and puckering. There’s also directional staystitching, which is important because it helps prevent bias-cut edges from stretching as you handle the garment you’re sewing. Let’s take a look at both techniques.
Directional Stitching
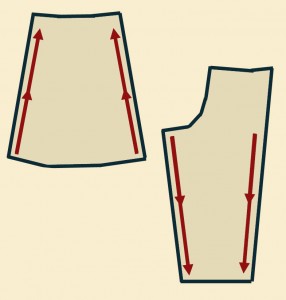
Whenever you sew something that has angled or curved edges, you need to use directional stitching.
Take a look at your pattern piece. If the sides slant diagonally, you want to sew from the widest point toward the narrowest point. With a gored skirt, this means you’re going to start at the hem and stitch toward the waist. With tapered pants, it means you’re going to start at the waist or crotch and stitch toward the hem.
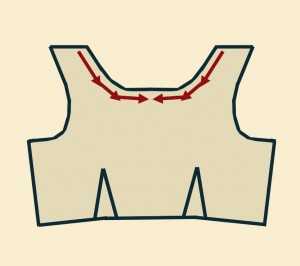
If the edge is curved (such as a neckline), you’re going to stitch from the highest point to the lowest point, which is usually from the outer edge toward the middle. Note: This means you cannot simply sew down the curve and back up the other side. Sewing the entire curve in one pass is quick and easy, but when you follow the curve back up, you’ll be stitching against the grain. This can cause distortion and rippling. Instead, follow the curve down from the top edge, stopping at the lowest point—usually the center of the neckline. Flip the piece over and repeat, sewing from the highest point on the other side and stopping at the lowest point, joining the two seamlines at the center.
Directional Staystiching
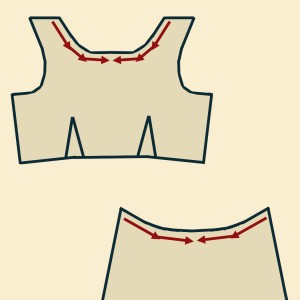
Patterns sometimes tell you to staystitch curved edges, such as necklines, waistlines, and armscyes, but they don’t explain why. Curves are cut on the bias—that is, the grain of the fabric lies diagonally instead of straight—and bias fabric stretches. This means it’s easy to accidentally stretch the edge of your garment as you’re sewing. By staystitching along the curved edge, you’ll stabilize the fabric so it doesn’t pull out of shape. This is a vital step, but one that’s often overlooked.
As with any curved edge, you must staystitch directionally. Start at the highest point and sew toward the lowest.
- Neckline: Start at the shoulder and stitch toward the center front, then flip the piece over and repeat on the other side.
- Curved waistline: Start at the outer edge and follow the curve down to the center front, then flip the piece over and repeat.
- Armscye: Start at the shoulder and stitch down toward the underarm.
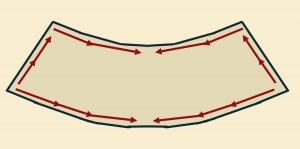
But suppose you’re staystitching a facing, which has numerous curves? Follow the same principles: for the curves, stitch from the highest point to the lowest. For the sides, sew from the widest point to the narrowest. This means you’re not starting at one corner and sewing all the way around. You will have to stop and reposition the facing several times in order to staystitch it properly. Yes, it takes more time. And yes, it can get annoying! But the results are worth it.
The same holds true if you’re basting sew-in interfacing onto a facing, or any shaped piece of fabric. You can’t stitch all the way around in one pass. As I learned the hard way, doing so causes the fabric to shift and stretch, resulting in a warped facing. If the facing is straight, sew each of the edges separately—first the long edges, then the short edges. If it’s curved, follow the rules for directional stitching.
You may be surprised at the difference in quality when you use directional stitching. Why not give it a try the next time you sew something?


Pingback: Vienna Tank Top Sew-Along, Teil 2 - My Little Sewing DreamsMy Little Sewing Dreams
Pingback: Vienna Tank Top Sew-Along, Part 2 - My Little Sewing DreamsMy Little Sewing Dreams
Pingback: Basics: Staystitching | Yesterday's Thimble