Using a Ruffler Foot Attachment ~ Revised

by Lisha Vidler

For those who haven’t yet discovered the wonders of a ruffler foot attachment, I highly recommend you get one. While it looks complicated—and in truth, it is a bit fiddly—once you master its quirks, it’s an amazing tool to have.

The ruffler foot can be used to gather a strip of fabric, or it can be used to gather and sew a ruffle to another piece of fabric at the same time. It can produce plain gathers or small pleats. You can adjust how large each gather or pleat is and how close together they are.

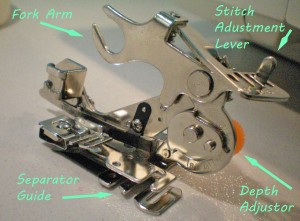
Labeled Guide

Labeled Guide

Attaching Your Foot
It needs to be oiled, so before we begin, dab a tiny bit of oil where the directions indicate, typically at the top gear and where the metal rubs against itself at the side bottom. Blot any excess oil, so you don’t get stains on your good fabric.

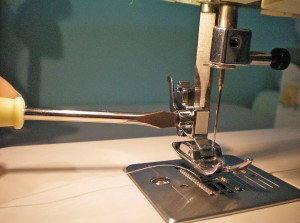
Next, you’ll need to attach the foot to your sewing machine. Unlike most presser feet, this one doesn’t simply snap in place. You’ll have to remove your entire presser foot assembly by unscrewing it.

Unscrewing Presser Foot

Unscrewing the Presser Foot

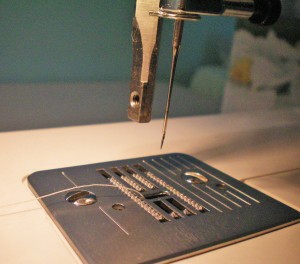
Presser Foot Removed

Presser Foot Removed

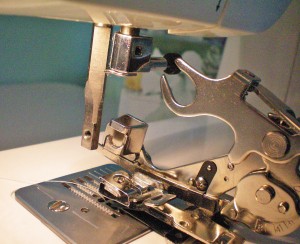
See the curved “fork” on the ruffler foot? That slips over the screw shaft that holds the needle in place. The notched “box” fits over the presser foot shaft. Once it’s in place, put the presser foot screw back in place to hold it secure.

Attaching the Ruffler Foot

Attaching the Ruffler Foot

How Your Foot Works
Basically, the foot works by mechanically pushing a bit of fabric forward, forming a small pleat as it goes under the needle. It can do this rapidly, forming a series of gathers, or it can do it slowly, forming narrow pleats.

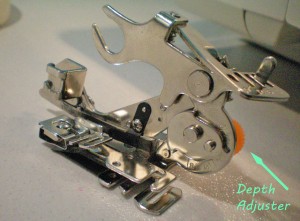
You can determine how deeply these folds are pushed (and therefore whether they resemble gathers or pleats) by using the depth adjuster. This is controlled by a screw. The higher the number, the deeper the pleats will be. When it’s turned to 8, you’ll sew the widest pleats the foot is capable of and when it’s turned to 0, the fabric won’t be pleated at all.

Depth Adjuster

Depth Adjuster

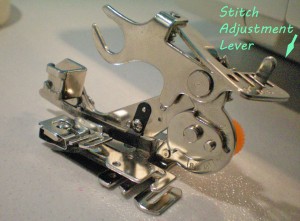
To adjust the fullness, you’ll use the lever at the top, which controls how many stitches get sewn between each pleat. These are numbered, so you can choose between 1, 6, and 12 stitches per pleat. When it’s set to the star symbol, it won’t sew any pleats at all. You can further adjust your fullness by altering your stitch length. Shorter stitches mean a fuller ruffle. It gathers at every stitch, so if your stitches are long, there will be more space between each one.

Stitch Lever

Stitch Adjustment Lever

Tips

  • When you cut your fabric for the ruffle, give yourself at least an inch extra at the beginning. It’s difficult to feed the fabric into the ruffler, so it’s extremely useful to have an extra bit of fabric to grip while you’re working the fabric between the blades. An inch should be plenty, and you can trim it off once the ruffle is complete.
  • Do a test ruffle first, to determine what settings to use. Measure a set length, say 11 inches. 10 inches is an easy number to divide or multiply to find your final length, plus you’ll need an inch to grip. Measure your finished sample ruffle (minus the extra inch) to see how much it’s been gathered. In this way, you can determine how much fabric you’ll need to get the final effect you prefer. For example, if your fabric was 10 inches long, and your finished ruffle is 5 inches, that means you’ve achieved a ratio of 2:1. With those settings, you’ll need twice as much fabric as your finished ruffle.
  • If you only have a certain amount of fabric and need to make sure it’s gathered to size, you’ll have to experiment with the settings and make several test ruffles until you find a combination that provides the ruffle length you need. This can be extremely tricky.
  • You’ll want to adjust your machine’s tension settings and stitch length, as well as adjusting the attachment foot itself. Play around with it to find the best combination for your fabric.
  • Don’t forget to put your presser foot down before you begin! This may sound obvious, but once the ruffler foot is attached, it barely moves when you shift the presser foot up and down. Because of this, it’s very easy to forget and try to sew with the presser foot up, but this will cause problems. If you’re having difficulty getting it to gather—check your presser foot lever to make sure it’s down.
  • It takes time to get used to how the ruffler works. Don’t give up if you have difficulty! You’ll soon figure it out and be creating yards and yards of delicious ruffles.

~~*~~

Have you used a ruffler attachment foot? Did you find it more of a help or a hindrance to creating ruffles?

88 Responses to Using a Ruffler Foot Attachment ~ Revised

  1. Mollie Mather says:

    Thank you so much. Just received my ruffler ( a vintage singer slant) and found your explanations far better than the vintage Kenmore book I found. I discovered your wonderful site on Gertie’s blog.
    Mollie

  2. Barbara says:

    Just got thru reading your ruffler article. I was looking for explanation of how to figure yardage for to make a ruffle. Thank you so much for your article.
    I bought a ruffler over a year ago and was afraid to use it. Now I have been sewing over 35 years so guess that seems silly but I figured out how to use it the other day and Why, oh Why did I wait so long to get and use one. That little piece of metal can make ruffles all day. Very amazing. So if anyone is like me and hasn’t ever used one, I request that you purchase one for you machine. They are not that expensive and the ruffles you can make with it.

    Barbara

    • Lisha Vidler says:

      Thank you for commenting–I’m glad you found my article useful! Just like you, I was amazed when I finally got my ruffler foot, and wished I’d bought one years ago. Now I’m slowly branching out and trying other specialty feet, like the pintuck foot. They make some amazing accessories for the sewing machine these days, that’s for sure. Thanks again for your comment!

  3. For years I referred to the ruffler that came with my Mom’s (and now mine) featherweight as a “medieval torture device!” Recently, though, I started playing around with it and now I just love it! The ruffler does take some practice and getting used to, so plan to just ruffle a lot of scrap fabric. I did find out, however, that Mom’s ruffler (which I assume came with her Singer 221) doesn’t quite fit that machine. The screw that holds the pressure foot on doesn’t line up properly with the hole with the ruffler in place. However, that ruffler fits quite well on my other low shank machines. Anyway, I love my ruffler and am teaching a ‘how-to’ on it at my next ASG meeting!

    Happy Stitching!

    Robbie

    • Lisha Vidler says:

      The rufflers do look like torture devices, don’t they? LOL! And they definitely take lots of practice. But it’s so worth it! I just love mine, now that I know how to use it. Thanks for commenting!

  4. Leslie says:

    I’m new to using a sewing machine, and I’m teaching myself. My first project is a ruffled shower curtain! So, I have been practicing with my ruffler lately. My only question is, how do you secure the thread at the beginning and end of the fabric? I know when you are just doing a regular stitch you do a backstitch at both ends so it can’t unravel, but I don’t know how that would work with a ruffler attachment?backwards!! Thank you so much in advance for the help!

    • Lisha Vidler says:

      I’ve never found a need to secure the thread at the beginning of the ruffle. Usually you fold the raw edges under and hem them, or stitch them into another seam, or something like that, which eliminates the need for securing the beginning and end of the ruffle. You can’t really backstitch with the ruffler, so if you really feel the need to secure your thread, leave a long tail of thread, then pull both to the same side and them into a knot.

    • Tammy Mahramas says:

      You can also reduce the stitch length to 0 or 1 for a few stitches at the beginning and end.

  5. Laura Martin says:

    My ruffler will work on my test material – heavyweight curtain material – made perfect pleats – but when I put the curtain in – the ruffler pushes the material & does the sewing but it does not make the pleat – just straight stitching. Any thoughts? Thank you.

    • Lisha Vidler says:

      It could be that you need different tension settings, because your fabric is a different weight. I’ve encountered this problem myself. You have to adjust all the settings separately depending on your fabric. Try loosening or tightening the tension and see if that helps. If not, try anything else that is adjustable, tweak it until you find a combination of settings that work. I hope you’re able to get it to work!

  6. Lynette says:

    I just purchased a ruffler and can’t figure out what I’m doing wrong. The first few stitches go ok, but after that I end up with a tangled mess of thread. Any suggestions?

    • Lisha Vidler says:

      It could be that your tension needs adjusting. It has to be just perfect for the ruffles to work. Depending on whether the loops are on the upper or lower side of your fabric, you’ll need to tighten or loosen your tension. (Check your sewing machine’s manual for details.) Sometimes you need to loosen or tighten it quite a bit, a lot more than you might imagine. If that doesn’t work, double check to make sure you’ve put your presser foot down. It can really mess things up if you forget and try to sew without lowering it. I hope you’re able to get it working! It’s a very temperamental device, but well worth the effort it takes to master.

  7. Jill Hannah says:

    I think it’s probably that you are trying to ruffle material that is too heavy for the machine to handle. Heavier weight materials work great for pleating, but not for the densely packed ruffles. Stick to lighter weight materials for the tight gathering, which produce more full ruffles…try changing the fold adjusting lever at the top to “1” for smaller, more packed folds, if you haven’t already. The “6” and “12” settings are for pleating and the star setting is for straight stitching. Hope that helps…

  8. Madeline says:

    Hi- I just bought a Ruffler Presser Foot Feet for my Brother Sewing Machine. When I try to use it, the stitch at the bottom comes too loose- like big loops. Any advice? Thanks

    • Lisha Vidler says:

      When the thread loops, it typically means your tension is off. Try adjusting the tension a little at a time, both looser and tighter, until the loops disappear. Practice sewing on some scrap fabric, so you don’t ruin your good fabric with all the experimenting. I hope you’re able to get your ruffling foot working!

  9. Virginia Bullers says:

    Dear Lisha: I have been using the ruffler for a few years and have generally been happy with it. However, lately the needle seems to get loosened and fall out while I am ruffling. Is it ever necessary to tighten the parts of a ruffler because it seems the ruffler is clacking a lot as I am sewing and I have never seen anyone having the problem of parts coming loose on the ruffler and/or the machine as a result of the using the ruffler. Thank you for any help you can give me. Virginia

    • Lisha Vidler says:

      I really don’t know if the ruffler itself needs to be tightened. You could check and see if yours has any screws that could be adjusted. If not, you may need to tighten the screw holding your needle in place. Perhaps the vibrations from using the ruffler foot are jarring your needle loose. You might try a new ruffler foot and see if the problem persists. Maybe yours has simply worn out. I wish I could be of more help, but I honestly don’t know what the problem could be!

      • Hln Fitch says:

        My ruffler is brand new and the needle drops out after I sew about 6inches of ruffles. It is getting very frustrating to say the least.

        • Lisha Vidler says:

          I’ve heard of this happening, although it really shouldn’t. It may be that your needle was already loose and that’s why it fell out. Try tightening it with a screwdriver, instead of by hand, and see if that makes a difference. Don’t give up on the ruffler! It’s a great tool, once you get past its finicky manner.

  10. Melisa says:

    I just purchased my ruffler foot and love it but after a bit of use, the needle starts hitting something and it makes a clanking noise and actually gets stuck. When I take the foot off and put it back on it is fine. I have it tightly attached. Do you have any ideas? I love ruffles!

    • Lisha Vidler says:

      I’m not sure what’s happening with your ruffler. If the needle is hitting something, that could be dangerous, as the needle could shatter, sending bits of sharp metal everywhere. Can you tell where it’s hitting? Is it hitting part of the ruffler itself? Or could it be hitting your bobbin case, inside your machine? Perhaps something about the ruffler is throwing your machine’s timing off, causing the needle to hit the bobbin case. I’m really sorry I don’t have a solution for you. Just be careful–you don’t want to break a needle and end up getting hit with a shard of metal!

    • Sky says:

      Melisa, I know this is a few years old, but did you ever fix this problem of your needle hitting the ruffler after a little while? I just got a ruffler and it is doing the same thing.

  11. Amy says:

    I have a basic Singer machine, and just bought a ruffler foot at my local shop – it’s a generic one, but seems to fit my machine just fine…only problem is that my machine jams up when the ruffler tries to take the first pleat. It’s as though my needle thumbscrew is getting torqued to an angle that makes it impossible for the hook arm to move freely, and BAM, it just locks right up and will go no farther until I angle it back into place…and this makes ruffling about as efficient as gathering by hand!

    Any idea what might be going wrong? I am going to try oiling the foot to see if that helps, but it’s really seeming to be my machine that’s wonky and I can’t tighten the needle thumbscrew any tighter (seriously, it’s like Superman has tightened that thing, it literally will not go another millimeter) to avoid it turning on me.

    • Lisha Vidler says:

      It doesn’t have the problem except when you use the ruffler foot? You might try loosening the screw a little and see if that makes a difference. Sometimes if you tighten things too tightly, it will shift them out of alignment. Other than that, I really don’t know what the problem could be. You might try taking the machine and ruffler foot in to the repair shop and demonstrate the problem to them, perhaps they can figure out what’s going wrong. Sorry! I wish I could be of more help.

  12. marylou says:

    I adore ruffles ergo I too purchased a ruffler for my machine…my problem is my needle comes OUT when I try to use the ruffler….the first few stitches are fine and the ruffler works well but after an inch or so the needle comes out….help;-(
    Thanks much
    **smiles**

    • Lisha Vidler says:

      I can’t imagine what could be making the needle fall out! The only thing I can suggest is to make sure your needle is tightened before you use the ruffler. Maybe check and see if the ruffler is pressing against the needle somehow, causing it to loosen? I really don’t know, I’m sorry!

  13. ARLENE PETERSON says:

    I need to put a ruffle around a pillow sham. I have treated the fabric strip as you would for binding on a quilt (mitred the lengths together and folded the strip in half lengthwise) I would like to make a complete circle with this and pleat it exactly to the length that I need without having raw edges at the end. Is this possible and if I use a 6 setting would twice the length be correct?

    • Lisha Vidler says:

      For your first question, you’ll need to leave a little extra fabric at the ends. Turn the raw ends under and stitch them by hand to finish the ruffle.

      For your second question, as far as I know, there is no way of predicting a precise 2:1 ratio of ruffles. There’s just too many variables, such as stitch length, the thickness of your fabric, the settings on your ruffler, and so forth. Do you have any scraps of the same fabric? Try making a practice ruffle to determine how much fabric you’ll need to fit the pillow sham. Make it 11 inches long, with one inch used to maneuver the fabric into the ruffler and hold onto when you begin. When you’re done ruffling it, measure and see how long the finished ruffle is. Remember to not measure that extra inch. If you can get the length down to five inches, you’ll know you’ve achieved a 2:1 ratio. Write the precise settings down and use the exact same settings for your pillow sham.

      I hope this helps! Thanks for your questions and I hope your pillow sham turns out great.

  14. Terri says:

    I bought a foot for my machine. I can’t figure out how to thread the fabric through–or something. It won’t ruffle, just run regular stitches. I have a Singer and I’ve looked online, but can’t find any specific instructions.

    • Lisha Vidler says:

      It can be difficult to get the fabric under the metal blade. Give yourself at least an extra inch of fabric to hold onto as you work it under the blade. If you think the fabric is threaded properly and it still won’t gather, check the settings. If the top adjusting lever is set to the star symbol, it will only stitch straight and will not form pleats or gathers. This permits you to create clusters of ruffles with flat space in-between. Move it to a numbered slot and try again. Unfortunately, the ruffler foot isn’t a “stitch and go” kind of device. You really have to experiment with it, changing the levers and dials around to see what works best for the fabric you’re using. I hope you can figure out how to make it work!

  15. Cynthia Reed says:

    Hello, I was trying to figure out how I needed to set the ruffles when attaching another piece of fabric (I am making tierd skirts with lace and “bling” for children, and organdy roses for barrettes and hair bands). I too went nuts with frustration on my new ruffler. I found a snap on one and was going crazy because it didn’t seem to sit flat on the needle plate.

    This was so much help, thanks for posting it. Now I am going in to play some more and see if I can’t figure out how to do the skirt issue. I wish there was a way to post some photos on your site.

    Terri, I also had trouble with your issue until I realized as I threaded the ribbon in wrong and it doesn’t get caught by the piece that pushes the fabric through the ruffler. Just be patient, you will get the hang of it.

    • Lisha Vidler says:

      Hi Cynthia, thanks for commenting! I’m glad you found my article useful. Rufflers are such fantastic devices, but they sure are difficult to use, aren’t they? I hope you get yours figured out.

  16. Thank you so very much!!! I’ve had a ruffler for many years and could never get it to work! With your directions and examples I have finally been able to use it.
    It is wonderful and so much faster than ruffling by hand!
    Wishing you all the best, Maki

  17. Valerie Kulp says:

    My ruffler is on #6. It skips every 4th ruffle. What could be wrong? I’m new at using one. Do you ever adjust the front screw? I’m afraid of messing with it. Thanks.

    • Lisha Vidler says:

      The screw you mentioned allows you to adjust the depth of each pleat. When it’s set to 0, it will stitch with no fabric being tucked. A setting of 8 will give you the deepest tucks, which look like pleats. The numbers in between will give you smaller pleats; the smaller they are, the more they look like gathers. I can’t think of any reason the ruffler would skip every fourth tuck, that seems strange. Try adjusting your tension and see if that makes a difference. Definitely do a few practice ruffles and play around with the settings. Experimentation is the best way to learn what your ruffler foot can and cannot do. I hope you’re able to get yours working!

  18. Julie says:

    I am having a couple of odd issues with the generic ruffler. Needles falling out. Alignment warnings. Bobbin thread bunching. Here is what I did. Set up the ruffler and when you do make sure that everything is tight (needle and the connection to the shank). Sew for a foot. Stop. Check to make sure everything is tight. If it starts making a noise. Stop. Raise the presser foot. Wiggle the foot, tighten. Lower the presser foot and start again (do not take the fabric out.) Completely forgot that you have to oil this beast. Thanks for the write up and happy sewing!

  19. Hi Lisha, so pleased I found your website through google. I am going to purchase a ruffler but wanted to do a bit of research first. Is a universal snap on ruffler foot better or just as good as one that you screw on? I have a Brother Innovis-600. Also, could you please tell me, when you want to ruffle and attach at the same time is the strip of material to be ruffled placed on top or underneath the main piece of fabric? I want to make ruffled nappy covers for my granddaughters using three rows of ruffles and if you have to attach the ruffle to the underside of the garment how would you keep it in the right spot if you can’t see it. If you get what I mean? Look forward to your reply. Thanks, Cynthia from sunny Queensland, Australia. -:)

    • Lisha Vidler says:

      Hi Cynthia! I’ve never used a snap-on ruffler foot, so I can’t speak for their quality or ease of use. Mine is the screw-on variety, and to be honest, I didn’t know you could buy a version that snaps in place. For your second question, when you sew a ruffle to the fabric, the flat fabric goes underneath, the ruffle on top. The upper layer is snagged by the ruffler, pushed under every few stitches to form pleats. To keep the ruffle in the right spot, you normally just line the edges up and then ruffle. Since you’re making multiple rows, you might have to experiment with marking a line for the edge of the ruffle to follow. Or you could ruffle the fabric by itself, then attach it to your nappy covers afterward. This might be the easiest way, since you probably don’t want the raw edges of the ruffles to show. You would sew the ruffle on upside down, facing the wrong way, then flip it down, hiding the stitching line and the raw edges. If you press it, it should stay put, but if not, you can sew a line near the folded edge to secure it and keep it flat. I hope I’ve answered your questions!

  20. jan says:

    I have used a ruffler on my singer sewing machine for years. I had to buy a new one as the old ruffler teeth broke. Now my thread keeps breaking with the new ruffler. Any ideas what I’m doing wrong???????????????

    • Lisha Vidler says:

      The first thing that comes to mind when you say your thread is breaking: tension. Check your tension settings and be sure they’re not too high. Also, make certain you’re using a high quality thread. Cheap thread is, well, cheap. It will fray and break easily, as well as leaving fuzz behind that can clog your sewing machine. I hope you’re able to solve the problem and get back to sewing ruffles!

  21. Kelly says:

    I am new to sewing and teaching myself. I purchased a generic ruffler for my Brother SE 400. My understanding is that this attachment is used with a straight stitch. My problem is that my straight stitches are either too far to the left or right to use the ruffler without hitting the metal. I have read my machine’s manual and I only see adjustments to move the needle to the left and right. Any ideas?

    • Lisha Vidler says:

      A ruffler should be used with a straight stitch, yes. Unfortunately, some machines don’t have the ability to shift the needle wherever you need it, they only have preset positions: Left * Center * Right. You might take it into the shop, demonstrate what it’s doing, and see if they have any suggestions. It could be that your needle position is stuck. I have one student whose machine can’t sew zippers because the needle won’t move left or right. Perhaps something like that is going on with your machine? Without more information, it’s hard to say, but I do hope you’re able to get it sorted!

  22. Shelby says:

    For those of you that are losing your needles, falling out, mine will do that every once in a while also, I believe the vibration is loosing it, stop every once in a while and just make sure its still tight, thats what I do. Mine works great, have not had to ever adjust my tension or stitch length and I just leave it in the middle as if straight stitching, Hope this helps. Thank you for a great tutorial!

    • Hln Fitch says:

      I’ll give it a go although it seems a bit much to have to tighten the needle every 6 inches or so. Spose it’s better than throwing the darn thing in the bin.

    • Zura says:

      I’m having this problem right this moment arrrggghh! The needle came out every few inches of ruffleing :'(

      • Lisha Vidler says:

        That sounds really frustrating! I don’t know why it’s doing that, to be honest, so all I can suggest is tightening the needle screw with a screwdriver, rather than your fingers. That might help a little.

  23. Sasha Robertson says:

    I have a brother se400 and just purchased a ruffler foot and am having the same issue. Have you been able to fix it?

  24. Susie says:

    I have had a ruffler for a couple of years, never could get it to work right. I didn’t know it was supposed to be oiled. Tonight I gave it a good oiling and got me some scrap fabric and it worked like a charm. Thank you so much.

    • Lisha Vidler says:

      Glad I could help! It’s surprising how many sewing tools require oiling. My pinking shears, for instance, need oiling on occasion to work properly.

      • Sandy says:

        Where or how do you oil it?

        • Lisha Vidler says:

          If your ruffler foot came with directions, it should say in there exactly where to oil it. My directions have gone missing, but as I recall, you want to place a drop of sewing machine oil down behind the rotating gear on the side, and also between the two thin metal plates that rub against each other to push the fabric forward. Make sure you blot the oil away before you sew anything, otherwise you may end up with grease stains on your fabric.

  25. Paula Morris says:

    I have a singer low shank pleater. The setting for skipping 6 stitches pleats every stitch, same as 12 setting. What am I doing wrong?

  26. Sandy says:

    I have the Brother SE400 and a generic ruffler. I want to make a double sided ruffle. I hold the material tight and try to keep it lined up perfectly but it’s like the ruffler pulls the top fabric and ruffles it but does not pull as much of the bottom fabric so ruffle begins to twist and fabric is uneven. To ruffle just one piece of Satin it works, just not folded over material…Help!!

  27. debra merrill says:

    I am new to sewing and bought the ruffler. Many hours later, it gathers beautifully but have yet to get it to stitch. I have a Kenmore 385.16567 with the pink dials and 17 stitches with no computer. Any help out there?
    Thanks

    • Lisha Vidler says:

      I’m not sure how it could gather the fabric if it’s not stitching it, honestly. In my article, there’s a checklist of things to make sure of when using a ruffler foot–have you tried everything? (e.g.: Making sure the presser foot is down, adjusting the thread tension, etc.) If so, I really don’t know what to tell you. Wish I could be of more help!

  28. Jonette Evans says:

    i have a question i just a ruffler athering foot for my brother sc9500 sewing machine i need to find out if i can use this foot to smock with and if so where can i watch a video to help me with it

    • Lisha Vidler says:

      I don’t know much about smocking, so I tried Googling the subject of using a ruffler foot to smock. Unfortunately, I couldn’t find anything about it. To be honest, I don’t believe it’s possible. The reason being, a ruffler foot pleats the fabric as you sew, creating a ruffle. Once you’ve gathered one row, it would be nearly impossible to gather a second row beside the first. The fabric would be all scrunched up, so anything you sewed would be very messy and uneven. You could always try it and see, though!

  29. vickie says:

    I love your instructions for the foot ruffle. My problem is the screw shaft is not big enough, or I think that is the problem. the ruffle swings over to the left and is crooked from the shaft. what can I do?

    • Lisha Vidler says:

      Well, either it’s the wrong kind of ruffler foot for your machine, or you aren’t screwing it on tight enough. Generally, the part of the ruffler that fits over the shank is a little loose, so it can snap on easily. Try tightening the screw and see if that helps. If not, you may have the wrong kind for your sewing machine. I hope you’re able to solve the problem!

  30. Annie says:

    My ruffle starts out well and then it hits the bobbin and jams up badly. This happens time after time. I change the bobbin, put in a perfectly wound one. It happens constantly. I feel like I wasted $25.00 on my ruffle. My machine is a Kenmore made by Janome. Thanks

  31. Pat says:

    I have a ruffler foot for the Brother. I would like to make ruffles on nylon/spandex fabric and then attach it to the same fabric. What do I need to do to make the ruffle “stretch”? Can I use elastic thread?? The item I’m making is a swim top and I need both the bodice of the top and the ruffle to be able to stretch.

    Thanks :)

    • Lisha Vidler says:

      What an interesting question! For your situation, I would probably not use a ruffler foot, because the ruffles it sews on are always going to be with a straight stitch, which means they won’t stretch. I’ve never tried a ruffler foot with elastic thread, so I have no idea how that would work. It seems like the elastic thread would throw everything off, so I wouldn’t recommend it unless you’re very adventurous and willing to try a few samples to see how it works.

      I’ve never needed to sew a stretchy ruffle, so you’ve thrown me a curve ball! Just off the top of my head, I can think of two possibilities. 1: Depending on the design of the pattern you’re using, if the top is very wide and gathers to fit with elastic, you might be able to cut a ruffle that’s the same length as the top, attach it (flat), and then insert elastic into a channel hidden where the ruffle meets the top. The elastic would gather the both the top and the ruffle and allow them to stretch. This would probably look more like a flounce than a ruffle, though–it wouldn’t be very full. 2: If the ruffle needs to be fuller than the top, you might gather it by zigzagging over elastic thread. Lay the elastic thread within the seam allowance at the top of the ruffle and zigzag over it, taking care not to catch the elastic in the stitching. Secure the tails at one end by knotting them together, then pull the other end until the fabric is gathered to the length you want. (Google “zigzag gathering” for more info.) This should allow you to have a stretchy ruffle.

      Those are the only two suggestions I can think of right now. I hope one of them works for you! Feel free to send me a private message (via the “Contact Me” page) if you need more help.

      • Pat says:

        Thanks so much for your quick response!!

        The ruffle on the suit will sit on top of the bodice at the hem. I’m thinking your last idea of the zigzag gathering over the elastic might work best and I’ll give it a try. I just bought the ruffler foot thinking it was my answer :( Guess I have it for other ruffles now!! lol

        If I remember, I’ll send you a message with my success story 😉

        Thanks again!! Pat

  32. gi says:

    I bought a ultimate ruffler foot for Janome 5812.

    I am unable to change the pleat length. It sews the same length whatever adjustment i make.

    http://cdn2.bigcommerce.com/server3800/b8620/products/7403/images/15019/Ultimate_Ruffler2__55969.1342716731.1280.1280.jpg?c=2

    Please advice

  33. Dolores Johnson says:

    I have a Singer Slant Ruffler for my Slant needle Singer 401A machine. The little piece of metal that catches on to the teeth and controls the size and/or spacing of the ruffle has broken off. I think just from using it so much. It looks like it is riveted on. Can it be repaired with a new metal piece and can it be screwed on instead of riveted? Is that little metal piece available or will I have to get a new ruffler? Thanks for the information.

  34. Michelle says:

    I have a Brother LS 2125. I have recently bought a ruffler foot for it. My problem is that when I use ribbon my needle stops and the ruffler jams up on like every stitch. I have used cotton fabric and all is great, but will not let me ruffle the ribbon, I’ve tried different settings on the ruffler, tried satin ribbon, gross grain….. can someone please help! What am I doing wrong?

  35. Pingback: Basic Fabric Manipulation – Part I – Your Ward

  36. Pingback: A Plethora of Presser Feet – Your Ward

  37. Pingback: Basic Fabric Manipulation – Part I | Foundations Revealed

  38. Pingback: Basic Fabric Manipulation – Part II | Foundations Revealed

  39. Pingback: A Plethora of Presser Feet | Foundations Revealed

  40. Kat says:

    I JUST received a ruffler in the mail (ordered it for $5 from Wish), and I think the fork arm is either bent or jammed. It is all the way below the fabric feed. Does anyone know a way to fix it, or did I just get what I paid for? The foot looks exactly like the one pictured in all other respects; judging from the boxing, I suspect that shipping is to blame for the state of the arm.

  41. Preethi says:

    Hi. You article describes in detail. I have trouble feeding my fabric in between the blades. I slightly lift the blades with a screw driver so I could place the fabric. It’s gonna break someday. Can you please help me?

  42. Ann says:

    I got ruffler attachment and it will not work in the #6 position. Does anyone have a suggestion?

  43. Ceecee says:

    Hi there… What is best way to get nice seams with ruffler foot? I get a lot of birdnesting on underside, both threads visible on both sides of test fabric, and twisted thread tails when i remove test fabric. So i email to ask since your website explained well how to attach ruffler foot. Also how do I oil ruffler foot? Thanks Ceecee

    • Lisha Vidler says:

      It could be that your tension is off. Sometimes you need to play around with the tension to get it right. As for oiling, just put a drop of sewing machine oil at the places where metal rubs against metal when the ruffler foot is in use. The instructions that came with your foot should show this. Do a test run after oiling so the oil can get into the right places, then use a tissue or scrap of fabric to wipe away any excess oil.

  44. Kathleen M Hollis says:

    Is there a way to adjust the ruffle foot for thicker fabric? I’m trying to ruffle a thicker collar for a costume.

Leave a Reply to Lisha Vidler Cancel reply

Your email address will not be published. Required fields are marked *