A Sewing Diary
by Lisha Vidler
(Click on any illustration to view the full-sized image.)
Part II
This is the conclusion of the story begun in Part I of this two-part article: the story of how I made a replica of the “Wishing” gown from Andrew Lloyd Webber’s The Phantom of the Opera, and what happened when I wore it to see the show.
June 18, 2006—Frantic Finishing
If you recall, we had to leave for St. Louis on Friday morning with the dress unfinished. It was, in fact, in pieces. Still, hope reigns eternal, and I was quite determined to wear this dress to the show.
As we drove, I managed to sew the appliqués on half of the collar, and finished the other half at the hotel.
Fortunately, the sweet young seamstress who had volunteered to make my corset, by a happy coincidence, lived in St. Louis. (For privacy’s sake, we’ll call her Em.) She kindly offered to meet us at the hotel to help finish the dress. After a brief rest, necessary to recover from the unbelievable heat and humidity, all three of us began working feverishly to finish the gown in time for the 7 p.m. show.
We’d hardly made any progress at all, when one of us noticed the time, which was considerably later than we’d thought. At that point all attempts at sewing had to stop so that my mother and I could simply get to the theater on time. I was not able to wear my costume, but we had a fantastic time nonetheless.
Saturday morning, we got up and began sewing again, hoping to finish the dress in time for the matinée. Em came over to help and we made good progress . . . until my sewing machine broke. I made a few attempts to fix it and when they did not work, we frantically packed everything up, checked out of the hotel, and drove to Em’s house to use her sewing machine. We worked as quickly as we could, but it soon became clear that the dress would not be finished in time. Still, I got dressed and wore what there was of it.
What Was Done
My undergarments were complete, save for the top petticoat, which had to be pinned shut. The skirt was finished, and the overskirt was mostly done. We pinned the overskirt on, and Em folded and tacked the drapes into the right position. The apron had a pleated ruffle, but it lacked any other trimming. The waterfall’s folds were hand stitched into place and it was attached to the skirt with pins. It, too, lacked embellishment. The sleeves had nothing but a plain navy cuff, perilously basted in place, with no ruffles, lace, or ornamentation; the sleeves were attached to the bodice so hastily that the gathers were all to the rear of the shoulder! (Thankfully, I didn’t notice until afterwards.) The bodice collar did have the floral appliqués done, which made it look a thousand times better than it would have otherwise, but it lacked buttons, or indeed, closures of any kind.
Already late, we ran for the car. I yanked the curlers from my hairpiece as my mother drove, pleased that it had turned out at least somewhat curly. As we sped down the highway toward the theater, Em leaned over and stitched my bodice shut.
To the Show, In Costume—The Bad Experience
Just as we got out of the car, it began to storm. Not a delightful spring shower, but something akin to a tropical depression. First came the wind. It blew so hard that our umbrella flipped inside out within seconds—and then broke! I grabbed onto my hairpiece to prevent it from blowing away. As we hurried toward the theater, the wind whipped my train so hard that the stitches broke and all the carefully draped folds were let loose.
Just as we crossed the street, the heavens opened and it began to pour. I ran, clutching my skirts up off the ground, trying to get to the shelter of the lobby. I burst through the doors, out of breath, my hair falling in wet tangles around my face, my dress soaked through, and my train dragging behind, broken and wet. The security guard glanced at me, recognized the dress, shook his head in sympathy, and said, “That’s too bad. . . .”
Worse yet, our tickets had blown away in the storm. Fortunately, the box office was able to confirm my credit card number and gave us a pass to be seated. The usher sat us in the dark.
To add to the adventure (as if all this was not enough), I began having heart trouble during the show. It got bad enough that I blacked out a few times, though I didn’t realize at first what was happening. When we left, I got so out of breath and dizzy going down the stairs that we had to stop several times so I could rest. For this reason, and because of the storm raging outside, we were unable to visit the stage door as we’d planned.
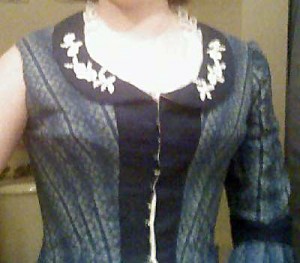
The entire time I wore the dress, I did not see myself in a mirror. I caught a glimpse of myself in the side of a building as I ran through the pouring rain, and the silhouette looked lovely, but I wasn’t able to see any detail. It’s for the best, considering the damage done by the wind and rain. Once I finally saw the photos of the event, I was horrified! Not only was my dress absurdly plain, but the bodice hung in wrinkles, caused by a combination of the water damage and the fact that it hadn’t been fitted properly.
I resolved then and there that I would wear the dress again to see The Phantom of the Opera, and it would be complete! I had my chance the following year.
Update—October, 2007
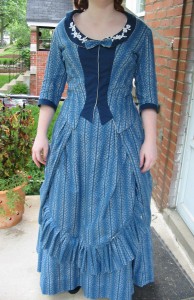
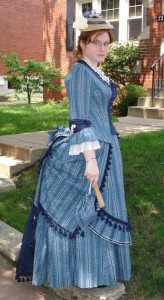
Two years and four months after I first began this costume, I finished it. It took hours upon hours of careful planning, innumerable revisions, and more hand sewing than I can account for. It was both a nightmare and a dream, and yet I don’t regret a moment of it.
Bodice
My first task, upon recovering from the trip to St. Louis, was to fit the bodice properly. It hung on me, wrinkled and ill-fitting, when it was supposed to fit both smoothly and snugly, like a glove. I took the shoulder seams up, as well as the center back seam. After some adjustment, I got the bodice to fit the way it ought, however I had some trouble with the front closure.
As you can see above, the hooks gaped terribly, causing wrinkling along the center front. The lining showed, and the edges of the hooks showed as well. In short, it looked terrible. After inquiring at the Truly Victorian message board, I learned that the problem lie with the fact that my hooks were only sewn to the lining, and not through all the layers of the bodice. My solution would be to either disassemble the bodice and resew all the hooks through the lining and interlining, leaving the outer layer free, or to simply remove them and resew them through all layers. The latter was much easier, but would leave visible thread bars on the bodice, and I didn’t have enough buttons to cover all of them.
I chose to remake the front vest panel. Unfortunately, in an effort to get the vest points sharp and defined, I cut the bottom pieces too narrow. As a result, the bodice doesn’t have a graceful V notch at the hips, but separates with a forced, severe angle. I didn’t realize this until too late, but if I ever make any further changes to the bodice, I will correct this.
Embellishment
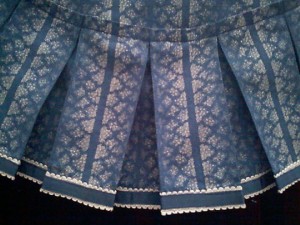
After remaking the bodice, I began working on the many embellishments. First, I added two layers of trim to the pleated ruffle that edged the front apron. I overlapped a piece of ivory lace with a navy ribbon and sewed this to the edge, and then pressed it to match the folds of the pleats.
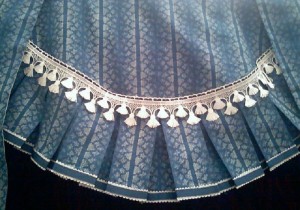
Next, I added an ivory fringe that I’d bought at WalMart. In the end, I removed this fringe, because it was too flat and one-dimensional. It looked cheap.
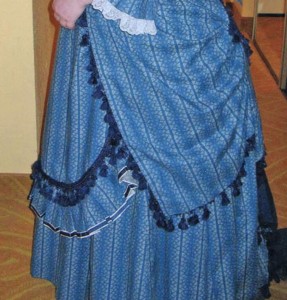
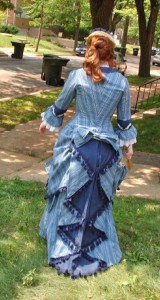
In the end, I found a navy fringe that went well with the blue fabric. I added this to the front apron, the edges of both the side drapes, and the waterfall train.
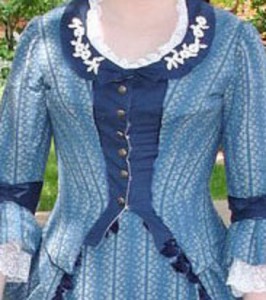
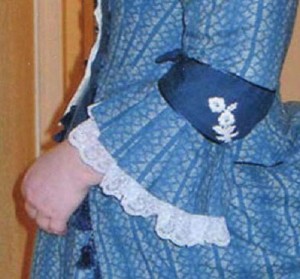
I created a wide navy cuff for the sleeves, which tapered in the front. To the back I added floral appliques like the ones on the collar, and to the front I added a small bow. Beneath this, I added a pleated ruffle of the striped fabric. Under it all, a deeply gathered ruffle of white embroidered lace. As a final touch, I hand-stitched navy satin cord to the edges of the cuff.
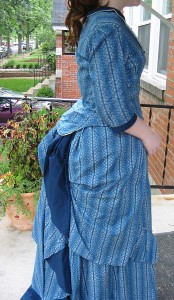
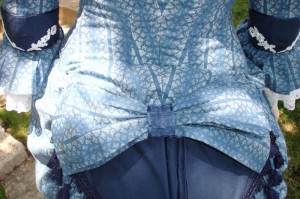
For the bodice, I added a large bow to the rear, over the bustle. Unfortunately, the bodice pattern I chose was not meant to fit over a bustle and I didn’t realize the effect this would cause on the final dress. As you can see, the rear of the bodice folds upward, fitting poorly over the bustle skirt. (This is evidenced by the jagged break in the V-stripes.)
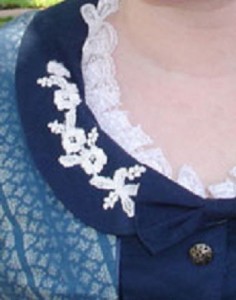
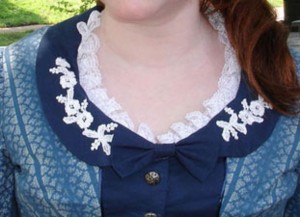
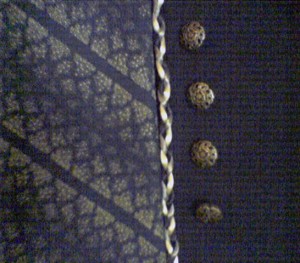
Next, I finished the collar and neckline. I used the double-scalloped version of the lace, folded it in half lengthwise, pleated it, and stitched it down inside the collar. I tweaked the appliques a little, and added a bow to the center front. I also added a row of pewter buttons down the vest front.
The original version has a braided cord that edges the vest and collar, but I experimented with this and didn’t like what it looked like. In the end, I chose a single strand of navy satin rat-tail cord and stitched it along the edges of the bodice and down the sides of the vest.
To the Show, In Costume—The Good Experience
At long last, I finished the gown. I had tickets to see the show in Birmingham, Alabama, but first I took it on a trial run in St. Louis, again, for an afternoon’s outing with Em. (For a full account of this experience and what it taught me, please see the article: The Death of Chivalry: Experiences While Wearing Victorian Costume)
Two months later, near the end of October, my mother and I attended the show in Birmingham. To my surprise, the first three rows of seating had been removed to make room for the orchestra pit—which meant our fourth row seats were actually front row!
It was an indescribable experience. I was thrilled to see the actual costumes from less than six feet away, and I learned a great deal about how they fit, as the actors moved about the stage. I did have a brief moment of fright during the graveyard scene, knowing that at the climax, flames would shoot forth from the edge of the stage. I panicked, sure that some stray sparks would land on my dress, setting me ablaze. They didn’t—thank goodness—but even my wildest imagination couldn’t have predicted what happened soon after.
All during the Masquerade sequence, one of the dancers kept flitting close to the edge of the stage. She made eye contact with me several times, grinning madly. I later found out that all of the ballerinas had seen me sitting in the front row, wearing my gown, and had whispered about me backstage.
When the show concluded, however, is when I received the shock of a lifetime. John Cudia (the Phantom) came out for his curtain call to a well-deserved standing ovation. He took his bow, and then gestured to the conductor, giving credit to the orchestra for the breathtaking score. And then he turned and pointed off to the side . . . in my direction. It took me a long moment to realize that there was nobody standing between me and the Phantom. He was, in fact, gesturing at me!
Afterwards, we made a beeline for the stage door and stood there in the freezing cold for at least an hour while cast and crew trickled out. I met nearly everyone involved with the show, including Meg and a number of ballerinas, Madame Giry, Raoul, Piangi, Christine, and, last of all, the Phantom. I was offered a job in the wardrobe department no less than twice, by the head wardrobe mistress, and by John Cudia (the Phantom)!
Of course, I couldn’t leave my husband to take up with the U.S. Tour, but just for a moment, it was certainly tempting.
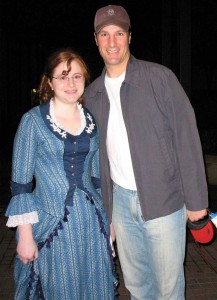
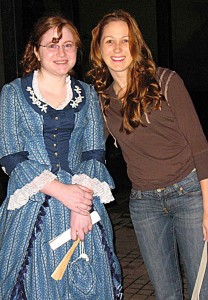
My mother took photos of me with John Cudia and Sarah Jean Ford, the actress who played Christine. By this time, my corset had stretched and my bodice hooks were straining, I was slouching dreadfully, my bangs had decided to form one single curl in the middle of my forehead, and I was flushed with all the excitement. In short, I looked absolutely dreadful. All the same, here’s the proof that all this happened:
This project took two years and every ounce of skill I possessed. I learned more than I imagined possible, and I had a brilliant time, both in creating the dress and in wearing.
It’s my intention to sew a new bodice, eventually. I lost forty pounds since making the original costume, so it no longer fits. Plus, there were aspects I wasn’t pleased with, such as the vest inset, and the ruffles on the sleeves.
It’s my hope that I can wear this costume at least once more to a showing of The Phantom of the Opera. But even if the opportunity doesn’t come again, I don’t regret a moment of the journey.
Project Started: June 2005
Project Completed: October 2007

Pingback: All About Me | Yesterday's Thimble